Crochet Christmas Gift Box Free Pattern
Tight tension and a small hook keep the walls of this crochet christmas gift box standing instead of slumping inward. A ribbon tied around the finished lid turns it into a gift on its own, or hang it on the tree as a decoration.
Give a seven year old a box that actually opens and you have bought yourself twenty quiet minutes. That is most of the appeal here. The lid lifts off properly instead of being sewn shut, it holds things, and it is small enough to live in a coat pocket on the way to school.
Crochet Christmas Gift Box

Cotton yarn worked over plastic mesh canvas keeps the walls rigid, so it survives being packed and unpacked forty times rather than going soft in a week. Finished at roughly ten centimetres square and eight tall, it takes a folded note or a couple of chocolate coins.
Countdown Before You Start
- One box, start to finish: three to four hours. The base square and walls take most of it, and the lid is the same construction again at a slightly wider size, so budget your time in halves rather than expecting the lid to be quick.
- A batch of six: eighteen to twenty two hours of crochet, plus about forty minutes of cutting mesh canvas. The cutting is worth doing all at once at the start, not box by box.
- Latest sensible start for a class set: two full weeks before you need them. Six is an evening-a-day project for a week. Twenty four is not a one-person job in December, and there is no shortcut in this pattern that changes that.
- Latest sensible start for one: a weekend. If a child is helping, double every number here and enjoy it more.
- Nothing needs drying or blocking, so once the bow is on, it is finished.
Safety First, Before You Pick Up A Hook
This one goes in a child’s hands, and it has plastic inside it. That changes the checklist.
The mesh canvas is the main thing to get right
- Cut mesh canvas through the middle of a row of holes, not flush along a bar. Cutting flush leaves a row of tiny plastic spikes that will work their way through cotton within a month. Cut through the holes and the edge comes out as smooth nubs instead.
- Run a fingertip along every cut edge before it goes anywhere near the crochet. If it catches, trim it again.
- Round every corner of every panel with the scissors. Square plastic corners are what pierce the fabric first.
- For a child under three, leave the mesh out entirely. The box will be floppy and it will not stand up on its own, and that is the correct trade. A soft empty box is safe. A rigid one with cut plastic inside is not, because under-threes chew corners.
Small parts
- This design has no safety eyes. If you are adding a face to turn it into a character box, insert eyes into the base square while it is still flat, before you work the turning round and long before any mesh goes in. Once the walls are up you cannot reach the back of a washer, and once the mesh is in you cannot reach anything at all.
- For under-threes, and for anything going into a treat bag, a party favour or a classroom set, skip safety eyes and embroider instead. Black cotton, stitched right through the fabric and knotted on the inside before the mesh covers it.
- No buttons, no beads, no sequins on the bow. The bow sits at the very top of the lid, which is the first thing a small hand grabs and the first thing that comes off.
- Sew the bow and the ribbon on. Do not glue them. Hot glue on cotton looks fine for about three washes and then peels off as a single hard lump, which is worse than no bow at all.
The box will get filled
- Children put things in boxes. Assume it will end up holding a coin, a marble or a small bead, and think about who else is in the room. If there is a baby in the house, say so to the child rather than relying on the lid staying on.
- If you add a hanging loop to make it a tree ornament, keep it under eight centimetres and never hang it in or over a cot.
Name tagging a class set
- Work a contrasting yarn initial into the underside of the lid lip with a few chain stitches, or sew a small woven label inside the base. Anything on the outside will be picked off.
- Do not rely on colour alone to tell whose is whose. In a set of twenty, four children will pick red.
Making These For A Group
- Yarn: one 50 g ball of 4 ply cotton makes roughly two boxes with lids, before ribbon and bow. For a class of twenty four, plan on fourteen balls of the main colour plus two or three contrast balls for all the ribbons.
- Mesh canvas: each box eats ten panels. For twenty four boxes that is two hundred and forty pieces, so buy the large sheets and cut with a rotary cutter and a metal ruler if you have one.
- Time: batching helps far more than usual here because the cutting, the base squares and the lids are three genuinely separate jobs. Cut all mesh first, then crochet all bases, then all lids.
- Let children do the ribbon straps. They are worked flat in a straight line, they are forgiving of tension mistakes, and a wonky ribbon looks intentional on this design.
- If the boxes are going home the same day, put the name inside before the mesh goes in. Retrofitting a name into a finished rigid box is genuinely annoying.
Pieces List
- Box base and walls, make 1 as one continuous piece
- Lid top and lip, make 1 as one continuous piece
- Ribbon strap, make 2
- Decorative picot border, make 2, one for each ribbon strap
- Bow, make 1
- Mesh canvas base panel, 9.5 by 9.5 cm, cut 1
- Mesh canvas wall panels, 9.5 by 6.5 cm, cut 4
- Mesh canvas lid panel, 11 by 11 cm, cut 1
- Mesh canvas lid lip panels, 11 by 2.5 cm, cut 4
A Note On The Counts
The source video demonstrates this box visually and never states stitch counts aloud for the square rounds. Everything below is reconstructed from the construction shown, and every unstated count is flagged. Work to the measurements rather than to a number, and count your own corners as you go.
What You’ll Need
- 4 ply cotton yarn, around 2 mm thickness, in a main colour
- A small amount of contrast cotton for the ribbon and bow
- 3.0 mm crochet hook
- 3.5 mm crochet hook
- Plastic mesh canvas, cut to the sizes in the pieces list
- Sharp scissors
- Yarn needle
- Stitch markers for the four corners
Abbreviations Used
- MR = magic ring
- ch = chain
- sc = single crochet
- inc = increase, two single crochets in the same stitch
- 3sc = three single crochets in the same stitch, used at corners
- hdc = half double crochet
- 2hdc = two half double crochets in the same stitch
- hdc cl = half double crochet cluster
- BLO = back loop only
- slst = slip stitch
- sk = skip
- p = picot, ch 3 then slst into the first of those chains
- st, sts = stitch, stitches
The Pattern
Box Base
Worked flat in joined rounds with the 3.0 mm hook.
- Begin with a magic ring.
- Round 1: Work sc into the magic ring and join with slst to the first sc. Pull the ring closed [CHECK — count unclear in source. A solid square of this type is normally started with 8 sc so that each corner gets a pair, but the video does not say].
- Round 2: Ch 1. Work sc around, placing 3sc into each of the four corner stitches, then join with slst [CHECK — count unclear in source].
- Round 3: Ch 1. Work sc into each st along the sides and 3sc into the centre stitch of each corner group, then join with slst. Mark the four corner stitches now, because they get harder to find as the square grows [CHECK — count unclear in source].
- Rounds 4 onward: Repeat Round 3, adding one more sc to each side every round as the 3sc corners create the growth. The square should stay dead flat on the table with no ruffling at the edges and no cupping in the middle [CHECK — count unclear in source].
- Continue until the square measures 10 cm across, which is the finished box width. Hold your 9.5 by 9.5 cm mesh panel against it. The crochet should overhang the mesh by roughly two millimetres on each side, no more.
- Turning round: Ch 1. Work sc in BLO into every stitch around the whole square, including the corners, then join with slst. The unworked front loops should form a visible ridge all the way round, and the fabric above that ridge should already want to fold upward on its own.

Box Walls
Worked straight up from the base with no increases.
- Round 1 of walls: Ch 1. Work sc into every st around, through both loops, then join with slst. Do not add corner increases. The absence of increases is what forces the wall vertical [CHECK — count unclear in source].
- Rounds 2 onward: Repeat, working sc into every st around and joining each round. After three or four rounds the piece should stand on its own like a shallow tray, with corners that are square rather than rounded.
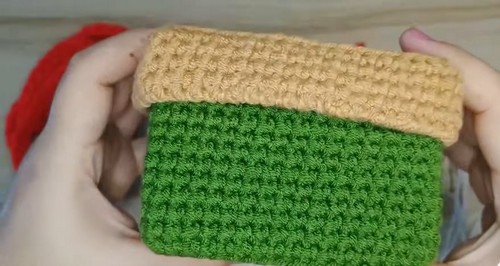
- Continue until the walls measure 6.5 cm from the fold. Fasten off and weave in the end.
- Slide the four 9.5 by 6.5 cm mesh panels down inside against the walls, then drop the 9.5 by 9.5 cm base panel in flat on the bottom to hold their lower edges. The panels should just meet at the corners without overlapping.
Just starting out with crochet? The video tutorial below is a great place to begin, or challenge yourself with the written pattern below!
Lid Top And Lip
Exactly the same construction, worked one size larger so the lid drops over the box.
- Work the base square pattern from Round 1 as above, continuing until the square measures 11 cm across [CHECK — count unclear in source].
- Test the fit before going further. Sit the square on top of the finished box. It should overhang evenly on all four sides by about half a centimetre. If it is tight, add one more round.
- Turning round: Ch 1. Work sc in BLO into every stitch around, then join with slst. Same ridge as before.
- Lip rounds: Ch 1. Work sc into every st around with no increases, joining each round, until the lip measures 2.5 cm deep. It should slip over the box body and stop rather than sliding all the way down [CHECK — count unclear in source].
- Fasten off and weave in.
- Insert the 11 by 11 cm mesh panel into the lid top and the four 11 by 2.5 cm panels into the lip.

Ribbon Strap, Make 2
Worked flat in a row with the 3.5 mm hook in the contrast colour. The larger hook keeps the ribbon from curling.
- Make a slip knot and ch a foundation long enough to wrap the box from the base, up one side, across the lid and down the other, plus 2 cm of slack [CHECK — foundation chain length not stated in source. Measure your own box rather than counting].
- Row 1: Sk the first ch. Work hdc across the chain, placing 2hdc at intervals to keep the strip lying flat and prevent the ends drawing in [CHECK — placement and count of increases unclear in source].
- End with a slst into the final stitch. The finished strip should lie flat on the table without twisting or waving at the edges. If it waves, you used too many increases.
- Fasten off, leaving a long tail for sewing.
Decorative Picot Border, Make 2
Worked along the edge of each ribbon strap.
- Make a slip knot and ch a foundation of the same length as the ribbon strap, or work directly into the edge of the strap itself [CHECK — the source works this as a separate strip; joining it to the strap edge as you go also works].
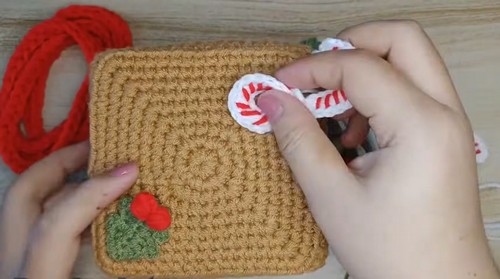
- Row 1: Work a repeat of sc, hdc and picot along the length. A picot here is ch 3, then slst back into the first of those three chains [CHECK — exact stitch repeat not stated in source].
- Continue the repeat to the end. The picots should sit as small evenly spaced bumps along one edge only, and should stand out from the strip rather than lying against it.
- Finish with a slst and fasten off.
- Sew the border along one long edge of each ribbon strap, or along both edges if you want a fuller ribbon.
Bow
Worked into a magic ring with the 3.5 mm hook.
- Begin with a magic ring.
- Round 1: Work hdc clusters into the ring, then join with slst [CHECK — cluster count unclear in source].
- Pull the ring tight. The clusters should splay out from the centre as distinct textured loops rather than packing into a flat disc. If it looks like a disc, the ring is not closed hard enough.
- Fasten off, leaving a long tail for sewing.
Assembly
- Check every mesh edge one last time before anything is sewn shut. This is the last easy moment to fix a sharp corner.
- Insert all mesh panels into the box body and the lid, base panels last so they lock the wall panels in place.
- Lay both ribbon straps across the closed box in a cross, one over the other, and pin them at all four points where they meet the base. Do not sew yet.
- Lift the lid off with the pins still in. The straps should be attached to the box body only, never across the lid seam, or the lid will not open.
- Sew the straps down along the box walls with small stitches through the crochet, not through the mesh.
- Sit the bow at the centre top of the lid, directly over the point where the straps would cross. Pin it, put the lid on the box and look at it from standing height before committing, because a bow that looks centred at desk level rarely is.
- Sew the bow down around its full base, not tacked at one point. This is both a durability and a safety fix.
- Weave the last ends inside the lid where they will be hidden by the mesh.
Stuffing, Or Rather The Lack Of It
- Nothing here is stuffed, and that catches people out. The mesh canvas is doing the job that stuffing normally does, so the fit of the panels is what decides whether the box looks crisp or sagged.
- Panels should be snug, not forced. If you have to bend a panel to get it in, it is too big by a couple of millimetres, and it will bow the wall outward in a visible curve that no amount of pressing will fix. Trim it rather than persuading it.
- The one place to leave a little slack is the four corners inside the box body. If the wall panels butt hard against each other, the corners go rounded and the box loses its shape. A one millimetre gap at each corner is right.
- If you are making the soft under-three version with no mesh at all, you can lightly pad the base with a single layer of felt cut to size and sewn in. Not stuffing, just a floor.
The Character Dial: Rustic Or Bright
The construction is fixed here, so the whole personality lives in the yarn and the trim.
- Rustic. Undyed ecru or oatmeal cotton for the box, with a ribbon in soft sage or a muted brick red. Skip the picot border entirely and use a plain hdc strap, which reads as a linen tie rather than a Christmas ribbon. Replace the crocheted bow with a simple knotted bow made from the same strap yarn, deliberately uneven. Work the ribbon in a slightly thicker cotton than the box so it sits proud and casts a shadow. If you want the aged look, use a natural cotton that will yellow slightly over time rather than a bleached white, and let it. A row of running stitch in brown around the lid lip does more for this direction than any colour change.
- Bright. Pillar box red box, white ribbon, and the picot border worked in a metallic blended thread held alongside the cotton. Two bows instead of one, sitting side by side. Work the ribbon straps in two different contrast colours so the cross on top of the box is two-tone. Add a second picot border along the opposite edge of each strap for a frilled ribbon. For a class set, this is the direction to go, because bright cotton photographs well under classroom lighting and children genuinely prefer it. A green box with a red and white striped ribbon is the loudest version and nobody has ever complained about it.
- The dial also moves through scale. Same pattern, mesh cut to half the dimensions, gives a tiny box that fits a folded note and hangs on a tree. Doubling it gives a desk tidy that stops being an ornament and starts being furniture.
Colourways
- Brown Paper Parcel. Kraft-coloured cotton box, cream ribbon, and a single length of real jute twine tied under the crocheted bow. Looks posted rather than wrapped.
- Toy Shop. Bright cherry red box, sunshine yellow ribbon, white picot border. The most childlike of the four and the easiest sell to a class of six year olds.
- Frosted Mint. Pale mint box, white ribbon and border, silver-blended bow. Cold rather than warm, and the one that carries on looking right into January.
- Blackboard. Deep charcoal box, chalk white ribbon worked in a matte cotton, no metallic anywhere. Very good in a room that already has enough red in it, and unexpectedly good for a teacher gift.
One thing worth knowing about cotton on mesh: the plastic squeaks against the yarn as you push panels in, and the first time it happens most people stop and check they have broken something. You have not. It is just cotton dragging over polypropylene, and it goes away as soon as the panel is seated.

Display Ideas
- Place setting marker on a Christmas table, with a name card tucked half out under the ribbon cross.
- Advent counter, a row of small ones along a shelf, each holding a folded note for the day.
- Tree ornament in the smaller size, hung from a loop sewn under the bow rather than through the lid.
- Party favour on the way out the door, filled and lidded, one per child.
- Tooth box or treasure box on a bedside table, which is what most of them end up being by February.
- Teacher gift holding a gift card, better than an envelope and reusable afterwards.
- Tiered tray, top level, lid slightly off so you can see something inside.
- Desk on a work-from-home shelf, holding paper clips and looking better than the alternative.
After The Season
Store it with the lid on and nothing inside, in a single layer rather than stacked under heavier things. The mesh is rigid but not indestructible, and a box that spends eleven months with a ceramic ornament sitting on top of it comes out with a permanently dished lid. Cotton also holds creases where it has been squashed, and unlike wool it will not steam back out. If it has been handled all season, a warm hand wash of the whole box works fine once the mesh is removed, so slide the panels out first and let it dry flat before putting them back. Check the bow stitching before it goes back into a child’s hands next year.
Quick Answers
- Is this safe for a toddler? Not with the plastic mesh inside, no. Cut mesh has edges that eventually work through cotton, and toddlers chew corners. Make the soft version with no mesh for anyone under three, and accept that it will slouch.
- Can I wash it? Yes, but take the mesh panels out first. Cotton washes well by hand in warm water and lies flat to dry, and the box will come out slightly softer than it went in, which is normal. Do not tumble dry it, and do not wash it with the mesh in, because the panels warp and never sit flat again.
- Do I really need the mesh canvas at all? For a box that stands up and holds its shape, yes. Cardboard cut to the same sizes works as a substitute if you can find something stiff enough, though it dies the first time the box gets wet. Some people use plastic from a food container, which is fine as long as you round every corner properly.
- How much can a child actually put in one? About the volume of a small mug. Chocolate coins, a folded letter, a couple of small toys. Anything heavier than about two hundred grams starts pulling the base away from the walls at the corners over time, so it is not a good place for marbles or coins in quantity.