
Crochet Bunny Hair Clip Pattern Free
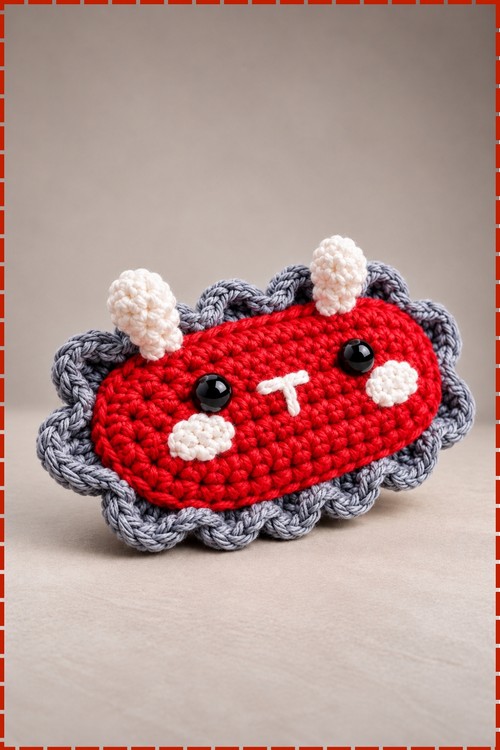
Fine or thick hair stays put under the crochet bunny hair clip, because felt and a 6 cm snap clip sit glued to the back. Red cotton forms the oval face on a 2.5 mm hook, with a grey scallop edge around it and white yarn for the muzzle and ears.
Flat pieces mean no stuffing and no seaming, and the crochet bunny hair clip comes together in one sitting from start to finish. The ruffle round is the fun part to watch grow. Attaching the cheeks takes patience. Finishing the bunny hair clip with the clasp feels quicker than you expect.
Crochet Bunny Hair Clip

Starting from a foundation chain builds the oval base of this crochet bunny hair clip flat in three rounds, and a scallop border in a contrast colour runs along the outer edge before the ears go on. Every part works from a single yarn end with no separate pieces to join, except the ears which attach from the top rim. Felt and a snap clip glued to the back keep it in place on fine or thick hair. Red cotton for the face, grey for the scallop border and white for the muzzle and ears make up the colour combination on my version.
Quick Facts
- Difficulty: beginner to intermediate
- Time: around one to two hours in my experience
- Hook: 2.5 mm
- Yarn weight: fingering or light DK cotton
- Clip size: 6 cm snap hair clip
Materials and Tools
- Cotton yarn in red for the face base, one small ball
- Cotton yarn in grey for the scallop border, a few metres
- Cotton yarn in white for the muzzle and ears, a small amount
- 2.5 mm crochet hook
- Two 5 mm black plastic or safety eyes
- White embroidery thread or fine white yarn for the nose embroidery
- Felt sheet in grey or white, pre cut to fit the clip
- 6 cm snap hair clip
- Hot glue gun
- Tapestry needle
- Scissors
Customization Ideas
Swap the red base for blush, cream or lavender and change the border to match. Work the muzzle clusters in a pink instead of white for a warmer look. Embroider rosy cheeks with a light pink thread under the eyes, which the original pattern lists as optional. Add a small bow stitched from ribbon at one ear base for a gift version. Make a matched pair in two sizes by using a shorter foundation chain on the smaller one.
Abbreviations
- ch means chain stitch
- sc means single crochet
- inc means increase, which is two single crochet in one stitch
- W means three single crochet in the same stitch
- hdc means half double crochet
- TV means half double crochet increase, which is two hdc in the same stitch
- dc means double crochet
- sl st means slip stitch
- BLO means back loop only
The Pattern
Round 1, Base Oval
- Chain 13, then starting in the second chain from the hook work 11 sc down the chain (11 sts), work 3 sc into the last chain to turn the corner (3 sts), work 10 sc along the opposite side of the foundation chain (10 sts), then work 1 inc into the last stitch (2 sts), giving an oval base that lies completely flat.
Round 2, Expanding the Oval
- Work 1 TV (2 hdc in the same stitch), then 10 hdc along the straight edge, then repeat 2 hdc in the same stitch three times around the curved end (6 hdc total from those repeats), then 10 hdc along the second straight edge, then repeat 2 hdc in the same stitch two times around the remaining curved end. The oval grows noticeably wider at the curved ends after this round.
Round 3, Final Base Outer Edge
- Work 1 sc followed by 1 inc as the first cluster, then 10 sc along the straight edge, then repeat 1 sc and 1 inc three times around the curved end, then 10 sc along the second straight edge, then repeat 1 sc and 1 inc two times to finish. Cut the red yarn and fasten off with a clean end.
Round 4, Scallop Border in Grey
- Attach grey yarn in the back loop only of any stitch from round 3, then repeat the scallop cluster pattern all the way around the edge: sl st in BLO, then in the next BLO stitch work 1 hdc, 1 dc and 1 hdc all in the same stitch, then sl st in the next BLO stitch. Continue this three stitch repeat around the full oval perimeter. The grey scallop border on my piece stands out from the red base and gives the clip its frilled edge.
Ears, Make 2
- Attach white yarn at the upper rim of the base oval, chain 6, then working back down the chain: 1 dc in the third chain from the hook, 1 hdc, 1 sc, 1 sl st back into the base. The two white ears on my piece sit close together at the top centre of the oval, each one a small rounded point. Space out slightly and repeat for the second ear.

Assembly and Finishing
- Embroider a T shape nose in white thread centred on the red face, just below the midpoint of the oval, matching the clean white embroidered nose visible on my piece.
- Hot glue the two black eyes on either side of the nose, sitting roughly halfway up the face.
- Take a felt piece cut to fit the back of the clip, make two small slits in it, and slide the metal snap clip through the slits so the opening faces down.
- Apply hot glue to the back of the crocheted piece and press the felt and clip firmly onto it, holding for a few seconds until the glue sets.
- Optional: apply a small dab of pink blush under each eye for rosy cheeks. My version does not include blush.

Tips
- Work the scallop round loosely so the border fans out properly rather than pulling the oval into a cup shape.
- Keep both ears equal in chain length before working back down, since uneven chains make one ear shorter.
- Press the clip backing for a full minute rather than a quick press, as cotton yarn slides on glue that has not fully set.

FAQ
Can I use acrylic instead of cotton? Yes, though acrylic stretches more than cotton and the oval can distort under the clip’s weight over time. A cotton acrylic blend is a good middle ground. What if my oval cups upward instead of lying flat? Your tension is too tight in the curved turns. Work the corner stitches one hook size up, or simply pull each loop a little looser through the curves. Does the clip hold in thick hair? The 6 cm snap clip in my version holds reliably in medium thickness hair. For very thick hair, glue a larger clip to the felt backing or use two clips side by side. Can I skip the felt backing and glue the clip directly? You can, but the felt distributes the clip’s pressure across the back of the crochet and prevents the stitches from distorting around the hinge. It is worth the extra step.


