Crochet Christmas Sweater Pattern Free
Anyone who has abandoned a garment halfway will get further with this crochet christmas sweater pattern free than with a top-down one. Flat panels, sleeves joined at the shoulder, nothing picked up around an armhole, and the colourwork sits on the front only.
Hang it from a wooden hanger on the wall beside the tree and it does more work than a wreath. That is the honest truth about this make. The stripes read from across the room, the snowman sits dead centre at eye level, and the whole thing costs you four skeins of acrylic instead of a shelf full of ornaments.
Crochet Christmas Sweater

It is a wearable, obviously. But most people who finish one end up styling it as much as wearing it, because a flat panel of green, white and red is basically seasonal wall art with sleeves. Worked in two flat panels, two sleeves, then decorated freehand.
The Countdown
- One sweater in adult size, worsted acrylic on a 6.0 mm hook: roughly 14 to 20 hours of actual crochet time, depending on how fast you are on long flat rows. Panels eat most of that. The appliqués are one evening, maybe two if you fuss with placement.
- A batch of six: budget 90 to 110 hours. Sweaters do not batch the way small toys do, so plan this as a six-week run, not a weekend.
- Latest sensible start: about three weeks out if you get 45 minutes most nights. Two weeks out is doable only if you have long weekend stretches. Under ten days, make the mini ornament version instead and keep the full sweater for next year.
Where It Lives Once It’s Done
- Draped over the back of the chair at the head of the table for Christmas dinner. It reads as decoration until someone gets cold, and then it earns its keep twice.
- Hung on a wooden hanger from a wall hook, a picture rail, or the top rung of a blanket ladder. Front panel facing out, sleeves pinned slightly forward so they do not disappear behind the body. This is the best display for the snowman, because the face lands around chest height on the wall.
- Folded thirds-style in a stair basket or an open shelf, with only the striped hem showing. Good if the snowman feels like too much for the room but you still want the colour.
- Off the mantel from a stocking hook, sleeves hanging loose. Works especially well if you made the mismatched cuffs, because the two different colours dangle at slightly different angles and the eye goes straight there.
- As a gift wrap layer. Fold it around the box, tie with jute, skip the paper entirely. The recipient unwraps the present and finds the wrapping is the present.
- Photo backdrop and porch shelf duty in December, then straight into storage in January. See the storage note at the end, because acrylic punishes lazy folding.
- If you want the tiered tray or garland version, crochet the same striped panel at about one fifth scale, skip the sleeves as separate pieces and work them as short flat rectangles, and string five or six across twine. Same design language, one evening of work.
What You Need
- Worsted weight acrylic in white, green and red. Impeccable or any equivalent smooth acrylic. Roughly four skeins total for an adult size, more if you size up.
- Small amounts of black yarn for the snowman hat and orange for the carrot nose.
- A 6.0 mm hook. The video uses a Furls hook, but any 6.0 mm works.
- Two buttons for the snowman eyes.
- Stitch markers, a yarn needle, scissors.
- Optional: a scrap of felt to back the snowman head and stop it puckering.
Pieces List
- Front panel, make 1
- Back panel, make 1
- Sleeve, make 2
- Cuff ribbing, make 2, one green and one red
- Collar ribbing, make 1, worked directly onto the neckline in red
- Snowflake, make 2
- Ornament shape, make 2 [CHECK — exact number and shape of the ornaments is not stated in the source]
- Snowman head, make 1
- Snowman hat, make 1
- Carrot nose, make 1
The Pattern
Sizing the Panels
- Work a swatch in your chosen yarn and the 6.0 mm hook, at least 15 by 15 cm, in the stitch you plan to use.
- Count stitches per 10 cm and rows per 10 cm. Write both down.
- Panel width equals half your chest measurement plus 8 to 12 cm of ease for a relaxed fit. Multiply by your stitches per 10 cm to get your starting chain.
- Panel length equals shoulder to hem, usually 60 to 68 cm for an adult. Multiply by your rows per 10 cm to get your row total.
- Sleeve length equals underarm to wrist, usually 44 to 48 cm. Sleeve width at the top equals about 40 percent of your panel width.
- Add one extra chain for the turning chain at the start.

Front Panel
- Chain your calculated width plus 1 in green. [CHECK — starting chain not stated in source]
- Work in rows across the chain, turning at the end of each row, until the panel reaches your full length. [CHECK — stitch type is not stated aloud in the source; the fabric shown is dense and flat, consistent with sc or hdc]
- Change colour at the end of a row, not mid-row, so all your joins sit at the same side edge.
- Follow the stripe sequence green, white, red, repeating in that order the full height of the panel. [CHECK — number of rows per stripe band not stated in source]
- Carry the unused colours loosely up the side edge if your bands are narrow, or cut and rejoin if they are wide. Carried strands get hidden inside the side seam later.
- Fasten off when the panel measures your full length. It should lie completely flat with no curl at the side edges. If it curls, your tension is tighter than your swatch and the panel will fight you at seaming.
- Checkpoint: at roughly one third height, hold the panel against your body. The width should already look slightly too wide, because a sweater with no ease looks like a vest once it is seamed.
Just starting out with crochet? The video tutorial below is a great place to begin, or challenge yourself with the written pattern below!
Back Panel
- Work exactly as the front panel, same starting chain, same row count, same stripe order.
- Lay the two panels flat on top of each other before you fasten off the second one. The stripes must line up at the side edges. If they are out by more than one row, add or remove a row now rather than at seaming.
- Fasten off.
- Checkpoint: stacked and squared up, the two panels should look like one panel with a doubled thickness. Any bowing at the hem means one panel has tighter tension and will pull the seam crooked.
Sleeves, Make 2
- Chain your calculated sleeve top width plus 1. [CHECK — sleeve stitch count not stated in source]
- Work in rows to your sleeve length, keeping the same stripe order as the body so the sleeves read as part of the same fabric.
- Work the sleeves as straight rectangles unless you want taper. To taper, decrease one stitch at each end every sixth row until the cuff end is about 70 percent of the top width. [This taper is my own suggestion, not from the source, which shows straight sleeves]
- Fasten off.
- Checkpoint: fold the sleeve in half lengthways. The two long edges should meet cleanly with no fluting. Fluted edges mean the row ends are loose and the underarm seam will gape.

Cuff Ribbing, Make 2
- Join green at the wrist edge of one sleeve and red at the wrist edge of the other. The mismatch is deliberate in the source and it is the detail that makes the sweater look handmade rather than bought.
- Work ribbing around the wrist opening for 5 to 7 cm. [CHECK — ribbing method and row count not stated in source; front post and back post stitches or a sideways worked ribbed strip both give the shown result]
- Pull the ribbing slightly tighter than the sleeve so the cuff hugs.
- Fasten off and weave in.
- Checkpoint: the cuff should draw the sleeve in visibly. If it hangs at the same width as the sleeve, it is too loose and will stretch out within one wear.
Assembly
- Slip stitch the front and back panels together at both shoulders first, leaving the centre open for the neckline. Leave that opening wider than you think you need, because ribbing will close it further.
- Slip stitch the side seams from hem to armhole, stopping where the sleeve will sit.
- Fold each sleeve lengthways and seam the underarm.
- Set the sleeves into the armholes and sew or slip stitch them in. Match the centre top of the sleeve to the shoulder seam first, pin it, then work outward in both directions. This is the one seam where pinning genuinely saves you an hour.
- Join red at the neckline and work collar ribbing all the way around the opening. Red against the upper shoulder stripes is what makes the collar read as a separate design element instead of an afterthought.
- Try it on before you go anywhere near the appliqués. Neckline too tight is fixable now and miserable to fix later.
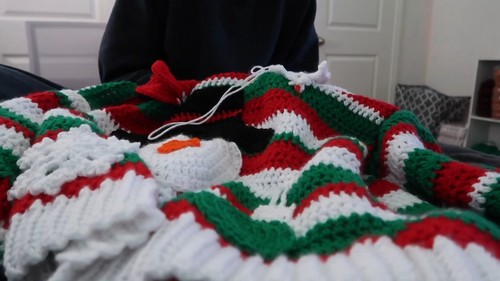
The Snowman and the Appliqués
Everything on the front is freehanded in the source video. The numbers below are mine, offered as a working starting point, and you should adjust them to your own panel size rather than treating them as the creator’s pattern.
Snowman Head
- Magic ring with white, 6 sc into the ring [6]
- Round 2: 2 sc in each stitch around [12]
- Round 3: sc 1, 2 sc in next, repeat around [18]
- Round 4: sc 2, 2 sc in next, repeat around [24]
- Round 5: sc 3, 2 sc in next, repeat around [30]
- Continue adding one plain stitch per increase each round until the circle reaches the width you want, then slip stitch and fasten off leaving a long tail for sewing. Checkpoint: worked flat this should stay a disc, not a bowl. If the edges are cupping, your increases are too few for your tension, so add an extra increase round and it will relax.
Snowman Hat
- Work a small black rectangle wide enough to cover the top third of the head circle, in rows.
- Work a second, wider and shorter black rectangle for the brim.
- Sew the brim across the base of the crown. Checkpoint: sitting on the head disc, the brim should overhang the head circle on both sides. A hat narrower than the head reads as a beanie, not a top hat.
Carrot Nose
- Chain 4 in orange and work back along the chain, decreasing to a point over the next few rows, to make a small triangle. [CHECK — the nose is freehanded in the source and no numbers are given]
- Fasten off leaving a tail. Checkpoint: laid on the head, the nose should reach roughly a third of the way across the face. Small noses vanish from three metres away, which is exactly the distance this sweater gets looked at from.
Snowflakes, Make 2
- Work a small white snowflake in your preferred method, six arms, roughly 8 to 10 cm across. [CHECK — the snowflakes are freehanded in the source and no stitch pattern is given]
- Block them flat before sewing. Unblocked snowflakes curl and the arms flip forward.
- Checkpoint: a good snowflake for this project is stiff enough to hold its shape when you hold it by one arm. Floppy ones need blocking or a starch bath.
Ornaments, Make 2
- Work small rounded ornament shapes with a short chain loop at the top for the hanger. [CHECK — ornament shape and size not specified in source]
- Keep them smaller than the snowflakes so the front does not compete with itself.

Eyes and Safety
- The source uses loose buttons for the snowman eyes, sewn on with the head already made.
- Sew the buttons onto the head piece before you attach the head to the sweater front. That way all your knots sit on the back of the head disc and get sandwiched against the panel, instead of showing as lumps on the inside of the sweater where they rub.
- If the sweater is for a child under three, do not use buttons at all. Embroider the eyes in black yarn with two small satin-stitch ovals, worked directly into the head disc before you attach it. Same look, nothing to pull off.
- Same rule if the item is going into a treat bag, a party favour pile, a classroom, or any situation where you will not be the one supervising it. Buttons come off eventually. Embroidery does not.
- Felt-backing the snowman head, if you use it, also traps every knot on the wrong side of the felt. Worth doing for a gift.
Stuffing
- This is a garment, so almost nothing gets stuffed. The exception is the snowman head, and even there the answer is barely.
- A whisper of fibrefill behind the head disc gives it a soft dome and stops the white circle from looking like a sticker. Half a walnut’s worth is plenty.
- The hat and nose stay flat. Stuffing the nose makes it stand out from the panel and it will get caught on things.
- Over-stuffing shows up as puckering. If the panel around the head starts to pull into little radiating wrinkles, take stuffing out until the fabric lies flat again. The snowman should sit on the sweater, not push out of it.
Placement Before You Sew
- Put the sweater on, or on a hanger at the height it will hang.
- Pin the snowman head first, dead centre, roughly at mid-chest. Slightly higher than feels right, because the fabric drops when worn.
- Add the snowflakes at the upper chest corners, the ornaments near the shoulders, and step back three metres. Everything that looked balanced up close will not be.
- Leave it pinned overnight if you can. Coming back to it with fresh eyes catches the crooked one.
- Sew each piece down with small stitches around the full edge, not just at four points. Corner-tacked appliqués flip up in the wash.
The Character Dial: Rustic Versus Bright
- Push it rustic and you get something that survives past 6 January without looking out of place. Swap the pure white for undyed cream or oatmeal, the kelly green for a muted sage or forest, and the red for a brick or dried cranberry. Narrow the stripe bands so the fabric reads as texture from a distance instead of blocks of colour. Make the hat slate grey rather than true black, because true black is the single most modern-looking colour in the whole palette and it fights the rest. Embroider the eyes in dark brown instead of using buttons. Skip the shine entirely. Tonal snowflakes, white on cream, so they show as texture rather than contrast. A wool-blend yarn instead of pure acrylic will fuzz slightly after one wash, which sounds like a downside and absolutely is not for this version. The finished thing looks like it came out of a chest at a cabin.
- Push it bright and you commit to the joke. Maximum contrast, primary red and true kelly green, hard white stripes with no blending. Make the snowman head noticeably too big for the chest. Give the hat a crooked brim on purpose and set the whole face at a slight angle, which reads as intentional if you go far enough and as a mistake if you go halfway. Add real jingle bells at the bottom of each ornament. Sequins or seed beads scattered across the snowflake arms. A pompom on the hat that has no business being there. Tinsel or sparkle yarn worked as a single row inside one stripe band, not the whole sweater, because a whole sweater of tinsel yarn is unpleasant to crochet and worse to wear. Uneven button eyes, one bigger than the other, sewn slightly off level.
- The middle ground is the trap. A sweater that is 60 percent rustic and 40 percent bright looks like it could not decide. Pick a side and go all the way.
Colourways Beyond Green, White and Red
- Cabin Smoke. Charcoal, oatmeal, rust. Reads as winter rather than Christmas, so it stays up through February.
- Glacier. Icy blue, white, pale silver grey. The snowman genuinely belongs in this one, and the black hat is the only dark note on the whole piece, which makes it land hard.
- Cranberry Pantry. Deep berry, cream, moss green. Warmer than the standard palette and much easier to photograph, if you are shooting this for a blog or a shop listing.
- Retro Motel. Mustard, aqua, chocolate brown. Wrong for Christmas on paper and completely right on the hanger. Best paired with the bright end of the character dial and the crooked hat.

One Thing Nobody Warns You About
The red collar ribbing swallows far more yarn than the panels suggest, because you are working into the sides of rows rather than the tops of stitches, and side edges pack in more stitches per centimetre than you expect. I have run out of red on the collar with two full skeins used elsewhere. Set aside a dedicated ball for the collar and cuffs before you start the body, and do not raid it.
After the Season
- Wash it on a cool gentle cycle inside a pillowcase, or by hand if you used buttons. Never wring it. Lay it flat to dry on a towel, reshaped to its original dimensions, because acrylic holds whatever shape it dries in and a stretched shoulder is permanent.
- Store it folded, never hung. A year on a hanger will pull the shoulders down and the sleeves out, and the panels are heavy enough to do real damage. Fold in thirds, put a sheet of acid-free tissue between the appliqués and the fabric so the buttons do not print into the panel, and keep it in a plastic bin with a lid rather than a vacuum bag. Vacuum bags crush the stitch texture flat and it takes weeks to recover. A cedar block or a lavender sachet in the bin is enough. Mothballs will scent acrylic for years.
- Pull it out in mid-November, shake it, and check the appliqué edges. That is usually where a stitch or two has worked loose, and it is a five-minute fix in November and a nuisance on 23 December.
Quick Answers
- Can I make this in a smaller size for a kid? Yes, and it is the easier make. Work your swatch, then use half the child’s chest measurement plus 6 cm of ease for the panel width, and scale the snowman head down so it still sits within the chest area rather than covering the whole front. Use embroidered eyes, not buttons.
- Do I have to seam it, or can I work it in the round? You can work the body in the round from the hem up and split at the armholes, and the stripes will still line up fine. The reason the flat panel version is worth doing anyway is that a flat front panel is much easier to lay out and pin appliqués onto. Seaming a sweater you can display flat is a fair trade.
- My stripes look wobbly where the colours change. What went wrong? Almost always the join is happening mid-row or the carried strand is being pulled too tight up the side. Change colour on the last yarn over of the final stitch of the row, and when you carry a colour up the edge, leave it slack enough that the fabric does not pinch. If it has already happened, a gentle wet block will pull most of it straight.