Crochet Duck Amigurumi Pattern With Beak, Webbed Feet and Tail
Add a straw hat and a bow to a yellow duck and it stops being a bath toy. Yellow and orange scraps cover this crochet duck pattern free, and the hat is what makes anyone stop and pick it up.
A wide flat beak sitting proud of the face is what makes this crochet duck pattern free read as a duck rather than a yellow bird. Body and head work as one rounded piece with orange feet set forward at the base and two small wings at the sides. A straw hat with a brown band sits at an angle on top, and a brown ribbon ties at the neck, both added once the duck is finished. Set the eyes close together above the beak.
Crochet Duck Amigurumi

What sells this duck is the neck. Most amigurumi birds are a ball stacked on a ball with a seam hidden under a collar, and you can always tell. This one narrows to fifteen stitches and holds there for three rounds before opening back out, so the head sits on a proper stem and tips slightly forward the way a real duckling stands. It is worked as a single unbroken piece from the crown to the base, thirty six rounds without a break, which removes the one seam that usually gives the game away. Then come the webbed feet, which are the other thing people notice.
Countdown
- One duck, worked start to finish including sewing and embroidered eyes: 5 to 6 hours for an experienced maker. The head and body alone is a solid three.
- A batch of six: budget 28 to 32 hours. This is not a same week project at that volume.
- Latest sensible start for Easter Sunday with one duck: the weekend before, and treat the embroidery as its own sitting rather than something you rush at eleven at night.
- Latest start for a set of three as a table centrepiece: two full weeks out.
- If you are short on time, the tail is the piece to drop. Nobody looks at the back of a duck first, and the body reads fine without it.
What You Need
- 4 ply cotton or a smooth acrylic in yellow for the head and body.
- Orange for the beak and both feet.
- White and black for the embroidered eyes.
- 3.0 mm hook.
- Stitch markers, scissors, tapestry needle.
- Polyester fiberfill.
- 10 mm safety eyes if you are going that route rather than embroidering.
One note on the materials. The video’s supply list includes beige and brown yarn for a hat, but the transcript never gives any hat rounds, so there is no hat pattern below. If you want one, a simple flat circle of 24 stitches worked to a brim will sit on this head size.
Abbreviations
- ch = chain
- sc = single crochet
- dc = double crochet
- sl st = slip stitch
- st / sts = stitch / stitches
- MR = magic ring
- inc = increase, two sc in the same stitch
- dec = decrease, two stitches worked together
Pieces List
- Head and body worked as one piece, make 1
- Arms, make 2
- Feet, make 2 in orange
- Beak, make 1 in orange
- Tail, make 1
Safety Eye Timing
If you are using 10 mm safety eyes, they go in between Round 9 and Round 10, spaced roughly six stitches apart across the front of the head. That is the only window. Round 12 starts the decreases that close the head, and by Round 15 you are stuffing it, at which point the back of the fabric is gone and no washer is going on anything. Set them, check the spacing from three angles before you push the backs on, and remember that a washer is permanent.
The maker in the video embroiders instead, and for this duck that is the better call regardless of who it is for. The embroidered version below gives you a soft white highlight that plastic cannot match. But the safety rule stands either way. No plastic eyes on anything going to a child under three, and none on anything going into an Easter basket, a party bag, or a classroom, because you will not be there when a younger sibling gets hold of it. Embroider those, work the ends through the head and out somewhere hidden, and knot off inside the stuffing.
The Pattern
Work in continuous rounds unless a round says to join, and move your stitch marker up as you go. The counts below all reconcile round to round, so if yours drift, stop and recount rather than pushing on.
Head and Body, Worked as One Piece
- Rnd 1: MR, 6 sc into the ring, sl st into the first sc to close (6).
- Rnd 2: inc in each st around (12).
- Rnd 3: [sc in next st, inc in next st] around (18).
- Rnd 4: [sc in next st, inc in next st, sc in next st] around (24). Shape check: a shallow saucer that curves gently in your palm. Flat and stiff at this point means the increases are too spread out for your tension.
- Rnd 5: sc in each st around (24).
- Rnd 6: [sc in next 3 sts, inc in next st] around (30).
- Rnd 7: sc in each st around (30).
- Rnd 8: [sc in next 2 sts, inc in next st, sc in next 2 sts] around (36).
- Rnd 9: [sc in next 5 sts, inc in next st] around (42). Safety eyes go in between this round and the next, about six stitches apart.
- Rnd 10: [sc in next 3 sts, inc in next st, sc in next 3 sts] around (48). Shape check: a deep dome about 7.5 cm across the mouth, standing on its own without support. This is the widest the head gets.
- Rnd 11: sc in each st around (48).
- Rnd 12: [sc in next 3 sts, dec, sc in next 3 sts] around (42).
- Rnd 13: [sc in next 5 sts, dec] around (36).
- Rnd 14: [sc in next 2 sts, dec, sc in next 2 sts] around (30).
- Rnd 15: [sc in next 3 sts, dec] around (24). Stuff the head firmly now, before the opening closes further. Shape check: a clean sphere with no flat side. Any dent you can see here is permanent.
- Rnd 16: [sc in next st, dec, sc in next st] around (18).
- Rnd 17: [sc in next 4 sts, dec] around (15). Top up the stuffing through the small opening, pushing it up into the crown with the blunt end of a hook.
- Rnds 18 to 19: sc in each st around (15). Shape check: this is the neck. It should feel dense and slightly resistant when you squeeze it, not soft. A soft neck means a head that flops forward within a week.

- Rnd 20: [sc in next 4 sts, inc in next st] around (18).
- Rnd 21: sc in each st around (18).
- Rnd 22: [sc in next st, inc in next st, sc in next st] around (24).
- Rnd 23: sc in each st around (24).
- Rnd 24: [sc in next 3 sts, inc in next st] around (30).
- Rnd 25: [sc in next 2 sts, inc in next st, sc in next 2 sts] around (36).
- Rnd 26: [sc in next 5 sts, inc in next st] around (42).
- Rnd 27: [sc in next 3 sts, inc in next st, sc in next 3 sts] around (48). Shape check: the body should now match the head at its widest. Hold the piece up by the crown. Head and belly should read as the same width, with the neck pinched between them.
- Rnds 28 to 29: sc in each st around (48).
- Rnd 30: [sc in next 3 sts, dec, sc in next 3 sts] around (42).
- Rnd 31: [sc in next 5 sts, dec] around (36).
- Rnd 32: [sc in next 2 sts, dec, sc in next 2 sts] around (30).
- Rnd 33: [sc in next 3 sts, dec] around (24). Stuff the body now, working the fibre down into the belly and around the neck join from below.
- Rnd 34: [sc in next st, dec, sc in next st] around (18).
- Rnd 35: [sc in next st, dec] around (12).
- Rnd 36: dec 6 times (6). Shape check: the base should be a small flat circle the duck can actually sit on. If it has closed to a point, the last two rounds were worked too tightly and the duck will rock.
- Cut the yarn leaving a long tail, thread it through the final 6 stitches, pull closed and fasten off inside.
Arms, Make 2
- Rnd 1: MR, 6 sc into the ring, sl st into the first sc to close (6).
- Rnd 2: [sc in next st, inc in next st] around (9).
- Rnds 3 to 7: sc in each st around for 5 rounds (9). Shape check: a narrow tube roughly 3 cm long with a rounded tip, about the thickness of a pencil.
- Rnd 8: flatten the opening and work 4 sc across through both layers to close (4).
- Cut the yarn leaving a long tail for sewing. Leave the arms unstuffed.

Feet, Make 2 in Orange
- Rnd 1: MR, 6 sc into the ring, sl st into the first sc to close (6).
- Rnd 2: inc in each st around (12).
- Rnds 3 to 6: sc in each st around for 4 rounds (12). Shape check: a short orange tube, wider than the arms and about 2 cm long.
- Rnd 7: flatten the piece so the 12 stitches sit as 6 paired positions, then work across through both layers as follows: 3 dc closed together in the first position, sl st in the next position, and repeat across to form the webbed toes
- Cut the yarn leaving a long tail. Shape check: laid flat, each foot should fan into distinct points rather than one solid paddle. If the clusters are indistinct, your dc stitches were pulled too tight at the top.
Beak, in Orange
- Foundation: ch 8.
- Rnd 1: starting in the second ch from the hook, sc in the next 6 chs, then 3 sc in the last ch. Turn the work and sc in the next 5 chs down the other side. Work 1 inc into the very first space where the first sc was made (16). Shape check: a flat oval, wider at one end, lying completely flat on the table. Any cupping means the turn was worked too tightly.
- Rnd 2: sc in each st around (16).
- Rnd 3: flatten the piece and join both sides together as follows: sc in the first 3 sts, inc in each of the next 2 sts, sc in the next 3 sts, working through both layers (10). Shape check: a shallow orange scoop with a slight flare at the middle, which is what gives the beak its width once it is on the face.
- Cut the yarn leaving a long tail. Do not stuff.
Tail
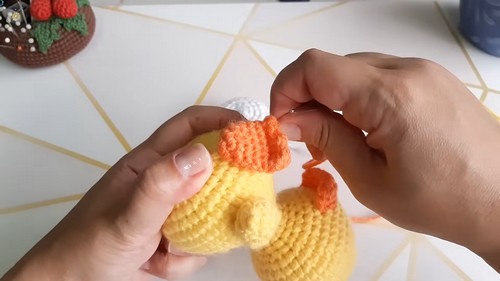
- Rnd 1: MR, 6 sc into the ring, sl st into the first sc to close (6).
- Rnd 2: inc in each st around (12).
- Rnd 3: sc in each st around (12).
- Rnd 4: sc in next 5 sts, inc in next st, sc in next st, inc in next st, sc in next 4 sts (14). Shape check: slightly wider on one side than the other, which is the point. That asymmetry is what makes the tail read as angled rather than as a lump.
- Rnd 5: sc in each st around, finishing with a sl st (14).
- Add a small amount of stuffing, then cut the yarn leaving a long tail.

Where Makers Usually Go Wrong on This One
- The neck. Rounds 17 to 19 are only fifteen stitches around, and the temptation is to leave them soft because stuffing a narrow tube is fiddly. Do not. Pack the neck harder than anything else on the duck, pushing fibre in from below with the blunt end of a hook before you widen at Round 20. A head that flops is not fixable afterwards without unpicking twenty rounds.
- Losing the marker in the middle of the body. Thirty six rounds is a long way to go without a break, and the section from Round 20 to Round 27 is nothing but increases at shifting positions. If you drop a marker there and guess, the increases stagger and the belly comes out lopsided in a way you will notice from across a room but not from directly above. Count at Round 24 and again at Round 27.
- Eyes too high. The instinct is to place the eyes near the crown because the head looks like a ball at that stage. Between Rounds 9 and 10 feels low while you are working, and then the head closes over the top and it turns out to be exactly right. Trust the round number over your eye.
- Beak sewn before the head is fully stuffed. The face changes shape as stuffing goes in. Sew the beak to an under-stuffed head and it will sit at an angle once the head fills out.
- Flat feet. The dc clusters in Round 7 need to be worked loosely or the toes collapse into a solid orange blob. Go up half a hook size for that round if your tension is firm.

Assembly
Order matters here, because one piece sets the alignment for everything else.
- Beak first, always. It goes on centred between the eye positions, sitting low on the face, roughly across Rounds 11 to 13. Everything on the face is then measured from the beak rather than guessed against a curved surface.
- Pin the beak in place and look at the duck from directly in front, then from below. A beak that looks centred from the front is often two stitches off when viewed from underneath. Adjust before a single stitch goes in.
- Sew the beak on around its full flattened edge, keeping the scoop shape rather than crushing it flat against the head.
- Arms next, pinned to the sides of the body at around Rounds 24 to 26, low enough that they hang rather than stick out. Pin both, then step back before sewing either.
- Feet next. This is the placement that decides whether the duck stands. Pin them to the front underside so the webbed ends point forward and slightly outward, then sit the duck on a table and adjust until it stops leaning. Sew only once it sits still.
- Tail last, at the back at roughly Round 30, angled upward rather than straight out.
- Eyes go on after the beak and before or after the limbs, whichever you prefer. Mark the two positions with a needle first, check the spacing, then embroider. Black for the pupil, a small white highlight worked off centre and in the same direction on both eyes.
Something worth knowing that no pattern tells you. Once the beak is on, the duck develops an expression, and it is almost never the expression you were expecting. Sew the beak, walk away for ten minutes, then come back and decide where the eyes go. The face you get after that break is consistently better than the one you would have committed to straight away.
Stuffing
Firm throughout the head, firmer still through the neck, and slightly softer in the lower body so the duck has some give when it is picked up. The head takes more fibre than you think, and under-stuffing shows as flat panels between the increase lines rather than as an obvious dent. Over-stuffing shows differently, as gaps between stitches where white fibre becomes visible, and once cotton is stretched that far it does not spring back. The tail wants a pinch only. Arms stay completely empty, which keeps them soft enough to sit against the body instead of sticking out at right angles.
The Character Dial
Toward naturalistic. Move off yellow entirely. A real duckling is buttermilk and wheat with brown across the crown and back, so work Rounds 1 to 11 in a warm mid brown and switch to cream at Round 12, which puts the colour change right at the widest point of the head and reads as a natural cap. Use a duller ochre for the beak rather than bright orange. Make the eyes smaller than feels right, with a tiny white highlight and no outline, because real bird eyes are dark and flat. Skip the tail’s stuffing so it lies closer to the body. If you want to go further, work a few rounds of the body in a slightly heathered or tweed yarn so the belly has texture where the head does not. The whole thing lands somewhere closer to a nature study than a toy, and it looks properly expensive on a shelf.
Toward candy coloured. Push hard the other way. Pale lemon body, coral beak, and feet in a completely unrelated colour like mint. Add a second highlight to each eye and place both highlights high, which reads as wide eyed rather than watchful. Round the head slightly by adding an extra plain round at Round 11 before the decreases start. A small stitched blush on each cheek in dusty pink, worked as a few flat wraps and tacked down, changes the face more than any other single change you can make. For Easter specifically, a thin ribbon at the neck sits perfectly in that fifteen stitch dip, which is one of the quiet advantages of this construction. Pastel duck, contrast ribbon, done.
Both versions take identical time. Decide before you cast on, because the head colour change has to happen at Round 12 and you cannot add it later.
Colourways
- Buttermilk Duckling. Cream body, wheat crown, ochre beak, soft brown embroidered eyes. The most convincing of the four and the one that suits a grown up room.
- Speckled Egg. Pale duck egg blue body, cream belly if you want to try a two colour lower half, and a dusty coral beak. Reads as Easter without any yellow at all.
- Mallard. Deep bottle green head worked through Round 11, warm grey body, a thin white round at Round 12 to suggest the neck ring, and a dark ochre beak. Ambitious and worth it.
- Vintage Nursery. Dusty lemon, sage green feet, off white embroidered eyes with a brown pupil. Muted enough to sit on a shelf all year rather than only in spring.
Display Ideas
- Centre of an Easter table, one duck per place setting with a name card leaned against the feet.
- On a mantel with a run of wooden or blown eggs at different heights, duck at the tallest point.
- Sitting in a shallow bowl of moss or dried grass, which works because the flat base at Round 36 lets it sit properly rather than sinking.
- Tiered tray, bottom level, with smaller eggs above so the scale reads correctly.
- In a basket in place of chocolate for a child old enough for a keepsake instead of sweets.
- A nursery shelf, where the naturalistic colourway holds up long after the season ends.
- Beside a front door on a console table, paired with a single stem in a jug.
- On top of a wrapped gift, tied on with the same ribbon as the parcel, which makes the duck the present rather than the packaging.
After Easter
This is a big piece with a lot of stuffing in it, and the thing that ruins stored amigurumi is compression rather than dust. Do not stack anything on top of it. Give the duck a light surface clean with a barely damp cloth on the yellow, let it dry completely, and put it in a box with enough room that nothing presses against the neck, because that is the part that deforms first and takes the head with it. Cotton holds a crease for months. When it comes back out next spring, roll the neck gently between your fingers for a few seconds and the head will sit upright again.
Quick Answers
- How big does this come out? At 3.0 mm with 4 ply cotton you are looking at roughly 20 to 22 cm from base to crown. Going up to a 4.0 mm hook with DK adds about a third to that, and the pattern holds up fine at that size as long as you stuff the neck harder to carry the extra head weight.
- Can I split the head and body into two pieces? You can, but you lose the reason to make this particular duck. The unbroken neck is the design. If you must split it, stop after Round 17, close it off, and start the body at Round 20, then be prepared for the join to show no matter how neatly you sew it.
- Is it safe for a small child? Only with embroidered eyes and every seam checked by squeezing hard along its length. The arms and feet are the pieces that come off first on a toy that gets carried, so sew them with a doubled strand and go around the attachment point twice.
- My duck leans forward. What went wrong? Almost certainly the feet, not the stuffing. They need to sit further forward on the underside than instinct suggests, acting as a counterweight to the head. Unpick, re-pin, and do the table test before you commit.