Free Crochet Nutcracker Amigurumi Pattern – Beginner-Friendly Toy
This crochet nutcracker pattern free stays firm enough to stand once stuffed, and beginners finish it without learning a new stitch. Swap the jacket colour and build a matching pair for either side of the mantel.
The tall hat is what makes a nutcracker read as a nutcracker, and this free pattern builds it as a separate piece that sits square on the head. You get the body, arms, legs, hat, and face detail, all worked in the round with straight sides and no shaping tricks. Colour changes carry the look here, not the stitches, which is why beginners get through it. Count your rows on the body and everything after lines up.
Crochet Nutcracker Amigurumi

This pattern makes the outfit, not the animal. A little military jacket and a tall nutcracker hat, both sized to dress an amigurumi you already own. The original tutorial puts them on a capybara, but they will fit any small toy with roughly the same body width, and part of the fun is trying them on things you made last year. If you were hoping for the full figure, this is not that pattern. If you have a bare amigurumi sitting in a basket somewhere with nothing to wear, this is a very good place to start.
Countdown Block
The outfit takes about two hours for a complete beginner, split roughly evenly between the jacket and the hat. Someone comfortable with basic stitches will finish in just over an hour. Six outfits comes to about eight hours of steady work, and the second one always goes noticeably faster than the first because the jacket construction stops being mysterious once you have done it. This is a very late-start-friendly project. Beginning on the twenty-third and finishing by Christmas Eve is entirely realistic, which is not something you can say about most amigurumi.
Why This Is A Good First Project
Almost everything here is single crochet. There are no decreases anywhere, no sewing pieces onto a body, no shaping a sphere, and nothing that has to be symmetrical to look right. The jacket is worked flat in rows, which is the gentler way to learn, and the hat introduces working in the round without asking you to close it up again at the end. The two hardest ideas in the whole pattern are the chain-space armholes and working into one loop instead of two, and both are explained below before you reach them.
Techniques You Will Need
- Magic ring. Used to start the hat. Wrap the yarn around two fingers so it crosses over itself, slide the loop off, hold the crossing point between finger and thumb, then work your stitches into the ring rather than into any individual stitch. When you have all six, pull the loose tail and the centre draws closed. If it will not close, you have worked into the wrong loop of the ring, which is a very common first attempt. Undo it and try again. It is worth getting right rather than working around.
- Chain spaces and armholes. In row 2 of the jacket you chain six and skip five stitches underneath. This makes a gap. The gap becomes an armhole. It looks alarming and untidy while you are doing it, like you have made a mistake and left a hole in your work. You have. That is the point. In row 3 you crochet six stitches across that chain bridge and the whole thing tightens up and starts to look deliberate.
- Back loop only and front loop only. Every stitch has two loops across its top, forming a small V. Normally you insert your hook under both. Working into only the back loop, the one further from you, leaves the front loop free as a visible ridge. Front loop only does the reverse. The hat uses both, once each, to create the two horizontal ridges that give it structure. Take your time identifying the loops the first time. After that it is automatic.
- Stitch markers. Put one in the first stitch of jacket row 1, and keep one in the first stitch of every hat round. In the round it is fatally easy to lose your place, and an 18-stitch round that quietly becomes 17 will not show for four rounds and then will show badly.
- Turning chains. Every jacket row starts with chain one, then turn. That single chain gives the row its height. It does not count as a stitch, so do not work into it at the end of the next row.
Materials
- Milk cotton yarn in your main outfit colour, around 125 g
- Black or dark grey yarn for the hat
- Yellow yarn for the buttons and hat band
- Crochet hook suited to your yarn
- Stitch marker
- Tapestry needle
- Scissors
Pieces List
- Jacket, one
- Hat, one
- Buttons, three, made from yarn knots rather than crocheted
- Optional chin strap, one
Safety Eye Timing
This pattern has no safety eyes, because it has no head. The eyes belong to whichever amigurumi you are dressing, and those went in when you made it.
Two things still matter. If the toy underneath is going to a child under three, its eyes should be embroidered rather than safety eyes, and no outfit can fix that after the fact. And the yellow yarn buttons on this jacket are knots with trimmed tails. They are secure enough for display but not chew-proof. For a toy heading into a treat bag, a party favour, or a classroom, sew the buttons through the jacket front with a tapestry needle and knot them on the inside instead of surface-knotting them.
The Pattern
Jacket
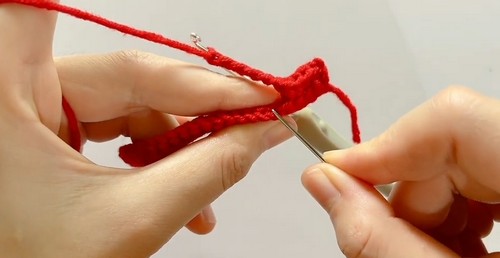
- Make a slip knot, then ch 33.
- Row 1: Skip the first chain and work 32 sc, starting in the second chain from the hook. Place a stitch marker in the first sc. [32] Shape checkpoint: a flat strip, slightly longer than it is tall. It may curl toward you. That is normal for a first row of single crochet and it flattens out by row 3, so do not tighten your grip trying to fix it.
- Row 2: Ch 1, turn. Work 4 sc. Ch 6, skip 5 stitches of the row below, then work into the 6th stitch. Work 14 sc. Ch 6, skip 5 stitches of the row below, then work into the 6th stitch. Work 4 sc to the end. [22 sc worked, plus two 6-chain spaces] Shape checkpoint: two loose loops now sit above two obvious gaps. The work looks wrong at this stage. It is not. Lay it flat and you should see a shape that already reads as a tiny jacket with two armholes.
- Row 3: Ch 1, turn. Work 4 sc. Work 6 sc across the first 6-chain space. Work 14 sc. Work 6 sc across the second 6-chain space. Work 4 sc to the end. [34] Shape checkpoint: the gaps have closed into neat openings and the row lies flat. If your armholes look puckered, you worked fewer than 6 stitches across the chain. Undo that section only and redo it.
- Row 4: Ch 1, turn. Work 34 sc, one in each stitch. [34] Shape checkpoint: a flat rectangle with two holes in it. Hold it against your toy now to check the fit before edging, because this is the last easy moment to add a row if it is too short.
For Jacket Edging
- Ch 1, turn. Work sc all the way around the outside edge of the jacket, as follows.
- Work 34 sc along the bottom edge. [34]
- Work 4 sc along the side flap. [4]
- Work 32 sc along the top neckline edge. [32]
- Work 4 sc along the remaining side flap. [4]

- Sl st into the first stitch to join. Fasten off leaving a long tail for sewing. Shape checkpoint: the border pulls the whole jacket into shape and stops the edges rolling. It should now sit flat on the table without help.
Jacket Assembly
- Fold the two front flaps toward each other so they overlap slightly at the front.
- Using the tapestry needle and the long tail, sew the first 3 corresponding pairs of stitches along the bottom front edge together.
- Weave in and hide all remaining ends inside the work.
Buttons
- Using yellow yarn and the tapestry needle, make 3 knots down the centre front of the jacket, spaced evenly.
- Secure each knot at the back of the work and trim the excess close.
Hat

- Round 1: Make a magic ring and work 6 sc into it. Pull the tail tight to close the centre. Sl st to join, ch 1. [6] Shape checkpoint: a small firm disc with no hole in the middle. If you can see through the centre, pull the tail harder before moving on.
- Round 2: Work 2 sc in each stitch around. Sl st to join, ch 1. [12] Shape checkpoint: still completely flat, roughly the size of a coin.
- Round 3: (1 sc, 1 inc) repeat around. Sl st to join, ch 1. [18] Shape checkpoint: a flat circle. It should lie on the table without doming or ruffling. A dome means your stitches are too tight, a ruffle means too loose.
- Round 4: Working in the back loops only, work 18 sc around. Sl st to join, ch 1. [18] Shape checkpoint: this is the round that turns the flat circle into a hat. The sides should now stand up at a sharp right angle, and a visible ridge should run around the outside where the circle becomes the tube.
- Rounds 5 to 9: Work 18 sc in each round, one stitch in each stitch. [18] Shape checkpoint: a straight tube with no widening. Check the height against your toy’s head around round 7, since this is a tall hat and the proportion matters more than the exact row count.
- Round 10: Work 18 sc around, changing to yellow yarn on the last stitch. [18]
- Round 11: Ch 1, work 18 sc around in yellow, changing back to black on the last stitch. [18] Shape checkpoint: a clean yellow band circling the hat. [CHECK — the source labels both this yellow round and the following front-loop round as round 11, so the numbering from here is uncertain. The order of the steps is clear, only the numbers are not.]
- Round 12: Working in the front loops only, work 18 sc around in black. Sl st to join, ch 1. [18] Shape checkpoint: a second ridge, matching the one at the base. The hat now has a defined structure top and bottom.
- Round 13: Work 5 sl st, 2 sc, 4 inc, 2 sc, 5 sl st. [22 stitches produced from 18 worked] Sl st to join. Fasten off and weave in ends. Shape checkpoint: the increases create a raised section on one side. That side is the front. The slip stitches on either side sit low and flat, which is what gives the brim its shape rather than making a plain circle.
Hat Details
- Using yellow yarn and the tapestry needle, add decorative accents around the sides of the hat, positioned at roughly the fifth round.
- Optional: add a chin strap by attaching yarn at each side of the brim and tying under the toy’s chin.

Stuffing
- Barely any, which is another reason this suits a first project. The jacket takes none at all. The hat takes none either in most cases, since the toy’s head fills it, and stuffing a hat that already fits produces a stiff cone that sits too high.
- The one exception is if your toy’s head is smaller than the hat. In that case, push a small amount of stuffing into the crown only, keeping it loose. Over-stuffing shows immediately here. The straight sides of the tube will bulge outward and the hat stops reading as military and starts reading as a mushroom.
Assembly Onto The Toy
- Hat first, jacket second, because getting a jacket over a hatted head is harder than the reverse.
- Slide the jacket on by feeding one arm through an armhole at a time. Overlap the front flaps and check the fit before you commit. If it gapes, add one more row before the edging on your next one. If it is tight, go up a hook size rather than adding stitches, since the row counts are what keep the armholes in the right place.
- Pin before you sew anything permanent. Two or three pins holding the front closed will tell you in ten seconds whether the button placement looks right, and repositioning a pin is a great deal easier than picking out a yellow knot you have already trimmed.

The Character Dial
- Two easy swaps, and neither needs any change to the pattern itself.
- Rustic. Swap the bright outfit colour for a heathered burgundy or a deep forest green, and use cream instead of yellow for the buttons and hat band. The result reads as an old wooden nutcracker rather than a new one, and it sits far better on a mantel with pine and dried orange than the bright version does.
- Bright. Keep it bold. Scarlet jacket, true black hat, strong yellow band and buttons. This is the storybook nutcracker and it is the version children will pick every time. Add a fourth button if the toy’s body is long enough to take it, since an odd number down the front is what makes the jacket look properly military.
Colourways
- Palace Guard. Scarlet jacket, black hat, gold band and buttons. The classic.
- Winter Officer. Deep navy jacket, charcoal hat, silver-grey band. Quieter, and better on a blue and white tree.
- Old Toybox. Faded brick red, dark brown hat, cream buttons. Looks like it has been in the family for decades.
- Sugar Plum. Dusty pink jacket, plum hat, pale gold band. The one for anyone tired of red.
Display Ideas
- A dressed toy wants to stand where it can be seen from the front, since all the detail is on the jacket. A mantel or a shelf edge works. So does a hall table beside the door, where the outfit gets noticed on the way past.
- A row of three or four dressed animals along a windowsill reads as a set even when the toys underneath are completely different creatures, and that mismatch is half the appeal.
- If you have made the outfit for a toy that already lives on a child’s bed, leave it there. A dressed-up regular toy is more interesting than a Christmas toy that appears once a year.
One Thing Worth Knowing
The armholes are cut higher than instinct suggests, and the jacket will look slightly too short in the body when you first hold it up. Put it on the toy before you judge it. The proportion is deliberate. A longer jacket covers the legs and the whole thing stops looking like a uniform and starts looking like a dressing gown.
After The Season
Store the outfit on the toy rather than folded separately, unless you need the toy for something else. Cotton yarn creases at the fold line and the crease sets over eleven months in a box. If you do store it flat, roll it rather than folding. The hat should be stuffed lightly with tissue to keep the tube from collapsing, since a flattened hat comes out oval and never quite recovers its round shape. Keep the yellow band away from anything damp, as bright yellow is the colour most likely to run onto a pale jacket if it gets wet.
Quick Answers
- Will this fit my amigurumi? Probably, if it is a small to medium toy with a fairly round body. The jacket is 34 stitches around and the hat is 18. Hold the jacket against your toy at row 4, before the edging, and you will know straight away.
- What is a magic ring and can I skip it? It is a way of starting in the round with no hole in the centre. You can substitute chain 2 and work 6 stitches into the second chain, which is easier but leaves a small gap. On a hat crown that gap will show, so it is worth learning the ring here.
- I lost count on the hat and now have 17 stitches. What now? Undo back to the last round you were sure about and rework it. Seventeen will keep being seventeen and the hat will spiral visibly. This is why the stitch marker goes in every round rather than just the first.
- Do I need cotton yarn specifically? No. Cotton gives crisper stitch definition and holds the hat’s shape better, which is why the original uses it. Acrylic works fine and is more forgiving on the tension, which matters more when you are starting out.
- My armholes look like holes in a mistake. Is that right? Yes, at row 2. They are supposed to look wrong until row 3 closes them with six stitches across the chain. Keep going and check again after that row before you undo anything.