Detective Conan Crochet Doll Amigurumi Pattern Free
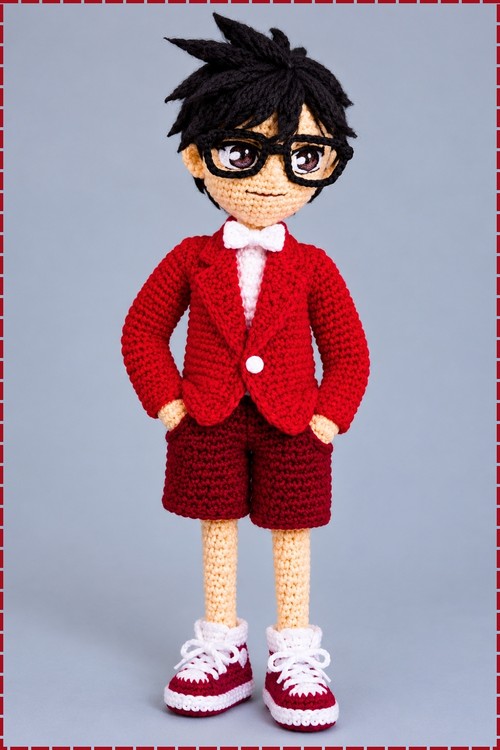
Wire through the legs and torso makes this crochet Detective Conan doll amigurumi a posable anime doll, dressed in a removable red jacket, white shirt and wine red shorts. Fine yarn on 1.0 mm and 1.5 mm hooks keeps every detail crisp.
Sharp eyes and a permanent air of suspicion give this crochet Detective Conan doll its personality. He looks like he already knows what happened. Fans of the series recognise the bow tie instantly, and the crochet Detective Conan doll keeps that quiet, watchful expression long after the case closes.
Crochet Detective Conan Doll
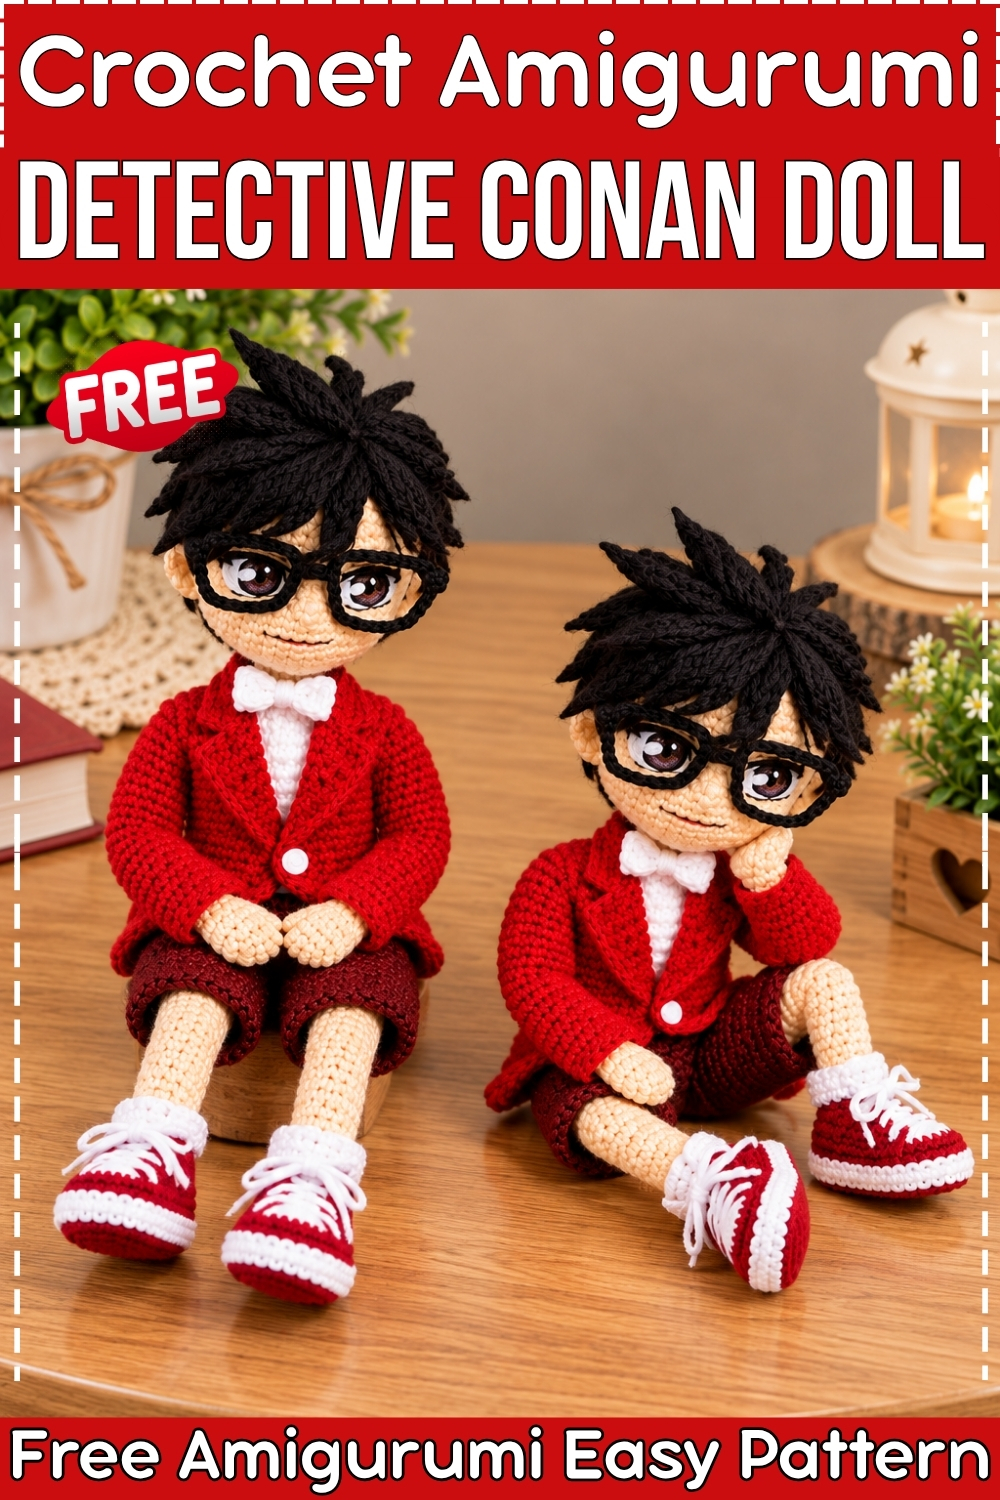
Wire runs through the legs and torso of this crochet Detective Conan doll, so he sits, leans, and props his chin on one hand exactly the way you pose him. Skin tone yarn builds the body from the feet up, and a white shirt, red jacket, and deep red shorts go on afterward as separate pieces you can slip off again. Black yarn, chopped fine and glued in place, gives him that spiked anime hair. Hand bent wire forms the square frames on his face. Everything written here matches the two dolls I finished and photographed on my table.
Materials and Tools
- Skin tone yarn for the head, neck, arms, legs, and hands
- White yarn for the shirt and for the white sections of the sneakers
- Red yarn for the jacket and for the red sections of the sneakers
- Deep red or wine red yarn for the shorts
- White yarn for the bow tie
- Black yarn for the hair flocking and for wrapping the glasses frames
- 1.5 mm crochet hook for the body, clothing, and shoes
- 1.0 mm crochet hook for the neck and head
- Fiberfill stuffing
- Thin armature wire for the body and for the glasses frames
- Fabric glue and plastic wrap
- Black doll hair wefts, optional if you prefer wefts over flocking for the fringe
- Thin plastic or cardstock, plus paints or markers, for the eyes and buttons
- Yarn needle, sharp scissors, stitch marker, and small pliers
My pair uses red for the jacket and wine red for the shorts rather than the blue the plain pattern lists, and the bow tie is white instead of red. The sneakers stay red and white.
Difficulty and Time
From my own experience with these two, this sits at an intermediate level. The stitches themselves are almost all single crochet, but the 1.0 mm and 1.5 mm hooks with fine yarn make the work slow, and the wire insertion and hair flocking take patience. I spent roughly two long evenings on the doll and clothes, plus part of a third on the hair, glasses, and face. Treat that as a guide rather than a promise, since tension and hook size shift everything.
Beginner Technique Notes
- Magic ring, written as MR, starts every rounded piece and lets you pull the centre closed with no hole.
- Single crochet, written as sc, carries almost the whole doll.
- Increase, written as inc, means two single crochet worked into the same stitch.
- Decrease, written as dec, means two single crochet worked together as one.
- Back loop only, written as BLO, means you insert the hook under the back strand of the stitch alone, which leaves a visible ridge. The shoes rely on this for the sole edge.
- Back post single crochet, written as bpsc, means you work around the post of the stitch from behind rather than into the top. On the shoes this pushes the sole outward like a rubber rim.
- Half double crochet is hdc, double crochet is dc, chain is ch, and slip stitch is sl st.
- Work in continuous spirals unless a round says to join, and keep a marker in the first stitch of every round because six stitch rounds lose their place fast.
The Pattern
Legs, Make Two, 1.5 mm Hook and Skin Tone Yarn
- R1: Work 6 sc in a MR and close the ring. (6 sts)
- R2 to R4: Work 1 sc in each st around for three rounds. The tube should be narrow and firm, about the width of a pencil. (6 sts)
- Row 5, heel: Work 2 sc, ch 1, turn. You stop working in the round here and build a small flap. (2 sts)
- Row 6: Work 2 sc, ch 1, turn. (2 sts)
- R7: Work 1 sc in each st around, taking in the side edges of the heel flap to return to the round. The foot now angles forward from the leg. (8 sts)
- R8: Work 2 dec at the back of the foot. Placing both decreases at the back keeps the toe long and the ankle tidy. (6 sts)
- R9 to R18: Work 1 sc in each st around for ten rounds. (6 sts)
- R19, knee shaping: Work 2 inc, 2 dec. The tiny bulge this makes is the knee, so keep it facing forward. (6 sts)
- R20: Work 2 dec, 2 inc. (6 sts)
- R21 to R30: Work 1 sc in each st around for ten rounds. Stop and compare both legs now, since a one round difference shows badly once he sits. (6 sts)
Joining the Legs and Working the Torso
- R31: Fasten off the first leg. On the second leg, ch 3, join to the first leg with a sc, then work 1 sc in each st across both legs and across the chain stitches. The three chains become the space between the hips.
- R32 to R35: Work 1 sc in each st around for four rounds. This short section is the hips and it stays skin tone because the shorts cover it.
- R36, shirt: Change to white yarn and work 1 sc in each st around for eleven rounds. Carry the colour change at the centre back so the join hides under the jacket.
Arms, Make Two, 1.5 mm Hook and Skin Tone Yarn
- R1: Work 6 sc in a MR. (6 sts)
- R2 to R16: Work 1 sc in each st around for fifteen rounds. Stuff only the hand end lightly, since the wire and a soft arm let him rest a hand against his cheek the way the doll on the right does in my photo. (6 sts)
Attaching the Arms, White Yarn
- R1: Join the arms to the sides of the body by working 1 sc in each st across the arms and the body. Pin the arms first and check that both thumbs face forward. (30 sts)
- R2 to R3: Work 2 dec at every corner where an arm meets the body, four corners in all, for two rounds. Shoulders form here and the top of the body narrows. (14 sts)
- Bend the armature wire into a long U, feed one leg of it down into each crocheted leg, and leave the bend sitting inside the torso. Push wire down the arms too if you want posed hands. Then stuff the legs and body firmly with fiberfill around the wire, using the blunt end of a hook to pack the shins.
- R4: Work 5 sc, 1 dec, 5 sc, 1 dec. (12 sts)
Neck and Head, 1.0 mm Hook and Skin Tone Yarn
- Neck R1 to R3: Work 1 sc in each st around for three rounds. The finer hook makes this section denser than the shirt, which is exactly what holds the head upright. (12 sts)
- Head base: Ch 4, skip the first ch, and work 3 sc along the chain. Working across a short chain rather than a magic ring gives the head an oval footprint instead of a ball.
- Continue increasing around in rounds until you reach 48 sts, then work even and begin decreasing to close the top of the head. Stuff firmly as you close, and shape the cheeks with your fingers before the opening gets too small, because this doll reads as Conan through a round lower face and a slightly flat crown.
Shorts, Wine Red Yarn, 1.5 mm Hook
- Pants legs, make two: Ch 20, sl st into the first ch to join into a ring, ch 1, then work 1 sc in each st around for six rounds and sl st to close. Slide each tube onto a doll leg as you go to confirm it clears the knee.
- Joining: Join both legs by working 1 sc in each st around both tubes. (40 sts)
- Pockets: Work 5 sc, ch 4, skip 4 sts, 22 sc, ch 4, skip 4 sts, then sc to the end of the round. The two chain spaces sit at the front hips as slash pockets.
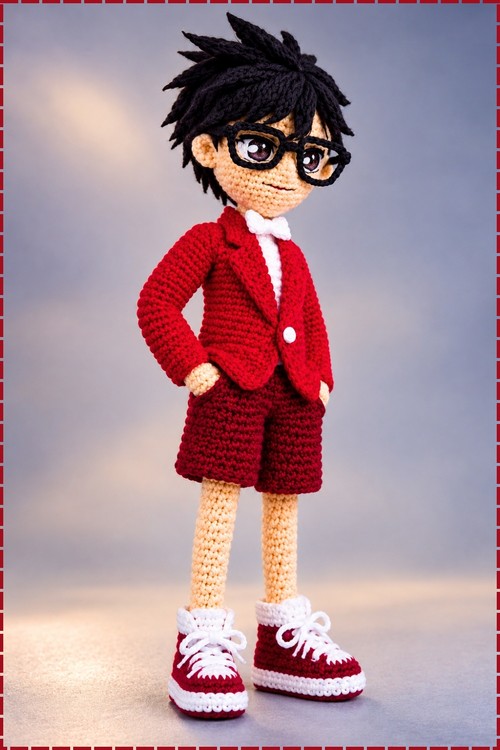
- Work 1 sc in each st around, including across the pocket chain spaces, for three rounds. My shorts are wine red rather than blue and they stop well above the knee, which is what leaves that long stretch of bare leg in the photo.
Jacket, Red Yarn, 1.5 mm Hook
- Sleeves, make two: Ch 10, sl st to form a ring, ch 1, then work 1 sc in each st around for fourteen rounds. Check the length against the doll’s arm before joining, because the cuff should end at the wrist and leave the hand showing.
- Jacket main body Row 1: Ch 41, skip the first ch, then work 1 sc in each st across. (40 sts)
- Rows 2 to 17: Ch 1, turn, and work 1 sc in each st across for sixteen rows. You are making a flat rectangle that wraps the torso with a small overlap at the front.
- Lapels, make two: Ch 2 and work an inc in the 2nd ch from the hook. (2 sts)
- Ch 1, turn, and work 2 sc. Repeat for a second row.
- Ch 2 and work 2 foundation single crochets.
- Ch 1, turn, and work 2 sc.
- Ch 1, turn, and work 1 inc. Ch 1, turn, and work 1 sc. Fasten off. The piece should be a narrow wedge that widens toward the shoulder.
- Assembly: Sew the sleeves into the armholes and pin the lapels along the front opening so they fold back in a shallow V, then work 1 sc edging around the entire outer boundary of the jacket to join everything and neaten the edges. My jacket is red throughout, and I sewed one small white painted button at the waist on the right hand side of the front opening.
Sneakers, Make Two, 1.5 mm Hook
- R1: Ch 5. Work an inc in the 2nd ch, 2 sc, then 4 sc in the last ch. Turn to work along the opposite side of the chain: 2 sc, then an inc in the last st. Sl st to join. This oval is the sole. (12 sts)
- R2: Ch 1, then work 2 inc, 2 sc, 4 inc, 2 sc, 2 inc. Sl st to join. The four increases together form the toe end. (20 sts)
- R3: Work 1 bpsc in each st around. Sl st and cut the yarn. The ridge this creates is the white rubber sole line you can see running around each shoe.
- R4, red back: Count 8 front stitches and leave them aside, then join red yarn in BLO and work 12 sc across the back. (12 sts)
- R5, white front: Join white yarn in BLO and work 8 sc across the front. (8 sts)
- R6, shaping: Work 12 sc with red yarn, then switch to white yarn and work 2 sc, 2 dec, 2 sc. The white toe cap starts curving upward here.
- R7: Work 12 sc with red yarn, then switch to white yarn and work 3 dec.
- R8: Turn and work 3 sc in white yarn. Then work 1 sl st in BLO in every st around the rim of the shoe to finish the opening cleanly.
- Thread a length of white yarn through the white front section in a criss cross to make laces, then tie a small bow on top. Both my dolls have the bow sitting at the front of the ankle with long tails left loose.

Bow Tie, White Yarn
- Ch 8, skip 3 chs, then work 2 hdc, 1 sl st, 1 hdc, 1 dc. Fasten off.
- Wrap a strand of white yarn several times around the centre to pinch it into the bow shape and tie off at the back. My bow tie is white rather than red, and it sits right at the collar where the shirt shows above the jacket.
Glasses
- Bend thin wire into two rounded square frames joined by a short bridge, then continue the wire out to each side and back over the ears as temples.
- Wrap the whole frame with black thread or fine black yarn, working close so no metal shows, and secure the ends with a dot of glue. Mine came out thick and chunky, which is what gives the dolls that heavy black frame look.
- Rest the glasses on the face and tuck the temple ends into the hair rather than gluing them to the cheeks, so you can take them off later.
Hair
- Chop black yarn as finely as you can until it looks like dust or fluff. Unplying the yarn first makes it chop much finer.
- Cover the face and body with plastic wrap so glue cannot reach the skin tone yarn, leaving only the scalp exposed.
- Spread fabric glue over the scalp area and press the chopped yarn flocking into it. Let it dry fully, then brush off the loose fibres.
- For the spikes, cut lengths of black yarn or use black hair wefts, glue them along the forehead and crown, and shape each one into a point while the glue is still soft. Both dolls have long pointed spikes standing up and out from the crown, with a heavier fringe across the forehead.
Face and Buttons
- Draw the eyes on thin plastic or cardstock, colour them with markers or paint, cut them out, and glue them to the face. Mine are large anime eyes with a dark brown iris, a white highlight at the upper left, and a soft shadow above the lid.
- Add a fine line of black thread or a light pen stroke for the mouth and a short curve for each eyebrow above the frames.
- Cut small circles from cardboard, paint them white, and glue or sew one to the jacket front and one to each shoe if you want the extra detail.
Tips and Troubleshooting
- Wrap the wire ends in a tight loop or a scrap of tape before you feed them into the legs, because a raw cut end will work its way through the fabric within days.
- Stuff the shins in small pinches rather than one big wad. Six stitch tubes lump instantly and a lumpy shin shows through more than a lumpy body ever will.
- Sew the head on with the neck held slightly forward. A neck set straight up makes the doll look stiff, and a small forward tilt is what lets him rest his chin on his hand.
- Test your glue on a yarn scrap before flocking. Some fabric glues soak through and darken skin tone yarn permanently.
- Pin the lapels and walk away for a minute before sewing. Uneven lapels are the single most visible mistake on this doll, more than any stitch count.
- Make both shoes to the same round before starting the colour changes, so the red and white sections land in matching places.
- If the head leans, add more stuffing into the neck itself rather than the head. The neck is the part carrying the weight.
Yarn Substitution
I used a fine cotton throughout, which is why the stitches stay crisp and the shorts hold a flat edge. A light fingering or size 10 thread works at these hook sizes too, and cotton beats acrylic here because it shows stitch definition on a doll this small. If you move up to DK weight with a 2.5 mm or 3 mm hook, every piece grows proportionally and the pattern still works, but expect a doll roughly twice the height and plan for more stuffing and heavier wire. Avoid anything fuzzy, since halo hides the face shaping completely.
Customization Ideas
- Swap the red jacket for navy or dark grey if you want the classic school uniform look instead of the version I made.
- Change the bow tie colour to red or black to match a different outfit.
- Make the shorts long trousers by adding rounds to each leg tube before joining them.
- Leave the glasses off and give him closed sleeping eyes for a softer nursery version.
- Use brown or light brown flocking instead of black and you have a generic schoolboy doll rather than a character.
- Add a tiny crocheted bag or book for him to hold, since the wire hands grip small props well.

FAQ
Can I make this without wire? Yes, but he will not sit, lean, or hold a pose. Stuff the legs firmly and he will stand propped against something instead. Every pose in my photos depends on the wire running through the legs and torso.
Why two different hook sizes? The 1.0 mm hook makes the neck and head much denser than the rest of the doll. That density is what stops the head from flopping and keeps the stuffing from showing through the face, which matters most on the part people look at.
My six stitch tubes keep twisting. What am I doing wrong? Probably nothing. Narrow spirals naturally torque, and the twist disappears once the wire goes in and the piece is stuffed. Keep your marker in place and keep going.
Is the flocked hair safe for a child? I would not give the flocked version to a small child, since glued fibres can loosen. Sew on yarn hair strand by strand instead if the doll is going to a toddler, and skip the wire and the glued plastic eyes as well.
How do I keep the glued eyes from peeling at the edges? Round off the corners of each cut eye and press the edges down with a fingertip for a full minute after gluing. A thin second pass of glue around the outer edge, wiped almost dry, seals them without leaving shine.