Free Crochet Candy Corn Amigurumi Pattern
Geometry and colour discipline in a small package, the Crochet Candy Corn Amigurumi is a Halloween mini where clean stripe work carries the whole result. For makers who enjoy precision in a quick build. Pattern inside.
Three colours, clean geometry, and a stripe transition that has to sit exactly level or the whole thing reads off. Candy corn is a deceptively structured build because the shape is so simple that any inconsistency in the colour bands becomes immediately visible.
Crochet Candy Corn Amigurumi
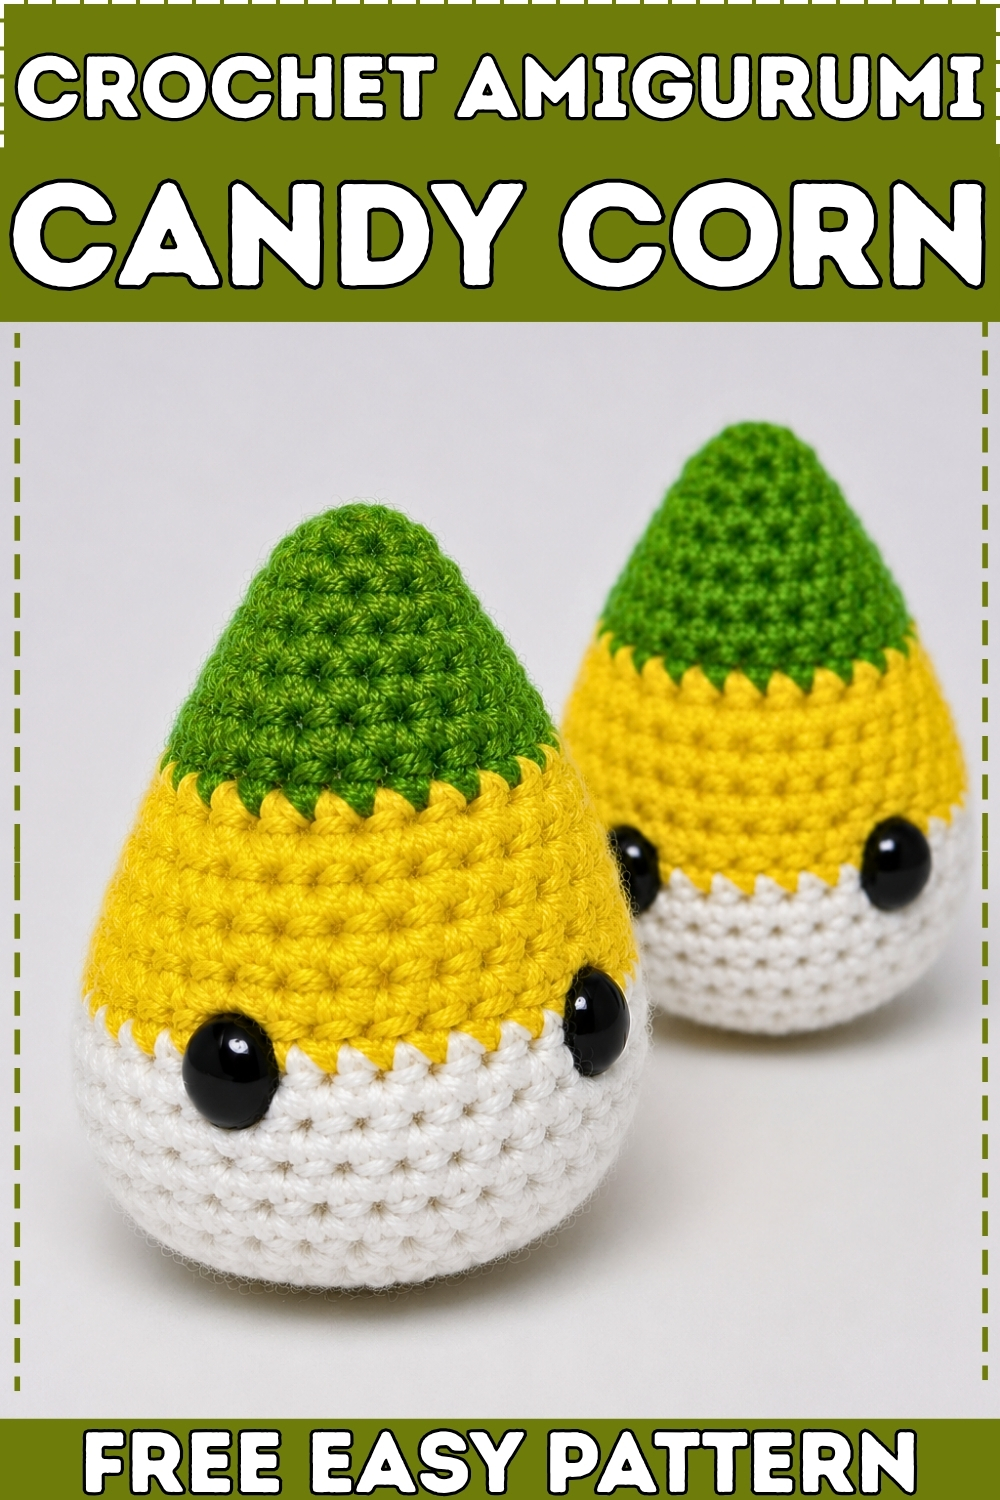
The Crochet Candy Corn Amigurumi rewards makers who take the join seriously, because the point where orange meets yellow is where most versions either succeed or quietly fail. Getting that line straight is more satisfying than it has any right to be.
The Finished Effect — And What Makes This Design Work
Candy corn is one of the most recognizable Halloween shapes in existence, which means a crochet version either looks instantly right or it looks like a yellow blob with a face. The difference is all in the stripe proportions. This pattern builds the shape from the white tip upward, using progressively wider increase rounds in each color section so the three bands genuinely taper — narrow at the white base, middle width through the orange, and the widest section in yellow at the top before the decreases pull everything closed. The result is a shape that reads as candy corn from across the room, not just up close.
The face, if you add one, sits in the yellow section. That placement matters. A face at the white tip looks crowded. A face at the orange seam looks accidental. In the yellow band, between the color change and the first decrease round, there’s just enough surface area to give the eyes breathing room. The color seam runs at the back, which means the face always faces forward without any extra planning.
Countdown Block
One candy corn: 1.5 to 2 hours for a confident beginner, closer to 1 hour for an experienced maker. This is a single-piece pattern with no assembly — the entire body is worked in one continuous spiral. A batch of six: 6 to 8 hours of active crochet across two sessions. Very manageable in a weekend. Last possible start: Three days before your deadline for one. A week out for six. This is genuinely a fast make.
Quick Answers
- Why does the color seam keep wandering to the front? The seam drifts because the start of each round naturally spirals forward as you work. To keep it at the back, use a stitch marker to track your round starts and orient the piece the same way each time you pick it up. When you change colors, make the change at the back of the piece rather than wherever you happen to be in the round.
- What size does this work up to? At 4mm with DK or light worsted yarn, the finished piece is roughly palm-sized — about 8 to 10cm tall. For a larger candy corn, go up to a 5mm hook and heavier yarn; for a miniature version, drop to 3mm with fingering weight.
- Can I skip safety eyes and still get the candy corn face effect? Yes. Embroider two small black French knots or satin-stitch ovals, then add a small curved backstitch mouth underneath. The embroidered version can look more vintage and hand-crafted, which actually suits the piece. Under-threes and treat bag recipients should always get embroidered faces regardless — see the Safety Eye Timing section.
- Is the decreasing at the top supposed to make the piece lopsided? If the top is pulling to one side, the color seam has likely drifted during the decrease rounds. The decrease rounds work faster than the increase rounds and the seam can wander noticeably here. Keep the stitch marker in and orient the piece consistently — it corrects itself if you stay aware of it.
Where Makers Usually Go Wrong on This One
The color transitions are everything on this pattern, and there are two places they typically go wrong.
- The first is the white section. Because white is the narrowest color and only covers five rounds, makers who crochet tightly can end up with a white tip that barely reads as a separate band. The fix is not to loosen your tension globally — it’s to make sure the increases in R5 are worked fully and evenly, because that’s the round doing the most shaping work in the white section. A round that comes out at 23 instead of 24 will cause the orange band to look off from the very first stitch.
- The second is the orange-to-yellow color change. This happens at R11, which is also where the piece transitions from increasing to straight even rounds. The piece is at 36 stitches at this point and has been getting wider every other round — suddenly it stops widening, and makers who haven’t been counting carefully suddenly realize they’ve been gaining or losing stitches silently for a few rounds. Count at R10, before the color change. Fix any discrepancy there rather than carrying it into the yellow section where it will distort the decrease rounds.
- A third issue, less common but worth naming: safety eye placement timing. The source specifies inserting eyes in R11. R11 is immediately after the color change to yellow, when the piece still looks like it’s in the middle of being built and the face placement isn’t obvious yet. Mark the front of the piece with a stitch marker in a contrasting color from round one, so you always know which direction is forward when R11 arrives.
Pieces List
- Candy corn body — make 1 (single piece, no assembly required)
Materials
- White yarn (small amount — five rounds only)
- Orange yarn (four rounds)
- Yellow yarn (five rounds plus the decrease section)
- Crochet hook: 4.0mm (size G)
- Safety eyes: 9mm to 11mm, 2 per piece (optional)
- Toy stuffing
- Stitch marker
- Yarn needle
- Scissors
Stitch Abbreviations
- sc — single crochet
- inc — increase (2 sc in same stitch)
- dec — decrease (invisible decrease recommended: insert hook through front loops of next 2 stitches together)
- mr — magic ring
The Pattern
Candy Corn Body (make 1)
Color: White yarn
- R1: 6 sc in magic ring (6)
- R2: (inc) x 6 (12)
- R3: 1 sc in each stitch around (12)
- R4: (sc, inc) x 6 (18)
- R5: 1 sc in each stitch around (18)
- R6: (2sc, inc) x 6 (24)
Reading crochet patterns can be tricky when you’re just starting out, feel free to follow the video tutorial below instead!
Change to Orange yarn.
- R7: 1 sc in each stitch around (24)
- R8: (3sc, inc) x 6 (30)
- R9: 1 sc in each stitch around (30)
- R10: (4sc, inc) x 6 (36)

Change to Yellow yarn.
Insert safety eyes now, before R11 — see Safety Eye Timing below.
- R11: 1 sc in each stitch around (36)
- R12: 1 sc in each stitch around (36)
- R13: 1 sc in each stitch around (36)
- R14: 1 sc in each stitch around (36)
Stuff the piece now, before the decrease rounds close the opening. See Stuffing section.
- R15: (4sc, dec) x 6 (30)
- R16: (3sc, dec) x 6 (24)
- R17: (2sc, dec) x 6 (18)
- R18: (sc, dec) x 6 (12)
- R19: (dec) x 6 (6)

Fasten off, leaving a long tail. Thread onto a yarn needle and weave through the remaining 6 stitches, pull tight to close. Pass needle through center of piece to lock closure. Weave in all ends.
Shape checkpoints:
- After R2, the magic ring base is a small flat disc of 12 stitches. It should lie completely flat with no curl at the edges.
- After R6, still in white — the disc has 24 stitches and is noticeably wider, still flat. This is the full width of the white section. The piece should look like a small coaster at this stage, not a bowl yet.
- After R10, the orange band has brought the piece to 36 stitches. The edges are just beginning to curve upward — the piece is transitioning from flat disc to shallow bowl shape. This is the widest point before the yellow straight section holds the count steady.
- After R14, the yellow section is complete and the piece should look like a wide, open cup — 36 stitches across, with the three color bands clearly visible from the side. If the bands don’t read as three distinct stripes at this point, the color changes were worked too loosely or the seam has drifted around to the visible front.
- After R19 and stuffed, the finished piece is a firm, rounded candy corn shape with a flat bottom (the magic ring), a tapered color-banded body, and a closed top. The narrowest band should be at the bottom.
Safety Eye Timing
Insert both safety eyes after R10 and before working R11 — when the piece is open and wide enough to see inside clearly. The source places eyes in R11, which in practice means just before you begin that round. Position them with the color change seam at the back, spacing the eyes 8 stitches apart and centering them on the face side of the piece.
Click the backings on from the inside before continuing. Once the backings are on, they cannot be removed without cutting into the piece.

For children under three, for treat bags, and for any favour where you don’t control who receives it: embroider the face instead. Two small oval satin stitches in black for eyes, one small curved backstitch in black for a simple smile. It takes five minutes and removes the only component that poses a safety risk.
Stuffing
The source describes the ideal stuffing as “not too firm, not too squishy” — in practice, aim for the firmness of a stress ball rather than a pillow. The piece needs enough stuffing to hold the candy corn silhouette without the sides bulging outward at the yellow section, which is the widest and most vulnerable to over-stuffing distortion. Add stuffing before R15 while the opening is still wide. Push stuffing down into the white tip first — that small pointed section needs to be filled before you can get accurate firmness in the upper sections.
The Character Dial — Classic vs Elevated
The standard candy corn palette is extremely high recognition, which is both its strength and its limitation. Most crochet candy corn look identical to each other. Here’s how to push the design in either direction without losing the silhouette.
- Sweeter and more graphic: Keep the white-orange-yellow colors but upgrade the yarn quality — a cotton or cotton-blend yarn gives crisp color transitions with no halo bleed between bands. Add a small embroidered smile and two tiny pink felt or yarn cheek circles between the eyes and mouth. The face reads as kawaii rather than classic, which photographs better and appeals to a younger audience. Use the 11mm eyes at the larger end to make the face feel proportionally bigger and more expressive.
- Moody and unusual: Replace the classic palette with a near-black deep purple at the base (instead of white), a dusty terracotta through the middle (instead of orange), and a muted mustard at the top (instead of bright yellow). The shape still reads as candy corn but the color story is autumnal rather than candy-bright. No face at all on this version — plain, stuffed, no eyes — and suddenly it looks like serious decor rather than a craft project. This is the version that gets photographed on a marble surface for Pinterest and surprises people.
One underused option: make the three sections different heights by adjusting how many rounds you work in each color before the color change. More rounds in orange, fewer in white, gives a silhouette that feels slightly abstract and modern rather than literal.
Colourways
- Original Classic: White, orange, yellow. No notes needed — it works exactly as designed.
- Autumn Muted: Cream (instead of white), burnt sienna or rust (instead of orange), golden ochre (instead of yellow). Same proportions, warmer and less candy-bright. Sits beautifully on wood surfaces and in terracotta bowls.
- Pastel Halloween: Pale lilac, soft coral, light butter yellow. The candy corn silhouette in pastel reads as Halloween-adjacent without being loud — useful for spaces where you want seasonal nods rather than full Halloween commitment.
- Monochrome Night: All worked in shades of one color — charcoal at the base, mid-gray in the middle, light silver at the top. This is a display piece for people who decorate in neutrals and still want something seasonal. The shape carries the whole read on its own.

Display Ideas
- A single candy corn sits well on a desk or bookshelf as a small seasonal marker that doesn’t take over the space. For a larger display impact, group three or five in a shallow wooden bowl or a small wicker basket with some dried corn husks — odd numbers always look less staged than even ones, and the variety of sizes if you’ve made them at different yarn weights helps.
- A row of five along a mantel, graduated from large to small, reads as an intentional display rather than a random grouping. On a tiered tray, one candy corn per tier next to a small pumpkin or a battery tea light works better than clustering everything on one tier.
- These are small enough to use as actual package toppers tied on with a loop of orange twine, which is particularly effective if you’re handing out handmade gifts in October.
After the Season
Store loosely — the rounded shape can get dented if packed tightly against harder objects in a box. A clean cotton pillowcase or a large zip bag with room to breathe works well. The white yarn section is the most vulnerable to yellowing over time if stored in light; a dark drawer or closet shelf is better than a windowsill box. Candy corn is a long-season decor piece — it works from early October and some people leave it up through November alongside harvest decor — so don’t rush it into storage the moment Halloween passes.


