Free Halloween Crochet Plushie Pattern – Make A Dozen Before Halloween
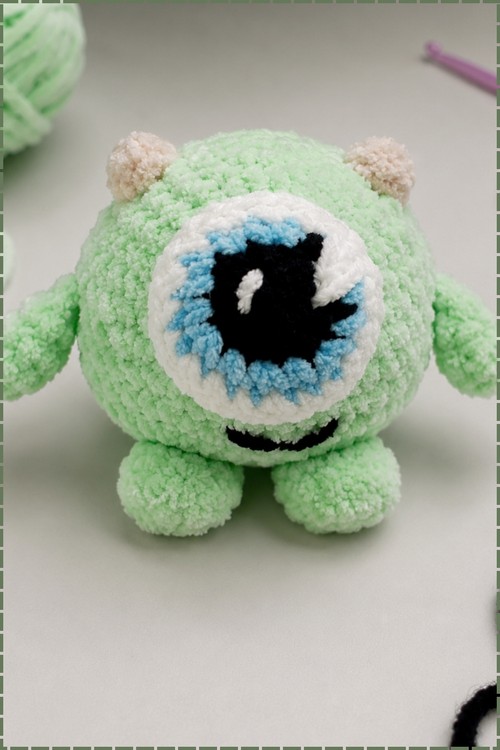
Make the most iconic little monster this Halloween with this Halloween Crochet Plushie pattern! This adorable Mike Wazowski amigurumi is perfect for Monsters Inc. fans of all ages and works up fast and makes the cutest desk buddy, trick-or-treat bag charm, or spooky season gift. One eye, one hook, endless fun! Save this pin before Halloween sneaks up on you!
One-eyed monster amigurumi have a design challenge that most other characters don’t — getting a single oversized eye to read clearly and stay centered while still looking expressive. This halloween crochet plushie pattern solves it by building the eye in layered pieces, working outward from a black center through blue and white rings that give it real depth and dimension.
Halloween Crochet Plushie

Countdown Block
- Single unit: 2–2.5 hours including assembly. Batch of twelve: plan 20–24 hours total — arms and legs go fast in assembly-line runs, but the eye takes genuine time per unit. If today is October 24th, you can still finish twelve by the 31st if you’re doing two or three evenings of 3–4 hours each. Cut it any closer than October 28th and you’re making six, not twelve.
- When the request is twelve identical pieces by a deadline, the pattern matters less than the sequence. This post is built for volume — one-unit instructions first, then an assembly-line running order at the end so you can batch efficiently without losing your place.
- Mike Wazowski is a deceptively efficient make: one large piece (the body/head combined), two small arms, two tiny legs, and one layered eye. No separate head to stuff and attach. That single-sphere construction is why he works so well for batch runs.
What You’ll Make
Pieces per unit:
- Body (worked in the round, includes horn bobble stitches): 1 Arms: 2 Legs: 2 Eye (three-color layered circle): 1
- Total pieces per unit: 6 Total pieces for twelve units: 72
Materials
- Yarn: Green (main), Brown (horns), White (eye sclera + shine embroidery), Blue (iris), Black (pupil + smile embroidery)
- Hook: 4.5 mm Notions: Stitch marker, yarn needle, scissors, polyfill stuffing
- Yarn estimate for twelve units: approximately 35–40 m green per unit (420–480 m total), 3–4 m brown per unit, 6–8 m white, 4 m blue, 3 m black. Wind off small bobbles of brown before you start — switching mid-round for bobble stitches is where people lose count.
The Pattern
Body
The body and head are worked as one continuous sphere. Mike’s silhouette is almost perfectly round, which means your shaping has to be clean — lumpy increases in the early rounds will show on the finished piece.
- Round 1: Magic ring in Green, ch 1, 5 sc into ring, pull tight. (6 sts) Round 2: Inc in each st around. (12 sts) Round 3: (1 sc, inc) × 6. (18 sts) Round 4: (2 sc, inc) × 5, 1 sc, begin inc but change to Brown on final pull-through. (24 sts)
Shape checkpoint: By round 4 this should sit like a shallow dome, roughly 4 cm across. If it’s cupping too steeply the tension is too tight; if it’s flopping flat, loosen up.
- Round 5 (horn round): Bobble stitch in Brown (5 dc joined together in one stitch). Switch back to Green on final pull-through. 2 sc, inc, 3 sc, inc, 1 sc, change to Brown on next sc. Bobble stitch in Brown. Switch back to Green. Inc, (3 sc, inc) × 2. Fasten off Brown. (30 sts)
The two brown bobbles sit opposite each other and become Mike’s horns. After this round the sphere will look a bit uneven — that’s correct, the horns stick out.
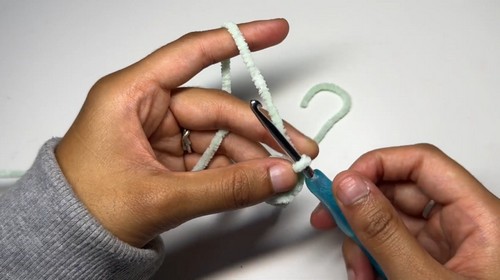
Never read a crochet pattern before? No problem! The video tutorial below is perfect for beginners, or give the written pattern below a try!
- Round 6: (4 sc, inc) × 6. (36 sts) Rounds 7–12: 1 sc in each st around, 6 rounds total. (36 sts each round)
Shape checkpoint: After round 12 the sphere should be at its widest. It should feel almost like a golf ball — firm and round, not pear-shaped. If it’s narrowing at the top already, count back.
- Round 13: (4 sc, inv dec) × 6. (30 sts) Round 14: (3 sc, dec) × 6. (24 sts) Round 15: (2 sc, dec) × 6. (18 sts) Round 16: (1 sc, dec) × 6. (12 sts)
- Stuff firmly here — Mike’s round shape collapses if you understuff. The body should feel solid, not squishy.
- Round 17: 6 dec around. (6 sts) Fasten off, leaving a long tail. Weave tail through front loops of remaining 6 sts, pull shut, knot, hide end inside.
Arms (make 2)
- Round 1: Magic ring in Green, ch 1, 5 sc into ring. (6 sts) Rounds 2–3: 1 sc in each st around. (6 sts)
- Flatten the tube so you have 3 sts per side. Crochet through both layers across the top to close. Fasten off with a long tail for sewing.
Arms stay unstuffed and flat. They’re small enough that stuffing creates an awkward stiffness.
Legs (make 2)
- Round 1: Magic ring in Green, ch 1, 5 sc into ring. (6 sts) Round 2: Inc in each st around. (12 sts) Round 3: (2 sc, dec through front loops only) × 3. (9 sts)
- Round 4: Dec in first 2 sts, 7 sc. (8 sts) Round 5: 1 sc in each st around. (8 sts)
- Fasten off with a long tail. Lightly stuff before sewing — just enough to hold the rounded foot shape, not enough to make them hard.
Shape checkpoint: After round 2 this should look like a flat disc. After round 3 the edges should begin to fold up into a foot shape. If it’s still completely flat, the front-loop decreases may not have pulled tight enough.
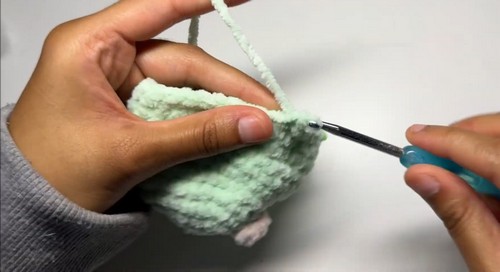
Eye (three-color layered circle)
- Pupil (Black): Magic ring, ch 1, 5 sc. (6 sts) Inc in each st around. (12 sts) Change to Blue on final stitch.
- Iris (Blue): Inc in each st around. (24 sts) Change to White on final stitch.
- Sclera (White): (2 sc, inc) × 8. (32 sts) [CHECK — final count unclear; source states this round but doesn’t give a number explicitly] Slip st to close. Fasten off with a long tail.
The eye is the most time-consuming piece per unit. In a batch run, complete all 12 pupils first, then all 12 irises, etc. The color changes are quick once you’re in the rhythm.
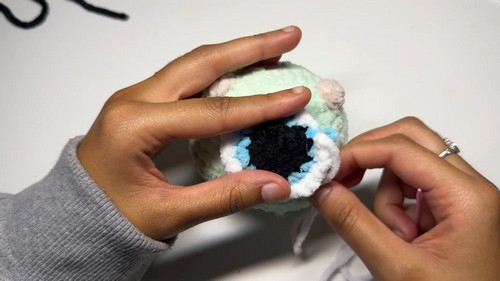
Assembly
- Order matters: Eye first, then arms, then legs, then embroider the smile.
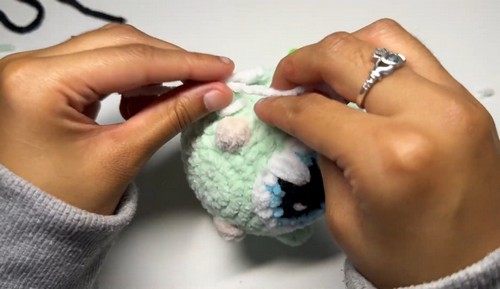
- Eye: Pin to the upper-middle front of the body, centered horizontally between the two horn bobbles. Sew all the way around before moving on — a loose eye shifts during the arm attachment. Using a separate length of White yarn, embroider 2–3 small vertical stitches on the upper edge of the black pupil for the shine marks.
- Arms: Attach at rounds 9–10, angled slightly forward (not straight out to the sides). Pin both before sewing either — symmetry is much easier to check when neither is committed yet.
- Legs: Sew onto the bottom of the body, positioned roughly below the horn bobbles so Mike stands aligned. Stuff lightly if you haven’t already.
- Smile: Single strand of Black yarn. One simple curved or straight-ish line just below the eye. Tie off and bury both ends.
The Character Dial
- Mike reads immediately at his most literal — bright green, one giant eye, brown horn bumps. But the design has more range than it looks.
- Creepier direction: Swap the bright green for a muted sage or army green. Embroider the smile as a jagged line rather than a curve — uneven, slightly lopsided. Use black yarn for the shine marks instead of white, so the eye looks darker overall. Consider a charcoal or deep plum bobble stitch for the horns instead of brown. The result reads less “Monsters Inc. character” and more “genuine creature.”
- Softer direction: Work the iris in a lighter cornflower blue or lavender. Add two small circles of pink yarn embroidery on either side of the eye for rosy cheeks. Use an off-white or cream for the sclera instead of stark white — it softens the whole face. Make the smile more of a gentle U than a flat line.
- Halloween-specific move: A small orange ribbon or yarn bow at the base of the body photographs extremely well in flat lays. Takes thirty seconds and immediately reads seasonal even on the non-spooky version.
- The detail most people miss: the exact placement of the shine marks on the pupil changes the whole expression. High and centered reads happy. Off to one side reads curious or slightly alarmed. Lower and smaller reads tired. Worth experimenting with even if everything else stays identical.
Safety Eye Timing
- The eye on this pattern is fully embroidered/sewn rather than a safety eye insert, which makes it safer by default. There are no plastic components to detach.
- That said: if you’re adding any embellishments (ribbon, buttons, decorative stitching with loose tails) to units going into treat bags, party favors, or classrooms, check every tail is buried completely and can’t be pulled free. For children under three, confirm there are no loops or yarn lengths loose on the exterior — even embroidered shine marks should be short and well-knotted.
Stuffing Note
- The body needs to be stuffed firmly — Mike’s silhouette is what makes him recognizable, and a soft-stuffed version loses the round profile. Push stuffing in before round 16 and don’t be conservative. The legs get a light fill just to hold foot shape. Arms stay flat and unstuffed.
- Over-stuffing shows most at the closing rounds: if the last 6 stitches are straining to pull together, there’s too much inside. Pull a small amount out before finishing.
Colourways
- Classic read: Bright Kelly green / chocolate brown / white / cobalt blue / black. Exactly as designed.
- Autumn field version: Olive or moss green / rust orange bobbles / cream sclera / amber iris / dark espresso smile. Loses the character reference but reads beautifully in October flat lays.
- Monochrome Halloween: Charcoal grey body / black bobbles / pale grey sclera / no iris color change (all black eye). Genuinely eerie. Works as a shelf piece rather than a character plushie.
- Pastel party version: Mint green / caramel bobbles / white / sky blue / black. Reads younger, less spooky, better for non-Halloween gifting in the same batch run.
Display Ideas
Grouped in threes on a tiered tray, these hold their shape without risers. A single unit fits perfectly in a small terracotta pot with tissue paper — instant Halloween desk decor. For a mantel, cluster five or six at varying heights using small wood slices or upturned mason jar lids as platforms. As bag clips or zipper pulls (add a jump ring through the top closing stitch), they double as party favors that won’t get lost in the bottom of a tote.
After the Season
Store in a breathable cotton bag, not an airtight container — polyfill compresses permanently if packed under pressure for months. A quick steam (not direct iron contact) will re-fluff any flat spots before next October. Keep brown and green yarns from the same dye lot together in the bag in case you need to make repairs.
Assembly-Line Running Order (Batch of 12)
This is where batch-making actually saves time. Work all identical pieces before switching, never one complete unit at a time.
- Station 1 — All 12 bodies. Rounds 1–17 in sequence. This is the longest station. Put on something to watch. Station 2 — All 24 arms (48 pieces if counting flatten-and-close step separately). They’re fast. Station 3 — All 24 legs. Slightly slower than arms due to the foot shaping. Station 4 — All 12 pupils (black layer only). Then all 12 irises. Then all 12 scleras. Do not attempt full eyes one at a time — the color change rhythm is what makes this fast. Station 5 — Assembly. Eyes first on all 12 bodies, then arms, then legs, then embroider all smiles. Station 6 — Embroidery pass. Shine marks on all 12 eyes in a single sitting.
- Time per unit once you’ve done three: approximately 90 minutes. The first two are slower while you calibrate tension and placement.
Quick Answers
- How much green yarn do I need for twelve? Budget roughly 420–480 m of green, plus small amounts of brown, white, blue, and black per unit. A standard 100m skein won’t cover twelve bodies alone — plan for five or six skeins of green minimum.
- Can I make these without the color-change bobbles and just embroider the horns? Yes. Surface embroidery with brown yarn in a French knot cluster works fine and eliminates the most technically demanding part of the pattern. The silhouette reads the same.
- What if my eye ends up off-center during sewing? Pin it in three places before you sew a single stitch — top, left side, right side. Check from directly in front before committing. Repositioning a half-sewn eye is genuinely miserable.