Free Crochet Frankenstein Amigurumi Keychain Pattern
Free crochet Frankenstein amigurumi pattern with a flat base so he stands upright on a shelf. Easy Halloween amigurumi keychain worked in simple sc rounds with an oval head, black hair strands, and tiny bolts. Quick to make in one evening. Great small Halloween decor or party favor.
Crochet Frankenstein Amigurumi Keychain Pattern

There’s a kind of Halloween decorating that doesn’t involve fake cobwebs or anything that plugs into a wall. A few small handmade things on a shelf, and that’s the whole plan. This little green fellow belongs to that category. He’s flat-topped, which sounds like a minor detail and isn’t — it means he stands upright on any surface without leaning or being propped against a candle. Worked in a fine yarn he’s keychain-sized. Worked in worsted he becomes a proper shelf piece. Either way he comes together in an evening: one oval head, a cap of black hair with strands falling over the sides, two flat ears, and two small bolts sitting low behind them.
Countdown Block
- One monster: 2½ to 3 hours the first time through, closer to 2 once the oval base stops fighting you. The head eats most of that. Everything else is small.
- A batch of six: 10 to 12 hours total. Spread across four evenings that’s comfortable. Across two it’s a slog, because the hair strands are fiddly and repetitive and your hands will tell you so.
- Last possible start date: One week out from Halloween for a set of six. For a single one, the night before is fine — start after dinner, finish before bed, and it goes on the shelf in the morning.
Small orange heads look best in odd numbers. That’s the first thing I noticed after making three of these: one on its own reads as a lost keychain, but a cluster on a shelf edge reads as a deliberate scene. The flat-topped head is the reason. It sits squarely on any surface without tipping, which is unusual for amigurumi, and it means this piece works as a standing object rather than something that has to slump against a candle or lean on a book.
The keychain ring is optional. Leave it off and you have a solid little decor piece for the six weeks of the year when a orange man with neck bolts makes sense in a living room.
Where It Actually Lives
Bowl filler. Three or four of them mixed with small gourds, black-painted acorns, and a few pinecones. The flat base keeps them sitting upright instead of rolling to the bottom, which is the usual problem with round amigurumi in a bowl.
Tiered tray, middle shelf. Give one the centre spot and surround it with candy corn or dried orange slices. Because he’s small and boxy, he doesn’t fight the other objects for attention the way a taller figure would.
Mantel edge, in a row. Space them evenly, all facing forward. The repetition is the effect. Five in a line looks intentional and slightly unsettling in a way one never manages.
Garland. Thread the keychain loops onto twine and alternate them with black felt bats or small white ghosts. Because the heads are firm and light, they hang straight without twisting.
Bag charm. The keychain ring on a tote or backpack through October. This is what the original construction is built for, and it holds up to being knocked around.
Desk or bookshelf. One sitting on top of a stack of books, facing out. Enough seasonal signal without committing to actual decorating.
Gift topper. Tie one to a ribbon on a wrapped box instead of a bow. It gets kept, which is more than most toppers manage.
Materials
- Light orange yarn (main colour, head and ears)
- Black yarn (hair)
- Grey or black yarn (bolts — the source lists white in materials but never uses it in the pattern; grey reads better against orange , black reads bolder)
- Black embroidery floss or thin black yarn (mouth and scar)
- Safety eyes, small — sized to your yarn
- Pink or coral yarn, or powder blush, for cheeks
- Fiberfill stuffing
- Yarn needle
- Stitch marker
- Keychain ring
The source works in a baby-fine yarn with a matching small hook. Go up to a worsted weight with a 3.5mm and you’ll get a piece roughly twice the size, which stops being a keychain and starts being a proper shelf object. Both are worth making.
Pieces List
| Piece | Quantity | Colour |
|---|---|---|
| Head | 1 | Light orange |
| Hair | 1 | Black |
| Ears | 2 | Light orange |
| Bolts | 2 | Grey or black |
Four piece types, six pieces total. Nothing here takes longer than fifteen minutes except the head.
The Pattern
A note before you start. This head is built on an oval base, and the stitch counts in the source drift once the increase rounds get going. I’ve written every round exactly as instructed and flagged the places where the running total doesn’t reconcile. Where you see a flag, trust the shape checkpoints and your own stitch marker over any number on the page. The oval logic is simple regardless: increases stack at the two rounded ends, plain sc runs down the two straight sides.
Head — Light Orange
- Round 1: Ch 8, plus 1 ch to turn. Starting in the 2nd ch from hook, sc in that ch and in each of the next 5 ch (6 sc). 3 sc in the last ch. Working back along the opposite side of the foundation chain: 6 sc, then 2 sc in the final stitch — the first sc you made completes this end as its third stitch. (18 sts) Mark your first stitch and move the marker every round.
- Round 2: Inc, 6 sc, inc 3 times, 6 sc, inc twice. (24 sts)
- Round 3: 1 sc, inc, 7 sc, (inc, 1 sc) 3 times, 7 sc, (inc, 1 sc) 3 times. [CHECK — this round calls for more stitches than round 2 produces; the count is unclear in the source. Work the increases at the two curved ends and plain sc along both straight sides, and let the piece stay flat.]
- Round 4: 2 sc, inc, 8 sc, (inc, 2 sc) twice, inc, 8 sc, then repeat the end sequence to match: (inc, 2 sc) twice, inc. [CHECK — running total unclear in source.]
- Round 5: 3 sc, inc, 9 sc, (inc, 3 sc) 3 times, 9 sc, then repeat the end sequence to match. [CHECK — running total unclear in source.]
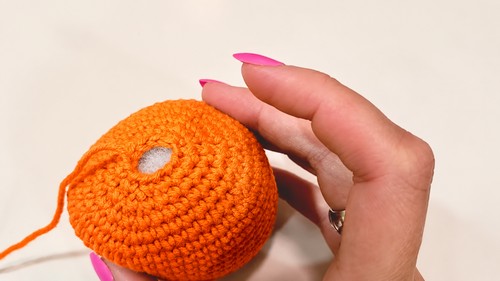
- Rounds 6–16: Sc in each st around. No increases, no decreases. Eleven straight rounds.
- Round 17: 3 sc, dec, 9 sc, (dec, 3 sc) 3 times, 9 sc, then mirror the end decreases.
- Round 18: 2 sc, dec, 8 sc, (dec, 2 sc) 3 times, 8 sc, then mirror.
- Round 19: 1 sc, dec, 7 sc, (dec, 1 sc) 3 times, 7 sc, then mirror. Start stuffing now, before the opening closes down.
- Round 20: Dec, 6 sc, dec 3 times, 6 sc, dec twice.
- Round 21: Dec, 3 sc, dec 3 times, 3 sc, dec twice. Fasten off leaving a long tail. (12 sts remain)
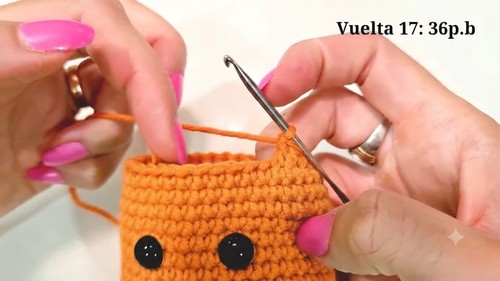
Closing: Stuff firmly. Thread the tail on a needle and run it through the front loop only of all 12 remaining stitches. Pull tight, knot off, and bury the tail inside the head.
Shape checkpoints — head
- After round 5, the piece should lie completely flat on the table like a small orange domino. If the ends are cupping upward already, you’ve stacked too many increases at the corners.
- Round 6 is where it changes. The walls kick up and the base stops being a disc. This is normal and immediate.
- By round 10 you should have a shallow open box with straight sides. If the sides are flaring outward like a bowl, a stray increase slipped in somewhere in rounds 6 to 9.
- By round 16 it’s a tall rectangle, open at the top, with two clearly flat faces — that flat front is where the eyes go.
- By round 19 the top corners have softened and the opening has pulled inward to a small oval. Stuff before this closes, not after.
Hair — Black
- Rows 1–5: Work exactly as rounds 1 through 5 of the head, in black. Slip stitch at the end of row 5 to finish the base.
- The base is now a flat black oval that should sit on top of the head like a cap. Check it against the head before you go any further — this is the moment to fix it, not after twenty strands are attached.
Long side strands: Ch 6, turn, and work 5 sc back down the chain starting in the 2nd ch from hook. Anchor with a slip stitch into the next stitch of the base.
Short front strands (bangs): Ch 4, turn, and work 3 sc back down the chain starting in the 2nd ch from hook. Anchor with a slip stitch into the next stitch of the base.
Work these around the edge of the black oval, alternating long strands at the sides and short bangs across the front. Leave a long tail for sewing.
Shape checkpoint — hair
The strands should hang, not stick out. If they’re pointing straight off the base like a sun, your chains are too tight — loosen the chain, not the sc.
Ears — Make 2, Light Orange
- Round 1: Magic ring with 6 sc. Slip stitch to close, ch 1. Fasten off, leaving a long tail for sewing.
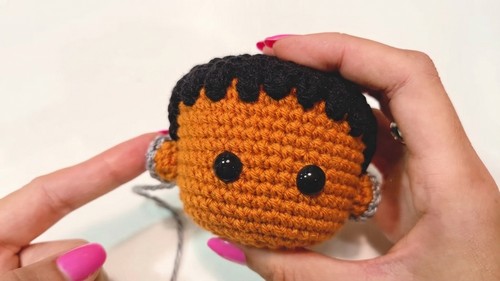
That’s the whole ear. It’s a flat orange disc and it isn’t meant to be more than that.
Bolts — Make 2, Grey or Black
- Round 1: Magic ring with 6 sc, working over the tail to hide it. (6 sts)
- Round 2: Sc in each st around. (6 sts)
- Round 3: (Inc, 1 sc) around. (9 sts)
- Round 4: Sc in each st around. (9 sts)
Finishing: Stuff lightly — barely at all. Weave the tail through the front loops of all 9 stitches and draw it in slightly, not fully closed. Leave a long tail for attaching.
Shape checkpoint — bolts
Each one should look like a tiny drum: flat top, flat bottom, straight sides. Over-stuffed, they turn into balls and stop reading as hardware.
Face
- Mouth: With black floss, stitch a straight or slightly curved line below the eyes. Keep it short. A wide mouth turns him friendly, which may or may not be what you want.
- Scar: A small cross-stitch on one cheek or on the forehead. Two crossing stitches, done.
- Cheeks: Pink or coral yarn worked in a small circle, or a fingertip of powder blush.
- Keychain: Thread the ring through the top centre of the head, knot securely on the inside, and weave in every remaining end.
Safety Eye Timing
- Insert the safety eyes between rounds 11 and 12, leaving 3 to 4 stitches between them. Do it while the head is still open and unstuffed. Once round 19 closes down you cannot reach the backs of the posts, and once it’s stuffed you cannot see what you’re doing.
- Wider spacing than you think looks right. Three stitches apart on a small head can read as cross-eyed, and 4 is usually safer.
For under-threes, skip the safety eyes entirely. Embroider two black French knots or two small satin-stitch ovals instead, positioned in the same place between rounds 11 and 12. Same for anything that leaves your house without you: treat bags, party favours, classroom sets, and anything going to a child you don’t know the age of. Safety eyes are rated as secure, but a backing washer that was seated slightly off is invisible from the outside and a small child will find it.
Stuffing
- Firm in the head, and specifically firm in the corners. The flat faces are what make this piece work, and under-stuffed corners round off and lose the boxy look immediately.
- Start stuffing at round 19 and add in small pinches rather than one large wad. Big clumps show through as lumps on the flat front, right where the eyes sit.
- Stop just short of the point where the stitches start to gape. If you can see fiberfill through the fabric, back off.
- The bolts take almost nothing — a shred of stuffing each, or none at all. Left soft they sit flat against the head. Firm they push out at an angle and look wrong.
- Ears get no stuffing. They’re flat discs and stay that way.
Assembly
Pin everything before you sew anything. All four pieces, in position, on the finished head. Look at it from the front, then from an angle. Move things. Then sew.
Order:
- Hair first. Sit the black base on top of the head with the strands falling toward the face and sides. Sew around the edge of the oval base. This sets the position for everything else.
- Ears second. Sew to the sides of the head, roughly level with rounds 6 to 8, sitting just below the hairline. Check they’re level by looking straight at the face, not by counting rounds on each side — the two sides rarely count the same.
- Bolts last. Directly beneath or slightly behind the ears, sewn on so the flat face of the drum sits against the head. They should look like they’re passing through the neck, not stuck on the side of the skull.
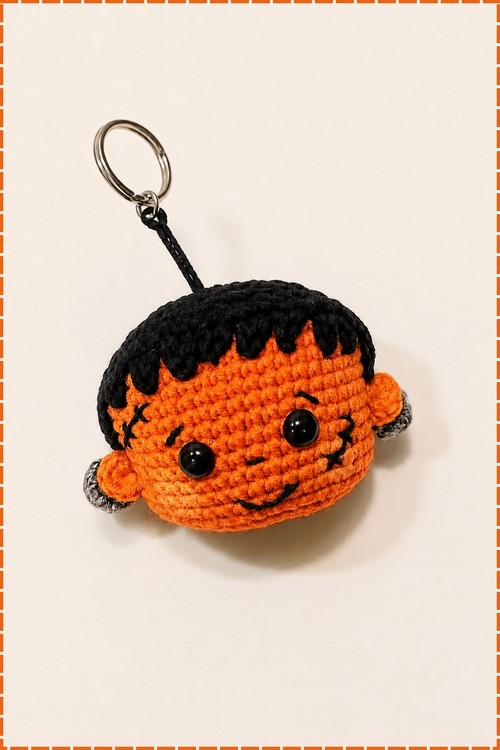
The bolts are the detail people get wrong. Placed too high they read as a second set of ears and the whole thing stops being Frankenstein’s monster. Low and slightly back is correct.
The Character Dial
This design sits comfortably in the middle. It can go either way with small changes, and the direction you push it changes where it belongs in the house.
Creepier
- Set the eyes uneven. One a full stitch higher than the other, or one noticeably larger. It’s a small change and it does more than anything else on this list.
- Drop the palette. Sage or olive instead of bright spring orange , charcoal instead of true black, no pink cheeks at all. A muted orange head reads as unwell rather than cute.
- Stitch the mouth as a row of vertical bars instead of a smile — five or six short black stitches crossing a horizontal line, like a sewn-shut seam. Extend it slightly past the width of the face.
- Add a second scar, longer, running from the hairline down across one eye. Use a running stitch with visible spacing rather than neat cross-stitches.
- Skip the ears. A head with bolts and no ears is noticeably stranger.
- Fewer, longer hair strands. Ch 8 or 9 instead of 6, spaced out with gaps showing the orange scalp beneath.
Sweeter
- Round the head. Add one extra increase round after round 5 and drop one straight round from the 6 to 16 section — the shape softens and stops reading as a slab.
- Bigger eyes, closer to 4 stitches apart, sitting slightly lower on the face. Low eyes read as young.
- Pink cheeks worked generously. Two full circles of coral yarn, not a dusting.
- A wider curved smile, ends turned up, positioned close under the eyes.
- Bolts in soft grey rather than black, or in a pale gold. They stop looking like bolts and start looking like buttons.
- Mint or pistachio instead of orange, with the hair in navy rather than black.
Colourways
- Sage and Charcoal. Muted grey-orange head, soft charcoal hair, dark grey bolts, no cheeks. This is the version that sits on a mantel next to real candles and dried eucalyptus without looking like it wandered in from a party supply aisle.
- Mint and Navy. Pale mint orange, deep navy hair, brushed silver bolts, coral cheeks. Reads modern and slightly retro. Good for anyone whose autumn decorating is more pastel than gothic.
- Bruised Plum. Deep purple-grey for the head, black hair, black bolts, and a scar embroidered in dark orange rather than black. Barely reads as a Frankenstein at first glance, which is the appeal.
- Bone and Rust. Off-white or bone head instead of orange, rust-orange hair, copper bolts, black stitching. Works with a warm autumn palette that doesn’t have any orange in it, and it slots into a Thanksgiving-leaning shelf as easily as a Halloween one.
- Classic Bright. Kelly orange, jet black, silver-grey bolts, hot pink cheeks. The one children pick every time.
After the Season
These store well because they’re small and firm. Wrap each one loosely in tissue paper and put them in a lidded box rather than a bag — the hair strands catch on everything and come out of a stuffed bag looking mangled. Don’t compress them under heavy boxes. Fiberfill takes a set if it’s crushed for eleven months and the flat faces you worked for will come out dented.
If a head has gone soft or slightly misshapen by next October, roll it firmly between your palms for a minute. That’s usually enough. If it isn’t, a light steam from a distance and a reshape by hand will bring it back.
Quick Answers
Can I make this bigger?
Yes, and it’s worth doing. Move to a worsted weight yarn and a 3.5mm hook and you’ll get something roughly double the size that stands on a shelf properly. The oval base gets much easier to read at that scale too, which helps if the increase rounds are giving you trouble.
My oval base is cupping instead of lying flat. What happened?
Too many increases too early, almost always in rounds 3 through 5. The ends of an oval need increases stacked in the same spots each round while the straight sides stay plain. If you spread increases along the sides as well, the whole thing curls up into a bowl before you’ve reached the wall rounds.
Do I have to use the keychain ring?
No, and for shelf pieces I’d leave it off. Without it you get a clean flat top that sits under a cloche or on a stack of books neatly. Add it only for the ones going on bags.