Chaengvely Crochet Amigurumi Free Pattern
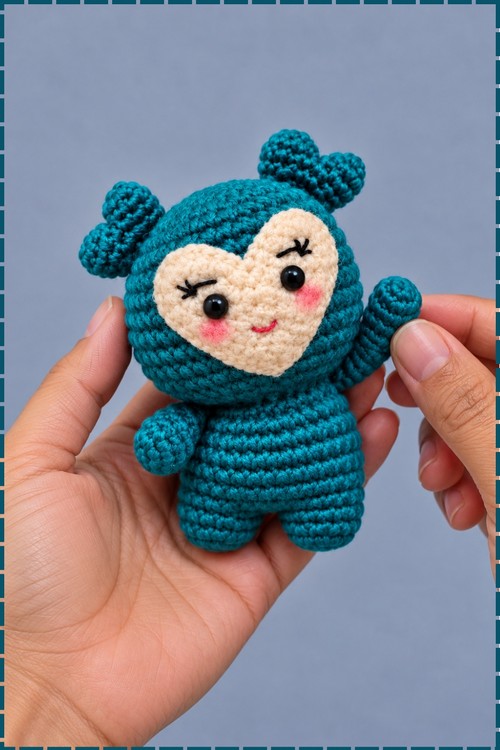
Once the cream heart face is stitched on, a crochet Chaengvely amigurumi stands on any desk on its own two short legs, no wire or base required. Teal suits it year round, while red turns the same chibi doll into a fist-sized Valentine.
Valentine gifting gets easier when the heart is built into the face, which is exactly what the Crochet Chaengvely Amigurumi does. February craft fairs sell these fast. Make a Crochet Chaengvely Amigurumi in red or pink for the season, or keep the teal and hand it over any time love needs saying out loud.
Crochet Chaengvely Amigurumi

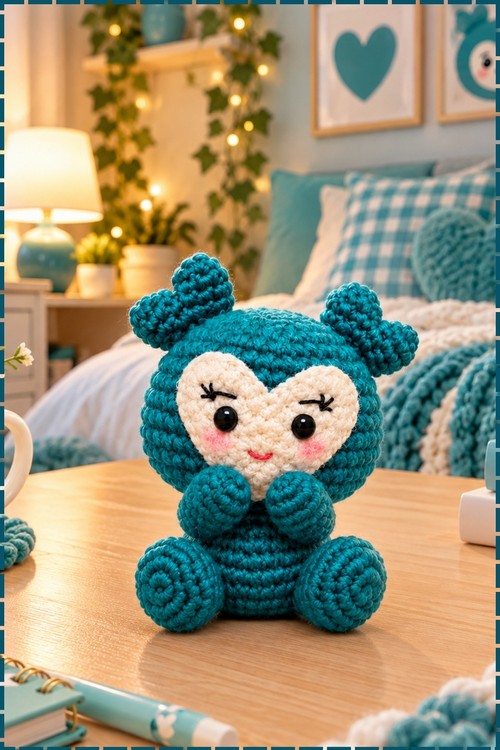
Head, body, arms and legs all grow from a single continuous piece, which means you never sew a torso onto a head or guess where the neck should sit. My crochet Chaengvely amigurumi came out in teal rather than red, with a cream heart shaped face panel crocheted separately and stitched on, two small bun ears sitting high on the head, and a tiny pink mouth that gives the face its expression. The whole doll fits in a closed fist and stands upright on its two short legs without any wire or base.
Why I Love This One
Every maker in my circle who has seen this one sitting on my shelf has asked what it is. There is something about the heart face shape that stops people mid conversation. It reads as a costume without needing a single sewn seam between the suit and the body underneath, and the teal reads beautifully against the cream centre. It is the kind of piece that photographs better than it looks in hand, which is a rare thing.
Materials And Tools
- Smooth DK or worsted yarn in teal for the body, head, arms, legs and ears
- Small amount of cream or off white yarn for the heart face panel
- Small amount of pink embroidery floss or thin yarn for the mouth and blush
- Black embroidery floss or thin yarn for the lashes and facial details
- White embroidery floss for optional highlight stitches on the eyes
- One pair of small black safety eyes
- Crochet hook, 3.0 mm
- Fiberfill stuffing
- Tapestry needle
- Scissors
- Stitch marker
- Fabric glue (optional, for securing the face panel)
Note: My piece uses a crocheted cream heart panel instead of the felt face background in the original pattern. The felt version remains a valid option if you prefer it.
Difficulty And Time
This one sits at intermediate level because of the arm partitioning at round 24, which requires reading the fabric rather than just following a number. Everything else is standard amigurumi. From my own run, the body took the longest session and the face the most patience, with the whole piece coming together in roughly three to four hours spread across two evenings.
The Pattern
Head And Upper Body
- Use teal yarn throughout the head and body.
- Round 1: make a magic ring (MR), chain 1, work 6 single crochet (sc) into the ring [6 sts]. The chain 1 does not count as a stitch here or anywhere else in this pattern.
- Round 2: increase (inc, meaning 2 sc in the same stitch) in every stitch around [12 sts].
- Round 3: (1 sc, inc) repeat around [18 sts].
- Round 4: (2 sc, inc) repeat around [24 sts].
- Round 5: (3 sc, inc) repeat around [30 sts].
- Round 6: (4 sc, inc) repeat around [36 sts].
- Round 7: (5 sc, inc) repeat around [42 sts]. The piece now lies as a flat disc; if it cups upward your tension is pulling too tight.
- Rounds 8 through 14: sc in all 42 stitches for 7 rounds [42 sts each round]. The sides build up into a dome here and the crown of the head takes shape.
- Round 15: (5 sc, decrease (dec)) repeat around [36 sts].
- Round 16: (4 sc, dec) repeat around [30 sts].
- Round 17: (3 sc, dec) repeat around [24 sts]. Begin stuffing the head firmly with fiberfill now, before the opening narrows further.
- Round 18: (2 sc, dec) repeat around [18 sts]. Add more stuffing if the head feels soft; pack it harder than you think necessary because it compresses under the face panel.

Lower Body Expansion
- Continue working in teal without fastening off.
- Round 19: (2 sc, inc) repeat around [24 sts].
- Round 20: (3 sc, inc) repeat around [30 sts].
- Round 21: (4 sc, inc) repeat around [36 sts].
- Round 22: (5 sc, inc) repeat around [42 sts].
- Round 23: (6 sc, inc) repeat around [48 sts]. The waist narrows at round 18 and then flares back out through these rounds, which gives the doll its distinct head to body silhouette.
Arm Partitioning And Main Body
- Fold the piece flat to find the natural sides of the body.
- Place stitch markers at each side, skipping 10 stitches on the left and 10 stitches on the right for the arm openings. You will have 28 stitches remaining across the front and back for the body.
- Round 24: sc in all 28 stitches around the main body section [28 sts]. Work only through these 28 stitches and ignore the 10 held on each side.
- Round 25: sc in all 28 stitches [28 sts].
- Round 26: sc in all 28 stitches [28 sts].
- Round 27: sc in all 28 stitches [28 sts].
- Round 28: sc in all 28 stitches [28 sts]. Add toy stuffing into the body section before you move to the legs. The ribbed look visible in my photo comes from the tension of working only around 28 stitches after the wider head, not from a stitch change.
Legs
- Divide the 28 body stitches into two equal parts of 14 stitches each.
First Leg
- Round 1: join teal yarn and sc in the first 14 stitches around [14 sts].
- Round 2: sc in all 14 stitches [14 sts].
- Round 3: sc in all 14 stitches [14 sts].
- Fasten off leaving a tail. Stuff the leg tightly so it holds its tube shape.
- Thread the tail onto a tapestry needle, weave through the back loops only (BLO) all the way around, pull tight to close the end, and weave the tail inside.
Second Leg
- Attach teal yarn to the remaining 14 stitches.
- Round 1: sc in all 14 stitches around [14 sts].
- Round 2: sc in all 14 stitches [14 sts].
- Round 3: sc in all 14 stitches [14 sts].
- Stuff, fasten off, and close using the same back loop technique as the first leg. Both legs in my photo sit forward and slightly apart so the doll balances without tilting.
Arms, Make 2
- Remove the stitch marker from one arm opening and attach teal yarn with a chain 1.
- Round 1: work 1 sc in each of the 10 stitches around the opening [10 sts].
- Round 2: sc in all 10 stitches [10 sts].
- Round 3: sc in all 10 stitches [10 sts].
- Fasten off leaving a tail. Stuff the arm lightly so it stays flexible rather than rigid.
- Weave through the back loops only to close the end, tie off, and hide the tail inside the arm.
- Repeat for the second arm opening. My arms sit angled slightly outward from the body, which you get naturally by not over stuffing.
Ears, Make 2
Part A
- Round 1: MR, chain 1, work 6 sc into the ring [6 sts].
- Round 2: inc in every stitch around [12 sts].
- Fasten off. This piece becomes the wider outer dome of the ear.
Part B
- Round 1: MR, chain 1, work 6 sc into the ring [6 sts].
- Round 2: sc in all 6 stitches [6 sts].
- Round 3: sc in all 6 stitches [6 sts].
- Do not fasten off. This narrower tube becomes the inner bun.

Joining Part A And Part B
- Insert your hook into Part A and sc across all 13 combined stitches [13 sts].
- Round 4: sc in all 13 stitches around [13 sts].
- Slip stitch into the next stitch, chain 1, and fasten off leaving a long tail for sewing.
- Make a second ear to match. In my photo, both ears sit on the very top of the head, one on each side, angled slightly outward so they read as buns rather than horns.
Cream Heart Face Panel
- Use cream yarn. Work a heart shaped piece large enough to cover the centre front of the head from just below the bun ears down to roughly the chin area.
- Start with a magic ring and increase outward in rounds until the piece reaches the right width for your doll, then shape the top into two humps and taper the base to a gentle point. Keep crocheting until the panel sits flat against the head without pulling or buckling.
- Fasten off leaving a long tail for sewing. Do not stuff the panel; it should lie completely flat.
- Place safety eyes through the face panel before sewing it down, positioning them in the lower half of the heart so the upper half frames the forehead.
Facial Details
- Attach the heart panel to the front of the head with the cream tail, catching the edge of the panel to the teal body all the way around. Use fabric glue under the panel if you want the edge to sit completely flat before you stitch.
- Embroider lashes above each eye using black floss, working four or five short diagonal strokes upward and outward from the outer corner.
- Embroider the mouth in pink floss as a small curved line just below centre on the panel, giving it a gentle upward lift at each end.
- Add small circles of pink on each cheek outside the lash line, worked in loose satin stitch, for blush. My piece has soft pink blush visible on both sides of the face.
Final Assembly
- Sew the two ears onto the top of the head using their long tails, one on each side just inside the crown, and anchor each one with several passes of yarn through the base so they sit upright.
- Check that the legs face forward and the arms angle out before you weave in the final ends. Both are impossible to adjust after the tails are hidden.
Customisation Ideas
- Keep the original red yarn for the classic Chaengvely look straight from the source.
- Try any solid colour for a general lovely costume doll without the specific character reference.
- Use a contrasting colour for the ears only to suggest hair buns in a different shade.
- Embroider closed eyes instead of using safety eyes for a sleepy face variant.
- Add a small chain loop between the ears and hang the doll from a bag strap or lanyard.
- Make the face panel in pale pink instead of cream for a warmer skin tone.
Troubleshooting
- If the arm openings pull tight after round 28, the partition likely caught an extra stitch. Count both groups of 10 before you start the body rounds.
- A face panel that buckles rather than lying flat usually means it is too large. Sew it down at several points around the edge rather than only the perimeter to hold the centre flat.
- Lashes that look too thick usually come from using full stranded embroidery floss. Split the floss to two or three strands and the lines stay fine.
- Ears that flop forward instead of standing need more stitches anchoring their inner edge to the head. One stitch at the base is rarely enough; use four or five.
FAQ
Can I use felt for the face panel instead of crocheting one? Yes, the original pattern calls for felt and it works well. Cut the heart shape, push the safety eyes through it, then glue and stitch it to the head. The crocheted version in my photo sits slightly more raised from the surface, which I prefer.
My body looks lumpy between the head and the lower section. What happened? The narrowing at rounds 15 through 18 and the re expansion at rounds 19 through 23 can gather unevenly if the stuffing was added too late. Stuff the head at round 17 as the pattern says rather than waiting until round 18 is done.
How do I keep both legs the same length? Count your rounds carefully on the second leg rather than eyeballing it against the first. Three rounds on 14 stitches is short enough that a single extra round makes a visible difference.
Is this safe for a child? With embroidered eyes rather than safety eyes, and every end woven securely inside, yes for older children. Safety eyes are not suitable for very young children without an adult present.