Crochet Christmas Decorations Peppermint Candy Amigurumi Pattern Free
Christmas trees look sweeter when the peppermint candy amigurumi hangs from a branch, its striped middle tied off with puffy ruffled wrapper ends. Red, cream and chocolate brown stripes let each crochet Christmas decoration play a different flavor across a wreath or garland.
Twisted ends and a striped middle make the Crochet Candy Christmas Decoration a good pick for anyone building out a tree with handmade ornaments. Beginners get a shape that forgives. Parents making a set with kids get quick wins. This candy Christmas decoration also suits crafters filling a gift basket with small handmade pieces.
Crochet Candy Christmas Decoration

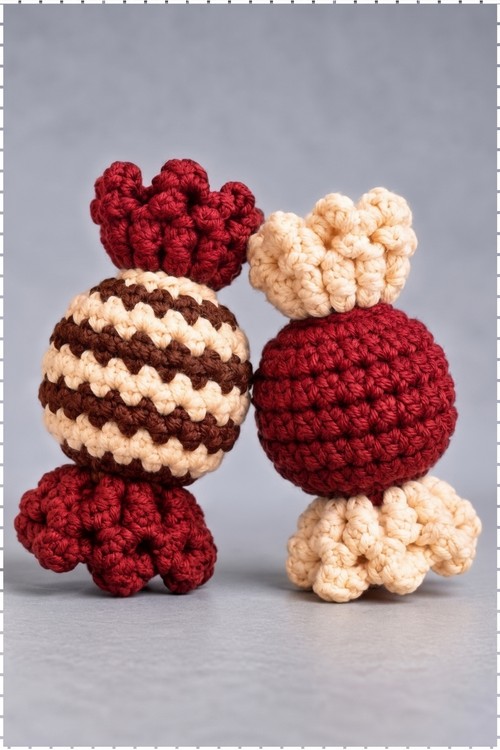
Eight short rounds build the whole body of this crochet candy Christmas decoration, which is why a pair of them takes barely an evening. Stripes come from changing colour on the last stitch of each round, so the fabric stays smooth with no jogs and no carried floats inside. Ruffled wrapper ends get worked directly into the surface loops at each tip once the body is stuffed and cinched. My set uses rust brown, cream and charcoal instead of the usual holiday green and red, which keeps the two candies looking like a matched pair on a table. Both use identical counts.
Materials and Tools
- Five strand milk cotton yarn in rust brown, cream and charcoal
- 2.5 mm crochet hook, or whatever gives you a dense fabric with your yarn
- Fiberfill stuffing
- Yarn needle and scissors
- Stitch marker if you lose track of round starts easily
Red and green work exactly the same way if you want the traditional version. My striped candy runs rust brown and cream with charcoal wrappers at both ends. My second candy is solid charcoal with cream wrappers at both ends, worked from the same rounds with the colour changes skipped.

Difficulty and Time
Beginner level. There is no shaping beyond one increase round and one decrease round, and the only fiddly part is keeping the colour changes clean. From my own making, one candy takes around forty five minutes to an hour, with the wrapper ruffles accounting for maybe fifteen minutes of that.
Technique Notes
- Change colour on the last stitch of the round, not the first stitch of the next one. Pull the new colour through the final two loops of that stitch and the stripe line stays straight instead of stepping up.
- Do not cut the colour you are dropping. Carry it up the inside of the work loosely and pick it up two rounds later, which saves a dozen ends on a striped body.
- Keep your hook small for the yarn. Dense fabric matters here because a stuffed ball in loose stitches shows white fiberfill between the stripes.
- Work the wrapper ruffles into the surface loops of a single round near the tip, not into the last round itself. The ruffle then stands out from the body rather than sitting flat along the end.
- Count your six ruffle repeats as you go. Five looks sparse and seven crowds the tip, and both are hard to spot until the piece is finished.
- Shape the candy with your fingers after cinching. Rolling it firmly between your palms rounds out any flat spot from the stuffing.
THE PATTERN
Candy Body
- Round 1: With rust brown yarn, make a magic ring (MR) and work 6 single crochet (sc) into the ring, then pull the tail tight to close the centre hole [6 sts]. Pull that tail properly now, since a gap here will show once the body is stuffed.
- Round 2: Work 2 sc in each stitch around, and on the last stitch stop with two loops on the hook and pull cream yarn through to finish it [12 sts]. Changing colour mid stitch like this is what keeps the stripe edge clean.
- Round 3: With cream yarn, work 1 sc then 2 sc in the next stitch, repeating that sequence 6 times around, and complete the final stitch by pulling through with rust brown [18 sts]. An increase here just means two single crochet in the same stitch.
- Round 4: With rust brown yarn, work 18 sc around and switch to cream on the last stitch [18 sts].
- Round 5: With cream yarn, work 18 sc around and switch to rust brown on the last stitch [18 sts].
- Round 6: With rust brown yarn, work 18 sc around and switch to cream on the last stitch [18 sts].
- Round 7: With cream yarn, work 18 sc around and switch to rust brown on the last stitch [18 sts]. At this point the body should read as an even barrel of stripes with no taper yet.
- Round 8: With rust brown yarn, work 1 sc then 1 decrease, repeating that sequence 6 times around, then fasten off leaving a tail long enough to sew with [12 sts]. A decrease is two single crochet worked together.
- For the plain charcoal candy in my photo, work rounds 1 to 8 exactly as written using charcoal throughout and skip every colour change.
Rounds 4 to 8

Stuffing and Closing
- Stuff the body firmly with fiberfill, pushing small amounts in at a time so the stripes stay evenly spaced. Underfilling is the most common problem here, since a soft candy loses its barrel shape and the ruffles droop.
- Thread the remaining tail onto a yarn needle and weave it through the front loops of all 12 stitches around the opening.
- Pull the tail tight to cinch the opening shut, tie off, then bury the end inside the body. Both tips should now look symmetrical before you add any wrapper.
Wrapper Ruffle, First End
- Attach charcoal yarn to the surface loops around one end of the candy body. On my striped candy both wrappers are charcoal, and on my plain charcoal candy both wrappers are cream.
- Work the ruffle sequence as follows: chain (ch) 3, work 2 double crochet (dc) into the same space, ch 3, then slip stitch (sl st) into the next stitch.
- Repeat that sequence 6 times around to form 6 wrapper flounces. Keep the chains loose so each flounce curls outward instead of pulling the tip flat.
- Fasten off and weave the end into the body.
Wrapper Ruffle, Second End
- Attach your wrapper colour to the surface loops around the opposite end of the candy.
- Repeat the same sequence 6 times around: chain 3, 2 dc in the same space, ch 3, slip stitch into the next stitch.
- Fasten off, weave all remaining ends inside the body, then squeeze and roll the candy into shape. Both my candies use the same colour at both ends rather than one white end and one red end.
- If you want a hanging ornament, attach yarn between two flounces and chain until the loop reaches your preferred length, then slip stitch back to the start. My pair sits loose on the table with no hanger.
Troubleshooting
- Stripes stepping sideways up the body usually means the colour change happened at the start of a round instead of in the last stitch of the previous one.
- Stuffing showing through means your hook is too large for the yarn. Go down a size and the fabric closes up.
- A lopsided cinch at the end comes from weaving through both loops instead of the front loops only, which drags the opening off centre.
- Flat ruffles usually mean the chain 3 sections were worked too tightly. Loosen them and the flounces stand up.
Yarn Substitution
Any smooth cotton or cotton blend in a light worsted weight behaves the same way. Cotton is worth using here because it holds the stripe edges crisply and the flounces keep their shape instead of flopping. Acrylic works but softens the ruffle. Avoid anything fuzzy, since the stripes blur and the wrapper detail disappears completely.

Customization Ideas
- Work the whole body in one colour and use a contrast only at the wrappers, as I did with the charcoal candy
- Alternate wide stripes by repeating each colour for two rounds instead of one
- Use metallic or sparkle yarn for the wrapper ruffles only
- Make a set of three in graduated tones for a bowl or a tray
- Add a chained hanging loop between two flounces to turn the candy into a tree ornament
- Scale up with chunkier yarn and a larger hook, keeping every stitch count as written
FAQ
Can I make the whole candy in one colour? Yes. Work all eight rounds in a single colour and ignore every colour change instruction. My charcoal candy is made exactly that way, with contrast only at the wrappers.
Where exactly do I attach the wrapper ruffles? Into the surface loops around the tapered end of the body, a round or two back from the cinched tip. Attaching directly into the closing round buries the flounces against the body.
Why does my candy look more like a ball than a candy? Rounds 4 to 7 are what create the barrel shape, so make sure you worked all four even rounds. Firm stuffing also helps, because a soft body rounds out and loses the straight sides.