
Free Crochet Christmas Gnome Pattern Amigurumi Free
Coffee tables and entry consoles look instantly festive with the crochet Christmas gnome standing guard, its tall green and cream striped hat dotted with leaves and brown berries. Lift that hat and the Christmas gnome amigurumi reveals a hidden spot for candy or a small gift, ready to join a gnome set or travel to a Secret Santa swap.
Grandmothers who collect gnomes will reach first for the leafy hat on the Crochet Christmas Gnome. The hat stands taller than the body, so the gnome holds its own on a mantel full of ornaments. Kids get one too, because a Crochet Christmas Gnome survives being carried around far better than glass baubles.
Crochet Christmas Gnome

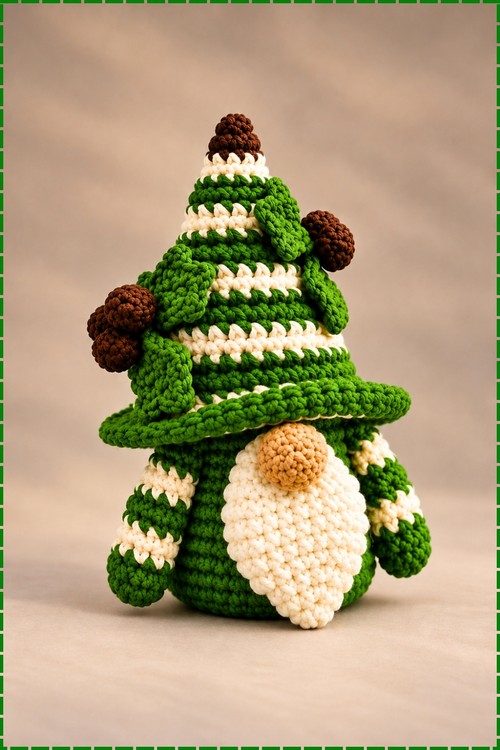
Crocheted around a small cylinder to hold its shape, this crochet Christmas gnome works as both a decoration and a secret gift box: the tall striped hat lifts off to reveal a hollow body that stores candy, a note, or a small trinket. My version uses green and cream alternating stripes throughout the hat and body, giving it a classic Christmas tree look. Striped arms end in dark brown bobble pinecones, a fat cream oval beard covers the front, and a small tan nose sits in the centre. A dark brown bobble crowns the very tip of the hat.
Materials and Tools
- Size 2 mm cotton yarn in green for the main body, hat, and arms
- Size 2 mm cotton yarn in cream or off-white for the stripes, beard, and brim
- Size 2 mm cotton yarn in tan or skin tone for the nose
- Size 2 mm cotton yarn in dark brown for the pinecone bobble hands and hat tip
- 3 mm crochet hook
- A small cylindrical container approximately 6 cm in diameter to act as the inner body structure
- Polyester fiberfill for stuffing the nose and arms
- Yarn needle and scissors
- Stitch marker
The container inside the base is what keeps the gnome standing upright and creates the hollow storage cavity, so choose one that fits snugly inside the finished body.
The Pattern
Body and Container Base
- Foundation: Starting with green yarn, begin with a magic ring (mr) or a chain foundation, then work continuous rounds of single crochet (sc) increases until the base matches the diameter of your chosen cylinder, approximately 6 cm across.
- Straight rounds: Once the base matches the cylinder, work even rounds of sc straight up, alternating green and cream stripes as in my photo, fitting the fabric snugly around the outside of the container until the body reaches your desired height; the finished body on mine reads as a short squat cylinder that sits level on a flat surface.
- Finishing the body: Fasten off and weave in the ends; the container inside provides all the structure needed.

Hat and Lid
- Foundation: Begin at the tip of the hat with a magic ring in green and work continuous rounds of sc, adding increases as you work downward to shape the classic pointed gnome hat taper, alternating green and cream stripes to match the body.
- Brim: As the hat widens toward the base, work a final round or two in the front loop only (flo) or with a targeted increase round to create the wide flat brim that overhangs the body when the hat sits as a lid; on my piece the brim is a distinct green stripe that flares out clearly above the cream beard.
- Hat tip: Using dark brown yarn, make a small bobble or tight magic ring circle and sew it securely to the very top point of the hat; mine sits as a neat dark round knot visible at the tip in the photo.
- Fit check: The hat should slide on and off the body opening cleanly; if it is too loose, work an extra decrease round just inside the brim; if too tight, add a small increase round.
Beard
- Shape: Work the beard as a flat oval or teardrop panel in cream yarn, starting from a magic ring and increasing evenly each round until it reaches a size that covers most of the front body from just below the brim line down to the base; on my piece the beard is a wide, full oval that takes up nearly the entire visible front of the body.
- Texture: Keep the stitches in smooth sc for the clean, rounded beard look visible in my photo; fluffy or loop stitch texture is optional if you prefer a shaggier look.
- Attachment: Sew the finished beard flat against the front of the body, centering it below where the hat brim sits when the lid is on.
Nose
- Work a small amigurumi sphere in tan yarn starting from a magic ring, increasing for a few rounds until the nose is a plump round disc, then work even rounds and close with decreases, stuffing lightly with fiberfill before cinching shut.
- Sew the nose to the centre of the beard, just above midpoint, so it nestles cleanly in the cream fabric; on my gnome it sits roughly where the eyes would be on a standard amigurumi, since there are no eyes on this gnome.
Arms (Make 2)
- Work each arm as a short tube in green and cream alternating stripes, sized to match the body proportions; start from a magic ring, increase for one or two rounds, then work straight rounds until the arm reaches your preferred length, stuffing lightly or leaving unstuffed.
- Pinecone hand: Using dark brown yarn, make a small bobble cluster or tight ball from a magic ring and sew it securely to the end of each arm; on my gnome both pinecone hands are visibly dark brown and distinctly round, attached at the tip of each striped arm.
- Sew the arms symmetrically to the sides of the body, positioning them roughly at mid-height so they fan outward as seen in the photo.

Holly Leaves and Berries (Optional)
- Holly leaves: Work small pointed leaf shapes in green yarn using a chain foundation and a few sc or half double crochet (hdc) stitches with picots at the tips for points; attach to the hat brim or body as a decorative accent if desired.
- Berries: Work small red bobbles or tight magic ring circles in red yarn and sew them in clusters of two or three alongside the holly leaves.
- On my gnome no holly leaves or berries are visible; this step is optional.
Tips
- Keep your stripe colour changes at the same spot each round so the jog lines up consistently on the back of the gnome rather than spiraling across the front.
- Test the hat fit on the container before finishing the brim; a brim that is too deep can make the hat hard to remove.
- Sew the beard on before the hat goes on for the last time so you can check the placement with the lid sitting naturally in position.

FAQ
- Does the container stay inside permanently? On my version the container sits loose inside the body so it can be removed for washing or swapped for a different size; a few tack stitches at the base secure it if you prefer.
- Can I make this without the container? Yes, stuff the body with fiberfill instead and it becomes a standard amigurumi gnome rather than a gift box.
- What stripe sequence did you use? The pattern does not specify exact round counts per stripe; I alternated one or two rounds of green with one round of cream throughout, matching the even stripe spacing visible in the photo.


