Crochet Christmas Dolls Free Pattern Amigurumi Gnome Set With Santa Elf And Grinch
Holiday guests stop to count the crochet Christmas dolls amigurumi, a round little trio of Santa gnomes and a green Grinch gnome in fuzzy chenille. Fluffy white beards, cozy scarves and tall pom pom hats give the Christmas gnome set real charm on a holiday table.
December shelves and mantels are where these crochet christmas dolls amigurumi belong, lined up beside the tree. Start them in autumn and the whole set is ready before the rush. Crochet christmas dolls amigurumi also work as advent gifts, one doll handed over each week, and a crochet christmas dolls amigurumi tucked into a stocking ends the season well.
Crochet Christmas Dolls Amigurumi

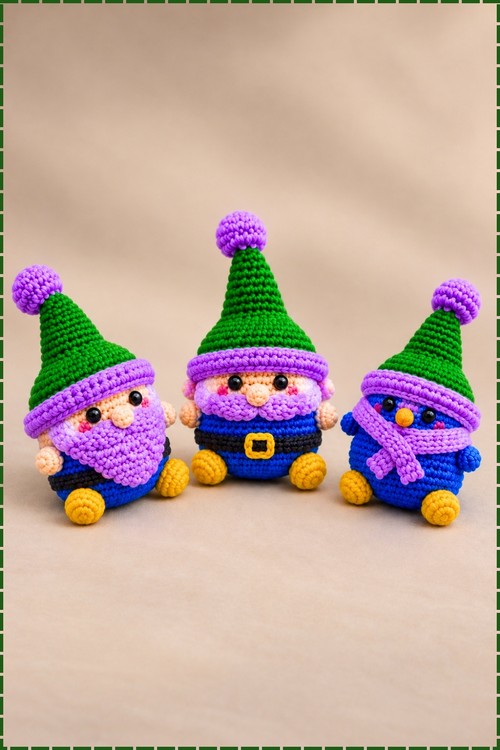
Stuffed bodies worked in chenille from a single magic ring grow into round, chubby gnome figures that sit up on their own once the bottom is sealed. Three characters share the same base pattern, and the hats, beards, scarves, and face details are what split them apart. My set recolors the whole trio away from classic Christmas red and green. Looking at them lined up on my table, two bearded gnome Santas in blue with purple beards flank a blue Grinch gnome in a purple scarf, all three wearing tall green hats with purple brims and little purple pom poms. Chenille gives the whole group a velvety, soft-focus surface.
Why I love this one: three characters from one body pattern means the second and third doll go faster than the first, and by the time you hit the third you barely have to think about the decreases.
Materials And Tools
- Chenille yarn in skin tone (peach), blue, black, yellow or gold, green, purple
- The Grinch body uses green yarn throughout in place of skin tone
- 2.5 mm crochet hook
- Polyester fiberfill stuffing
- Stitch marker
- Yarn needle
- Scissors
- Cosmetics blush for noses and ear tips
My version replaces the pattern’s red shirt color with blue across all three figures, and the pattern’s white hat brim with purple. The Grinch in my photo wears a purple scarf rather than a red one. Yellow is used for the hands, feet, and belt buckle on all three.
Abbreviations
- MR: magic ring
- st(s): stitch(es)
- sc: single crochet
- inc: single crochet increase, meaning 2 sc in the same stitch
- dec: single crochet decrease worked as an invisible decrease
- hdc: half double crochet
- dc: double crochet
- tr: triple crochet
- 4-tr CL: 4 triple crochet cluster
- FLO: front loop only
- sl st: slip stitch
- ch: chain
US terms throughout.
The Pattern
Part 1: Main Body Base (Make 3)
Color notes: Santa and Elf start with skin tone yarn. Grinch works the entire body in green with no color change for arms or hands.
- Round 1: make a magic ring and work 8 sc into it, then pull the ring tight. (8 sts)
- Round 2: work 8 inc around. (16 sts)
- Round 3: work [1 sc, 1 inc] eight times around. (24 sts)
- Round 4: work [2 sc, 1 inc] eight times around. (32 sts)
- Round 5: work 32 sc around. (32 sts)
- Round 6: work [3 sc, 1 inc] eight times around. (40 sts)
- Round 7: work 40 sc around. (40 sts)
- Round 8: work [4 sc, 1 inc] eight times around. (48 sts)
- Round 9: work 48 sc around, then change color to blue at the end of this round for the shirt. (48 sts) The embroider eyes will land on round 8, so take a moment to note where the midpoint of the face sits before moving on.

- Round 10: work 48 sc around in blue. (48 sts)
- Round 11 (Arms and Hands): work 15 sc in blue, switch to yellow and make 1 four triple crochet cluster for the first hand, switch back to blue and work 16 sc, switch to yellow and make 1 four triple crochet cluster for the second hand, then switch back to blue and work the remaining 15 sc to the end of the round. (48 sts) The two clusters sit opposite each other across the body and read clearly as little rounded fists in the finished doll.
- Rounds 12 to 13: work 48 sc around in blue for both rounds, then change color to black at the end of round 13 for the belt. (48 sts each round)
- Round 14 (Belt): work 48 sc around in black. (48 sts)
- Change back to blue at the end of round 14.
- Rounds 15 to 16: work 48 sc around in blue for both rounds. (48 sts each round)
- Round 17 (Feet): work 15 sc in blue, switch to yellow and make 1 four triple crochet cluster for the first foot, switch back to blue and work 16 sc, switch to yellow and make 1 four triple crochet cluster for the second foot, then switch back to blue and work the remaining 15 sc to the end of the round. (48 sts) Yellow feet against the blue body read as boots in my version, and they sit directly below the yellow hands when the doll faces forward.
- Round 18: work [4 sc, 1 dec] eight times around. (40 sts)
- Round 19: work [3 sc, 1 dec] eight times around. (32 sts)
- Round 20: work [2 sc, 1 dec] eight times around. (24 sts)
- Pause here and stuff the body firmly with fiberfill before the opening becomes too narrow to reach inside. Shape the doll in your hands as you stuff and make sure the base is flat enough to sit.
- Round 21: work [1 sc, 1 dec] eight times around. (16 sts)
- Round 22: work 8 dec around. (8 sts)
- Fasten off, weave the yarn tail through the front loops only of the remaining 8 stitches, pull tight to close the hole, and hide the tail inside the body.
Rounds 12 to 22
Part 2: Facial Details And Embellishments
Eyes And Nose
- Embroider black thread vertical stitches at round 8, spaced 6 stitches apart for the eyes. My dolls have black safety-eye style vertical stitches that sit centrally on the face.
- For the Santa and Elf nose: embroider 2-stitch wide horizontal wraps using skin tone yarn between the eyes, wrapping the thread around the center 2 stitches roughly 8 times to build a rounded nose shape.
- For the Grinch nose: embroider 2-stitch wide black horizontal wraps between the eyes in place of the skin tone wraps.
- For the Grinch eyebrows: using a darker green yarn, embroider angled eyebrows at round 6, placed 3 stitches apart.
- Apply a light sweep of cosmetics blush to the noses of Santa and Elf once all embroidery is done.
Elf Ears (Make 2)
- Attach skin tone yarn to the side of the head between rounds 7 and 9, approximately 5 stitches away from the eye.
- Chain 4.
- Starting from the 2nd chain from the hook, work 1 sc, 1 hdc, 1 dc.
- Slip stitch to the body at round 7, fasten off and weave in the ends.
- Apply a small sweep of cosmetics blush to the tip of each ear.
Belt Buckle
- Using yellow yarn, embroider a square buckle frame centered over 2 stitches on the black belt round (round 14). My dolls show a small square yellow buckle sitting centrally on the front.
Elf Collar
- Attach white yarn at the front of the body between round 9 and round 10.
- Chain 1 and work 1 sc in the same stitch.
- Skip 2 stitches, then work 2 dc, chain 1, and 2 sc between those 2 dc into the 3rd stitch to form one collar point cluster.
- Work 1 sc in the next stitch.
- Repeat the cluster and sc steps around for 12 point clusters total.
- Join with a slip stitch to the first stitch, chain 1, fasten off and weave in the end.
Santa Beard And Mustache
Beard:
- In white yarn, make a magic ring, chain 1, and work 7 hdc into the ring. (7 sts) Chain 3 and turn.
- Row 2: work 1 tr in the first stitch, 2 dc increase worked as 4 dc total, 1 dc, chain 1 and 1 dc in the same stitch, 2 dc increase worked as 4 dc total, then 1 tr in the last stitch.
- Edging: chain 5, starting from the 2nd chain from the hook work 4 sc, then work 3 sc into the side of the tr, 1 sc across the top row stitches, 3 sc into the chain 3 space, chain 5, starting from the 2nd chain from the hook work 4 sc, then slip stitch into the chain space and fasten off leaving a long tail.
- Pin and sew the beard to the body starting at round 8, placing it 5 stitches away from the eyes and wrapping it under the nose. My Santas have purple beards worked in purple yarn instead of white, which gives the doll its gnome look.
Mustache:
- In skin tone yarn, make a slip knot, then chain 4.
- Starting from the 2nd chain from the hook, work 1 sc, 1 hdc, then slip stitch into the last chain.
- Chain 4 again, starting from the 2nd chain work 1 sc, 1 hdc, then slip stitch into the 4th chain.
- Slip stitch into the first foundation chain, fasten off leaving a tail, and sew the mustache directly under the nose.
Part 3: Christmas Hat (Make 3)
- Round 1: in purple yarn, make a magic ring and work 6 sc into it. (6 sts) The tip of the hat starts in purple to match the pom pom color in my version.
- Round 2: work [1 sc, 1 inc] three times around. (9 sts)
- Round 3: work 9 sc around. (9 sts)
- Round 4: work [1 sc, 1 dec] three times around. (6 sts)
- Change color to green.
- Round 5: work 6 inc around. (12 sts)
- Rounds 6 to 7: work 12 sc around for both rounds. (12 sts each round)
- Round 8: work [2 sc, 1 inc] four times around. (16 sts)
- Rounds 9 to 12: work 16 sc around for all four rounds. (16 sts each round)
- Round 13: work [1 sc, 1 inc] eight times around. (24 sts)
- Round 14: work [2 sc, 1 inc] eight times around. (32 sts)
- Round 15: work [3 sc, 1 inc] eight times around. (40 sts)
- Round 16: work [9 sc, 1 inc] four times around. (44 sts)
- Rounds 17 to 19: work 44 sc around for all three rounds. (44 sts each round)
- Change color to purple for the brim.
- Round 20: work 44 sc around, then slip stitch to the first stitch and chain 2. (44 sts)
- Round 21 (Brim): working in front loops only, work 44 hdc around. (44 sts) Slip stitch to join, fasten off leaving a long tail. The brim in purple folds upward and frames the gnome face the way a hat band would.
- Fold the purple brim upward and sew the base of the hat securely onto the top of the head.
- Attach a small purple pom pom to the tip of the hat at the magic ring end.

Part 4: Grinch Scarf
- With purple yarn, chain 62.
- Starting from the 3rd chain from the hook, work 60 hdc across. (60 sts)
- Fasten off, fold the strip into a loop, and sew the two ends together to form a closed scarf loop. My Grinch wears the scarf looped around the neck with one end hanging down the front, as visible in the photo.
Customization Ideas
- Work the beards in any yarn color to shift the characters into gnomes, dwarves, or seasonal figures.
- Try a solid color hat with a contrast pom pom for a simpler read, or stripe the body rounds for a more patterned look.
- Make the scarf longer before joining the ends so it wraps twice around the neck.
- Swap the yellow feet and hands for the shirt color to simplify the color changes in round 11 and 17.
- Display the trio on a wooden slice, a mantle shelf, or a holiday wreath for a grouped scene.
Tips
- Chenille hides stitch detail, so count every round with a stitch marker rather than counting by eye. One missed increase throws the sphere off fast.
- Work the four triple crochet clusters slightly tighter than you think you need. Chenille is forgiving but loose clusters look shapeless at this scale.
- Sew the hat down at the brim all the way around rather than just at the front and back. A hat that lifts at the sides tips off every time the doll is handled.
- Stuff the hat with a small pinch of fiberfill before sewing it to the head if you want the cone to hold its shape fully upright.
- Make all three bodies before starting any of the face work, since embroidering the expressions is easier when the bodies are all done and you can compare placement across the set.

FAQ
Can I use regular acrylic yarn instead of chenille? Yes, and the stitches will read more clearly, which makes the face embroidery easier to place. The finished dolls will look more structured and less plush, which suits a sharper gnome style just as well.
Why does my four triple crochet cluster look flat instead of round? Triple crochets need height to cluster properly. Make sure each leg is worked to its full height before pulling through, and do not tighten too early. Pulling the final loop through all four legs at once while they are still upright is what gives the cluster its rounded shape.
How do I keep the beard from sliding out of position? Pin it in place before sewing and work the attachment stitches through both the beard and the body rather than just catching the surface. Running the tail through the body a couple of times and knotting it on the inside holds even the heavier chenille beard securely.
What size do the finished dolls come out? Mine stand roughly as tall as a closed fist using a 2.5 mm hook and fine chenille. Yarn weight and your tension will shift that, so treat it as a rough guide from my own set.