Crochet Capybara With Turtle Bag Amigurumi Pattern
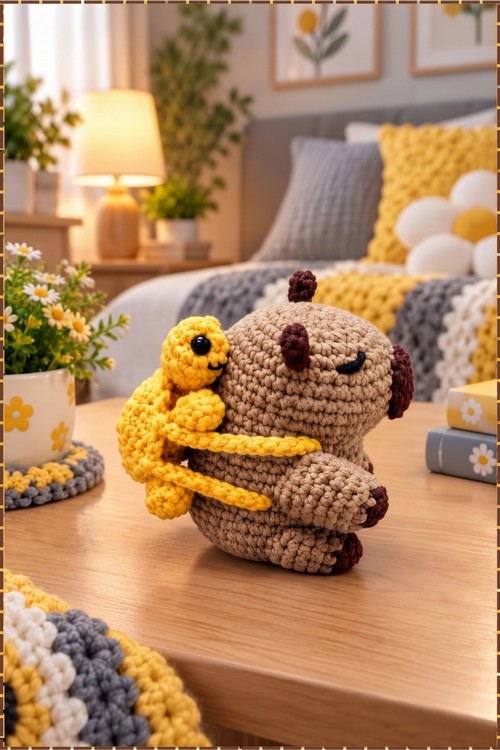
Animal lovers fall for the crochet capybara turtle backpack at first glance, a sleepy tan capybara giving a golden yellow turtle a piggyback ride. Dark brown ears and feet frame the capybara amigurumi, while the smiling turtle clings on with long dangling legs on any toy shelf.
Back to school season is when the Crochet Capybara Turtle Backpack starts showing up in pencil cases and on lunch bags. Summer camp send offs too. Work the Crochet Capybara Turtle Backpack up ahead of a birthday in autumn, or add it to a winter gift basket for a child who collects small animals.
Crochet Capybara Turtle Backpack

Continuous rounds from a six stitch magic ring build the entire capybara body, head and cheeks as one unbroken piece, so the only seaming happens when the arms, legs, ears, snout and turtle go on at the end. My version came out in slate grey for the capybara with dark brown accents on the ears, snout and limb tips, and a warm golden yellow for the whole turtle and its backpack straps. A single black safety eye on the turtle, closed embroidered arcs on the capybara, and the yellow straps crossing the grey back are what make this one look exactly like the internet loves capybaras: unbothered and carrying something.
Why I love this one: the turtle is a fully finished separate amigurumi that just happens to live on the capybara’s back. You end up making two small animals and one of them wears the other.
Materials and Tools
- Slate grey worsted weight yarn for the capybara body, head and cheeks
- Dark brown yarn in the same weight for the ears, snout, limb tips and eye embroidery
- Worsted weight yarn in golden yellow for the entire turtle and the backpack straps
- 3 mm crochet hook
- One small black safety eye for the turtle
- Dark brown yarn or embroidery thread for the capybara’s closed eyes
- Stitch marker, tapestry needle, fiberfill stuffing, scissors
- Hot glue optional for the turtle assembly
Difficulty and Time
This is an intermediate project because of the part count rather than the stitch complexity. Every individual piece is straightforward, but there are nine separate parts to make and one multi step assembly at the end. In my own experience the capybara body takes the longest, a couple of hours on its own, and the turtle and its four small legs add another hour or so. Assembly and finishing take as long again once all the sewing is in play. Treat those figures as rough guidance from my own making.
The Story of This One
I had the capybara body done and sitting on the table for two days before I picked up the yellow yarn for the turtle. Somehow the grey body alone looks completely finished, which is a sign the cheek expansion rounds are doing real work. Then the turtle went on and the whole thing clicked into being the thing everyone recognises from the capybara memes.
The straps are the last detail and they matter more than they look. Two chains crossing each other over the back and connecting at the shell are all it takes to read as a backpack, and once they are on the piece stops looking assembled and starts looking designed.
The Pattern
Capybara Body
- Round 1: 6 sc into a magic ring [6 sts]. An increase means 2 sc in the same stitch throughout this pattern.
- Round 2: 6 inc [12 sts].
- Round 3: (1 sc, 1 inc) x6 [18 sts].
- Round 4: (2 sc, 1 inc) x6 [24 sts].

- Round 5: (3 sc, 1 inc) x6 [30 sts].
- Round 6: (4 sc, 1 inc) x6 [36 sts].
- Rounds 7 to 14: 1 sc in each stitch around for 8 rounds [36 sts per round]. At the end of this section the piece is a long open cylinder and the top will become the head.
- Round 15: (4 sc, 1 dec) x6 [30 sts]. A decrease means an invisible decrease worked through the front loops of the next two stitches together.
- Round 16: (4 sc, 1 inc) x6 [36 sts]. This round expands back outward below the waist.
- Round 17: 15 sc, 6 inc, 15 sc [42 sts]. These 6 increases in a row are the cheek expansion and they push the sides of the face outward into the rounded jowl shape the capybara is known for.
- Rounds 18 to 20: 1 sc in each stitch around for 3 rounds [42 sts per round].
- Round 21: (4 sc, 1 dec) x5, then work remaining stitches to finish the round [35 sts].
- Round 22: 1 sc in each stitch around [35 sts].
- Round 23: (3 sc, 1 dec) x7 [28 sts].
- Stuff the head and body firmly with fiberfill now, while the opening is still wide enough to pack properly.
- Round 24: 1 sc in each stitch around [28 sts].
- Round 25: (2 sc, 1 dec) x7 [21 sts].
- Round 26: (1 sc, 1 dec) x7 [14 sts].
- Round 27: 7 dec [7 sts]. Fasten off leaving a tail, thread through the front loops only of the remaining 7 stitches, pull tight to close the bottom, and secure.
Rounds 16 to 27
Ears, Make 2
- Round 1: 6 sc into a magic ring in dark brown, close the ring, sl st to the first stitch, and fasten off leaving a yarn tail. These become small flat discs that sit near the top of the head.
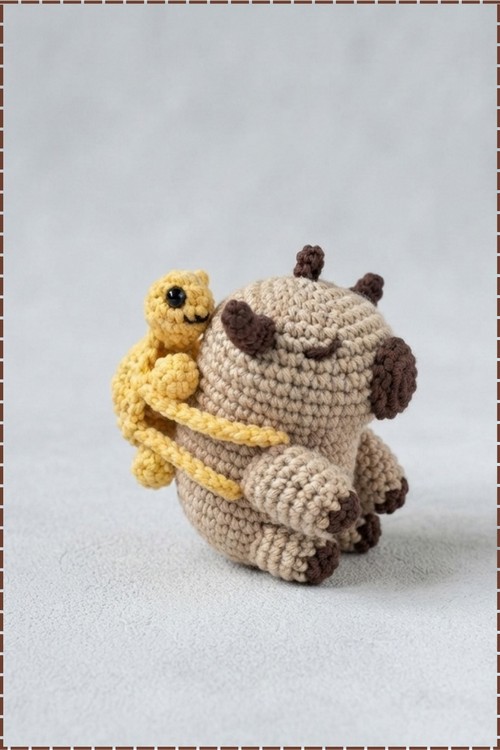
- Sew one ear to each side near the top corners of the head. In my photo the ears are small dark brown discs sitting high and slightly toward the back of the head.
Snout
- Round 1: 6 sc into a magic ring in dark brown [6 sts].
- Round 2: 6 inc [12 sts]. Sl st to the next stitch, fasten off leaving a tail to attach.
- Sew the snout centrally onto the lower front face area. Mine sits where the cheek expansion rounds create the widest point of the face.

Arms, Make 2
- Round 1: 6 sc into a magic ring using dark brown yarn [6 sts]. Switch to grey yarn on the last step of this round.
- Round 2: 6 inc [12 sts].
- Rounds 3 to 7: 1 sc in each stitch around for 5 rounds [12 sts per round].
- Press the opening flat so both layers align, then single crochet across both layers together for 5 to 6 stitches to seal it closed. Fasten off leaving a tail for sewing.
- Sew the arms to the sides of the body near rounds 14 to 15, angling them slightly forward.
Legs, Make 2
- Round 1: 6 sc into a magic ring in dark brown [6 sts].
- Round 2: (1 sc, 1 inc) x3 [9 sts]. Switch to grey yarn.
- Rounds 3 to 6: 1 sc in each stitch around for 4 rounds [9 sts per round].
- Press flat and single crochet across both sides to seal. Fasten off leaving a tail for sewing.
- Sew the legs angled slightly forward at the lower body. In my photo they point outward and down, which is what keeps the capybara sitting level.
Capybara Face
- Embroider closed eyes above the snout in dark brown. Mine are two short curved arcs worked as parallel lines on each side, giving the capybara its signature relaxed expression. Position them level with or just above the top edge of the snout.
Turtle Shell
- Round 1: 6 sc into a magic ring in golden yellow [6 sts].
- Round 2: 6 inc [12 sts].
- Round 3: (1 sc, 1 inc) x6 [18 sts].
- Round 4: (2 sc, 1 inc) x6 [24 sts].
- Round 5: working in front loops only, 1 sc in each stitch around [24 sts]. This FLO round is the pivot that separates the top dome from the under shell, and the back loops left behind are what you pick up next for the base.
- Round 6: working through both loops as standard, 1 sc in each stitch around [24 sts]. Sl st and fasten off golden yellow yarn.
- Under shell: attach golden yellow yarn to the back loops left over from round 5.
- Round 7: 1 sc in each back loop around [24 sts].
- Round 8: (2 sc, 1 dec) x6 [18 sts].
- Round 9: (1 sc, 1 dec) x6 [12 sts]. Stuff the shell lightly with fiberfill.
- Round 10: 6 dec [6 sts]. Sl st and weave the end in to close.
Turtle Head
- Round 1: 6 sc into a magic ring in golden yellow [6 sts]. My turtle head is golden yellow rather than white or light grey, matching the overall colour of the whole turtle.
- Round 2: (1 sc, 1 inc) x3 [9 sts].
- Rounds 3 and 4: 1 sc in each stitch around for 2 rounds [9 sts per round].
- Round 5: (1 sc, 1 dec) x3 [6 sts]. Sl st and leave a tail to attach.
- Attach the black safety eye to the head before sewing it onto the shell. One eye sits on the front of the turtle head as seen in my photo.
Turtle Legs, Make 4
- Round 1: 6 sc into a magic ring in golden yellow [6 sts].
- Rounds 2 to 5: 1 sc in each stitch around for 4 rounds [6 sts per round]. Sl st and fasten off.
- Glue or sew the head and all four legs onto the underside of the turtle shell.
Backpack Straps and Assembly
- Attach golden yellow yarn to one side of the turtle shell, then chain approximately 25 stitches or until the chain reaches comfortably across the capybara’s shoulder to the lower front, wrap it over the shoulder, and join to the bottom of the shell. Repeat on the other side. In my photo both straps cross the back in an X shape and the yellow reads clearly against the grey.
- Position the whole turtle assembly on the capybara’s back and sew or glue it in place so the straps hold it firmly.
Troubleshooting
- Round 17 places 6 increases together in a run and the resulting shape looks asymmetric at first. That is correct. The increase cluster becomes the wider cheek area once the body is stuffed and the later decrease rounds reshape it.
- The FLO round on the turtle shell is what makes the whole backpack construction work. Skipping it or working through both loops means there are no free back loops to attach the under shell to, and the dome will not close correctly.
- Pin every sewn piece in place and look at the piece from the front before committing any stitches. The arms, legs and ears need to be balanced on both sides, and with a round body it is easy to drift without noticing.
- Stuff firmly but not tightly enough to distort the shape. If the cheeks lose their rounded jowl shape after stuffing, the filling is packed unevenly.
Customisation Ideas
- Use the original colour scheme of light brown body, dark brown accents and green turtle with white and light grey turtle details for a more naturalistic palette.
- Swap the golden yellow turtle for any accent colour. Red or teal both work well against a neutral capybara body.
- Make the capybara in a solid colour without the dark brown limb tips for a simpler two colour version.
- Add a tiny flower or fruit on the capybara’s head, which is a well known version of this character.
- Leave the turtle legs off and simply sew the shell flat against the back as a less complex alternative.
FAQ
Why does round 15 decrease and round 16 increase back to the same count? Those two rounds together create a slight waist indentation between the body and the head section. Without them the piece would be a uniform cylinder from top to bottom and the capybara would lose its shape.
My cheeks look lumpy rather than rounded. What went wrong? Almost always the stuffing. The six consecutive increases in round 17 create a protrusion that only smooths out when the piece is packed firmly and evenly. Pack the cheek area first before filling the main body.
Does the turtle have to be removable? No. Mine is sewn on and the straps hold everything in place. If you want a removable turtle, skip the stitching and rely on the straps alone, attaching them with press studs or ties rather than sewing them down.
Can I use safety eyes on the capybara instead of embroidery? Yes. Insert safety eyes before round 23 while the opening is wide enough to fit the washers inside. The embroidered closed arcs in my version are just the style I chose for that relaxed capybara expression.