Crochet Ornament Ball Free Pattern Amigurumi
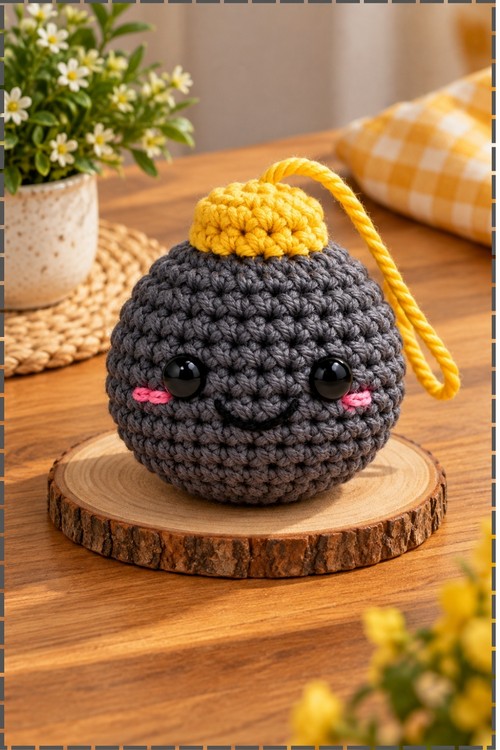
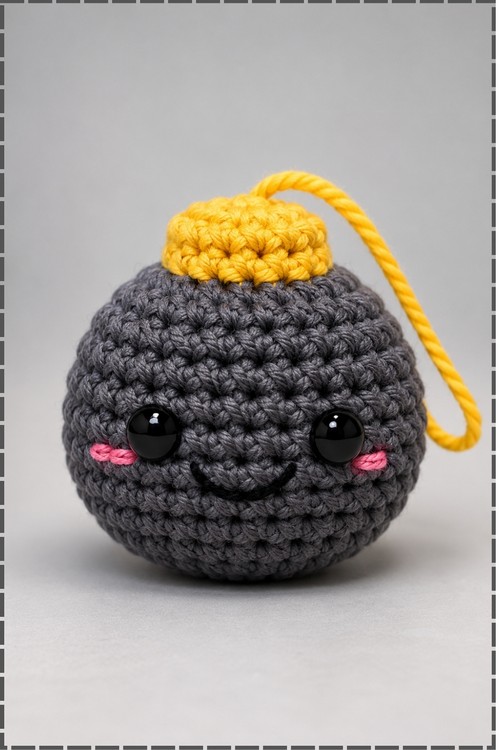
Unlike glass baubles, the crochet ornament ball amigurumi works from its yellow cap straight down into one seamless stuffed ball. A back loop ridge marks the cap, charcoal grey forms the body, and a smiling face with pink cheeks hangs from a yellow cord.
Hanging ornaments go up every December, and the Crochet Ornament Ball Amigurumi fills a branch better than glass because nothing shatters when it drops. Trees with toddlers underneath need exactly this. Make a batch in autumn while the evenings are long, and the Crochet Ornament Ball Amigurumi will be ready before the box comes down from the attic.
Crochet Ornament Ball Amigurumi

Work begins at the yellow cap and runs straight down into the ball without a single seam, which is why this crochet ornament ball amigurumi comes off the hook as one round piece. Back loop and front loop rounds create the ridge that separates the cap from the body. Safety eyes go in before the last decreases, since the opening closes for good after that. My version pairs charcoal grey with a bright yellow cap and a matching yellow hanging cord. One evening on the sofa was all it took from start to finish.
The Story Behind This One
I made the first of these in early December with leftover grey from a scarf, planning to hang it on a tree. It never reached the tree. It sat on the kitchen shelf through January because the little face looked too good beside the coffee tins. By February I had made three more in different colours, and the yellow capped grey one is still the favourite. Something about the sharp yellow against the flat charcoal makes it read like a small character rather than a decoration, and people pick it up every time they walk past.
Why I love this one: the whole thing is a single spiral of single crochet, yet the face makes it feel like a proper amigurumi friend.
Materials and Tools
- Medium weight yarn (weight 4) in charcoal grey for the ball and bright yellow for the cap and the hanging loop
- Scrap black yarn or embroidery floss for the mouth, and scrap pink for the cheeks
- 4.25 mm (G) crochet hook
- Two 10 mm black safety eyes with washer backs
- Fiberfill stuffing
- Yarn needle, stitch marker, scissors
Difficulty and Time
Easy, beginner friendly, and short. From my own making, the ball took about an hour and the face another fifteen minutes with pinning and fussing. Consider that experience based, because the embroidery is where most people slow down.
The Pattern
Ornament Cap
- Round 1: start with a magic ring or slip knot loop in yellow and work 6 single crochet (sc) into the loop, then pull the tail to close the ring. (6 sts) Close this ring hard, since the hanging cord exits right here and any gap will show.
- Round 2: work 6 increases, meaning 2 sc in each stitch around. (12 sts)
- Round 3: working in back loops only (BLO), sc in each of the 12 sts around. (12 sts) That back loop round creates the visible rim you can see around the base of my yellow cap.
- Round 4: sc in each of the 12 sts around. (12 sts) On the twelfth stitch, begin the sc, stop with 2 loops on the hook, cut the yellow yarn, tie on the charcoal grey tightly, and pull it through the last 2 loops to finish the stitch. Change colour mid stitch like this or you will get a stepped jog where the cap meets the ball.

Main Ball
- Round 5: working in front loops only (FLO), repeat (1 sc, 1 increase) 6 times around. (18 sts) Using only the front loops leaves the free back loops as a raised ridge that separates the cap from the body cleanly.
- Round 6: repeat (2 sc, 1 increase) 6 times around. (24 sts)
- Round 7: repeat (3 sc, 1 increase) 6 times around. (30 sts) The piece should now flare into a wide bowl shape.
- Rounds 8 to 12: sc in each of the 30 sts around for 5 complete rounds. (30 sts each round) These straight rounds are the widest part of the ball and they carry the face, so keep tension even here more than anywhere else.
- Round 13: repeat (3 sc, 1 decrease) 6 times around. (24 sts)
- Round 14: repeat (2 sc, 1 decrease) 6 times around. (18 sts)
- Round 15: repeat (1 sc, 1 decrease) 6 times around. (12 sts) Stop and do the eyes and stuffing before going any further.
Eyes and Stuffing
- Count down from Round 1 to find the space between Rounds 9 and 10.
- Insert the two 10 mm black safety eyes there, set 4 stitch holes apart so 3 visible stitches sit between them. On my ball this places them low and wide, which is what gives the round face its friendly look.
- Push the washer backs on firmly from inside, since they cannot be removed once seated.
- Push a small amount of fiberfill up into the cap first so the yellow top keeps its shape.
- Stuff the main body moderately firm until it holds a true round shape. Over stuffing stretches the stitches apart and lets grey fibres show white underneath.
Closing Round
- Round 16: work 6 decreases around. (6 sts)
- Slip stitch into the next stitch and fasten off, leaving a long yarn tail for closing and for the hanging loop.
Face Embroidery
- Use 2 strands split from medium yarn, or embroidery floss, in black for the mouth.
- Bring the thread through the open bottom hole and up to a point 1 stitch below one eye at a 45 degree angle.
- Stitch down to a centre stitch one row below, then back up to the other eye. On my ball I pulled this into a soft curved smile rather than a sharp V, by keeping the centre stitch shallow and easing the two arms outward.
- Tie the thread ends off inside the bottom hole.
- Using pink yarn or floss, come up through the bottom hole again and work 1 horizontal stitch to the outside corner of each eye for the cheeks. Mine sit right against the eye edge and slant slightly downward.
- Tie the pink ends off inside the bottom as well.
Closing and Hanging Loop
- Add a little extra stuffing into the bottom to cover the tied off ends.
- Thread the long tail on a yarn needle, weave through the front loops only of the remaining 6 stitches, and pull tight to close.
- Knot to secure, then run the remaining tail straight up through the centre of the ball and out the top of the cap to form the hanging loop.
- My loop is yellow rather than grey, so I closed the bottom with the grey tail and made the loop separately. Cut a length of yellow yarn, thread it through the centre top of the cap, and knot the ends inside the ball before final closing, leaving the loop as long as you want it to hang.
Tips and Troubleshooting
- Mark the first stitch of every round. In a plain 30 stitch spiral it is very easy to lose your place.
- Place the eyes before any stuffing goes in, so you can reach the backs.
- Check the eye placement by holding the ball at arm’s length. Too high reads as startled, too low reads as sleepy.
- Keep the mouth small. A wide smile on a ball this size takes over the whole face.
- Work the grey tightly. Dark yarn over white stuffing shows every loose stitch.
Yarn Substitution
Any smooth worsted acrylic or cotton at 4.25 mm works. Cotton gives the crisp, matte stitch definition visible on my ball, while acrylic makes a lighter ornament that hangs better on a thin branch. Avoid fuzzy yarn, because the halo swallows the face. If your yarn runs thinner, drop to a 4.0 mm hook to keep the fabric tight enough to hide the stuffing.
Customization Ideas
- Swap grey and yellow for classic red and gold, or white and silver, for a traditional tree look.
- Leave the face off entirely for a plain ornament ball.
- Use a longer cord and hang it from a door handle, a rear view mirror, or a bag.
- Make a set of three in graduated colours and hang them at different heights.
- Add a tiny bell to the bottom closing knot so it rings when the branch moves.

FAQ
Can I use embroidered eyes instead of safety eyes? Yes, and it is the safer choice for a baby or toddler. Embroider two solid black ovals in the same position between Rounds 9 and 10, four stitch holes apart.
Why does my ball look egg shaped instead of round? Usually uneven stuffing, with too much packed toward the bottom. Fill from the cap downward in small pieces and roll the ball between your palms as you go.
How do I stop the hanging loop from pulling out? Knot both ends of the cord inside the ball before you close the bottom, so the knot sits under the stuffing and the pull is spread across the whole piece rather than one stitch.
My cap and ball do not have a clear ridge between them. What happened? Round 5 must be worked in front loops only. If you worked both loops, the ridge disappears and the colour change looks blurred.