Crochet Capybara Amigurumi Free Pattern In Brown
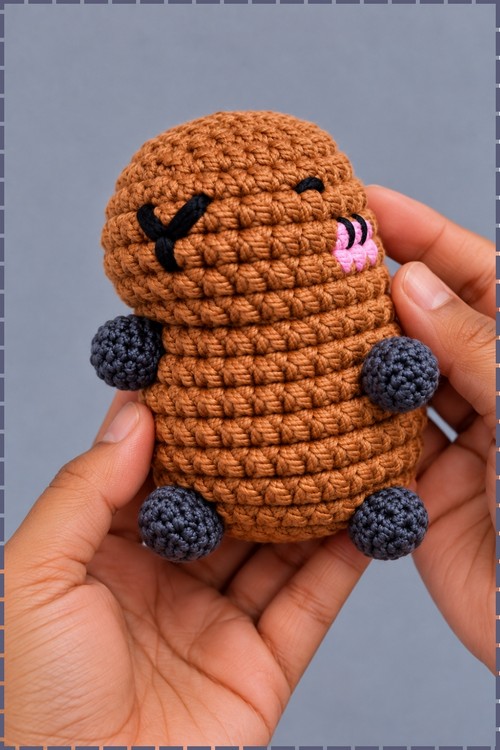
Almost the whole capybara amigurumi comes from one continuous strand of warm brown worsted, with only the two small ears worked apart. Dark grey popcorn paws, closed black eyes and a pink stitched snout finish a palm height figure that sits upright on its own.
Slow living fans and animal collectors are who the Crochet Capybara Amigurumi is really made for. Give it to a student in exam season, or a friend who talks about hot springs. The Crochet Capybara Amigurumi also lands well with anyone already deep into the capybara internet.
Crochet Capybara Amigurumi

An oval foundation chain rather than a magic ring starts this crochet capybara amigurumi, giving the base its signature elongated shape from the very first round. Popcorn stitches push four rounded paws outward from the body without any separate pieces to sew on. My version is warm brown throughout the body with dark grey popcorn paws, which gives the legs real contrast and weight. Closed black eyes and a pink embroidered snout complete the face. Everything except the two small ears comes from one continuous piece of yarn, which makes the construction cleaner than it looks.
Materials and Tools
- Worsted weight yarn in warm brown for the body and ears
- Worsted weight yarn in dark grey or charcoal for the popcorn paws
- Black yarn or embroidery thread for the eyes and nose outline
- Pink yarn for the snout embroidery
- Crochet hook to suit your yarn weight, stitch markers, fiberfill stuffing, tapestry needle, scissors, positioning pins
No gauge is given in the source pattern, so hook size and finished dimensions both depend on your yarn and tension. The photo shows the finished capybara sitting upright at roughly palm height.
Technique Notes
- The popcorn stitch, used here for all four paws, is made by working 5 double crochet into the same stitch, dropping the loop from the hook, inserting the hook into the top of the first double crochet of that group, pulling the dropped loop through, then chaining 1 to lock it. That closing chain is what makes the cluster pop outward. Keep your tension relaxed on the 5 double crochet or the popcorn will sit tight and flat rather than rounded.
- Working in joined rounds means every round closes with a slip stitch into the first single crochet and begins with ch 1. That chain does not count as a stitch. Placing the slip stitch into the chain rather than into the first single crochet is the most common error here, and it shifts the stitch count off by one in a way that is hard to track down later.
- When you reach a popcorn stitch on the following rounds, single crochet into its centre, not around it. Going around the popcorn lifts it free of the body and it will eventually migrate.
- Carry your grey yarn inside the body when you are not using it on the paw rounds rather than cutting after every popcorn. At this scale, four cut and woven ends in dark grey on a brown background will show through.
- The sc3tog on round 10 pulls three stitches down to one. Insert your hook into the next stitch and pull up a loop, repeat for the next two stitches, then yarn over and draw through all four loops. It is sharper than a standard decrease and is what gives the snout its squared shape.
The Pattern
Body
- Round 1: make a slip knot and ch 5, then starting in the 2nd chain from the hook work 3 sc, then 3 sc into the same stitch at the end of the chain to turn the corner, then working back along the opposite side work 2 sc and 1 increase into the final loop [10 sts]. Sl st to start, ch 1. An increase means 2 sc worked into the same stitch.
- Round 2: 1 inc, 2 sc, 3 inc, 2 sc, 2 inc [16 sts]. Sl st, ch 1.
- Round 3: 1 inc, 3 sc, then (1 sc, 1 inc) three times, 2 sc, then (1 sc, 1 inc) twice [22 sts]. Sl st, ch 1.
- Round 4: 1 inc, 4 sc, then (2 sc, 1 inc) three times, 2 sc, then (2 sc, 1 inc) twice [28 sts]. Sl st, ch 1. At the end of this round the base should be a flat oval with clearly defined long sides.

- Rounds 5 to 7: work 28 sc all the way around for each of three rounds [28 sts per round]. Sl st, ch 1 at the end of each round.
- Round 8: 1 sc, 1 inc, 7 sc, 1 dec, then (1 sc, 1 dec) twice, 8 sc, 1 inc, 1 sc, 1 inc [28 sts]. Sl st, ch 1. A decrease means sc 2 together. This round starts reshaping the snout end of the body.
- Round 9: 9 sc, 3 dec, 13 sc [25 sts]. Sl st, ch 1.
- Round 10: 9 sc, 1 sc3tog, 13 sc [23 sts]. Sl st, ch 1. The sc3tog pulls three stitches into one and gives the snout its squared front.
- Round 11: 5 sc, then work 1 popcorn stitch in dark grey for the first front paw, 2 sc, 3 inc, 2 sc, then work 1 popcorn stitch in dark grey for the second front paw, 9 sc [26 sts]. Sl st, ch 1. Push each popcorn toward you as you lock the closing chain so it sits on the front of the body.
- Rounds 12 to 14: work 26 sc all the way around for each of three rounds, single crocheting into the centre of each popcorn stitch as you reach it [26 sts per round]. Sl st, ch 1 at the end of each round.
- Round 15: 6 sc, then work 1 popcorn stitch in dark grey for the first back paw, 8 sc, then work 1 popcorn stitch in dark grey for the second back paw, 10 sc [26 sts]. Sl st, ch 1. In my photo the back paws sit lower and slightly wider than the front ones.
- Round 16: (1 dec, 2 sc) six times, then 2 sc [20 sts]. Sl st, ch 1.

- Round 17: (1 dec, 1 sc) six times, then 2 sc [14 sts]. Sl st, ch 1.
- Stuff the body firmly with fiberfill now. Work filling into the snout end first, then pack the main body until the sides feel firm when you squeeze them.
- Round 18: 7 dec [7 sts]. Sl st, cut the yarn, weave the tail through the remaining 7 stitches, pull tight to close, and tie off.
Ears, Make 2
- Make a slip knot and ch 3, then starting in the 2nd chain from the hook work 2 sc, then sl st.
- Fasten off leaving a yarn tail for sewing.
- Sew one ear to each side of the top of the head. In my photo the ears sit far apart, almost level with the upper curve of the body, which is wider than they appear on most pattern versions.
Face
- Embroider the nose and snout between rounds 4 and 5. My version uses pink yarn worked as a wide rounded muzzle shape, with a black outline defining the edges, and a black vertical line dividing it down the centre. Work the pink fill first then outline it.
- Embroider the eyes above the snout in black. Mine are closed eyes, each one a short arc worked as two curved lines sitting close together, which gives the capybara its sleepy expression. The original calls for safety eyes or embroidered open eyes, so work whichever suits your style.
- Whiskers are optional. The original includes simple line whiskers on the side of the snout, which my version does not show.
Yarn Substitution
- Smooth worsted weight cotton or acrylic both work. Cotton gives the clean defined stitches visible in my photo. Anything fuzzy softens the popcorn definition to the point where the paws read as bumps rather than rounded feet.
- Going heavier adds size only. Every count stays the same.

Customisation Ideas
- Switch the paws to the same colour as the body for a single colour capybara.
- Add a small flower, a fruit slice, or a tiny bow at the top of the head, which is a popular version of this character online.
- Change the eye style from closed arcs to round safety eyes for a more alert looking animal.
FAQ
Why does my snout look too round rather than square? The sc3tog on round 10 is what squares it. A standard decrease or a missed sc3tog leaves the snout rounded. Make sure all three stitches go into the sc3tog rather than working a dec by mistake.
Can I use different coloured paws without carrying the yarn? You can cut and rejoin instead, but four cut ends in a contrasting colour are hard to hide on a smooth yarn at worsted weight. Carrying gives a cleaner finish.
My popcorns are sinking inward. How do I fix it? Push the cluster toward you firmly before you lock the closing chain. Once the ch 1 is done the popcorn is fixed in position, so it must be pushed out before that point.