Crochet Blossom Doll Amigurumi Pattern Free
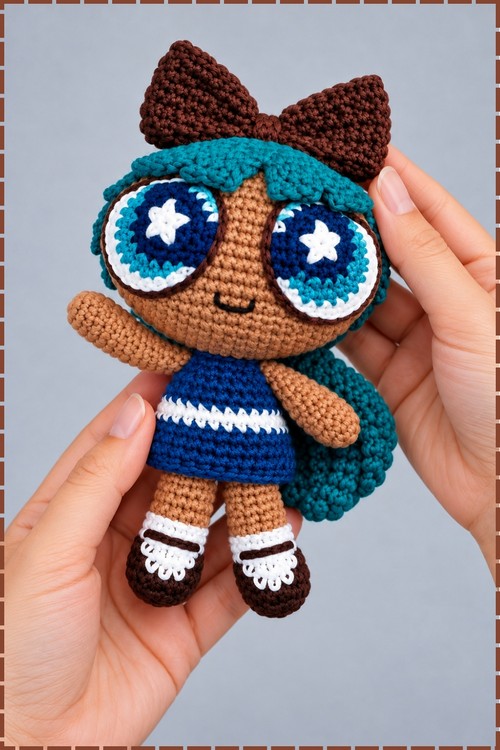
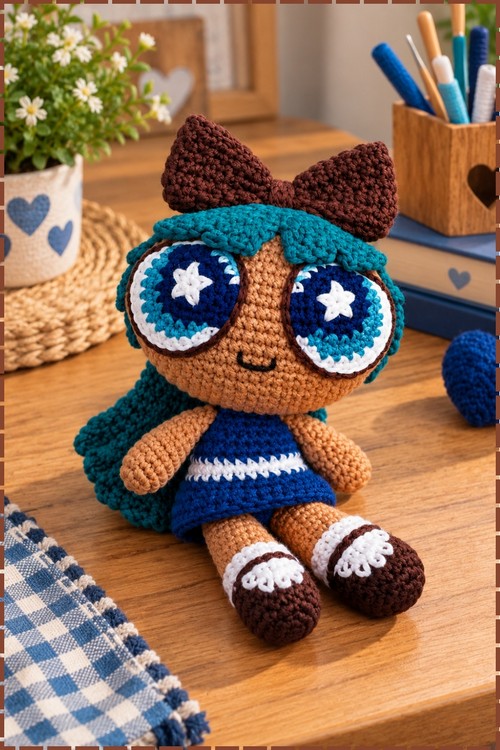
Deep blue, teal and chocolate brown replace the classic pink in this crochet Blossom amigurumi doll, topped by a towering bow and a long ponytail. Sturdy joined legs let the handmade toy sit or stand, and four colour star eyes finish the face.
Star eyes and that towering bow give the Crochet Blossom Amigurumi Doll her whole personality, part leader, part troublemaker. She looks ready to boss someone around from a shelf. Anyone who likes a toy with an opinion will enjoy this Crochet Blossom Amigurumi Doll staring right back at them.
Crochet Blossom Amigurumi Doll
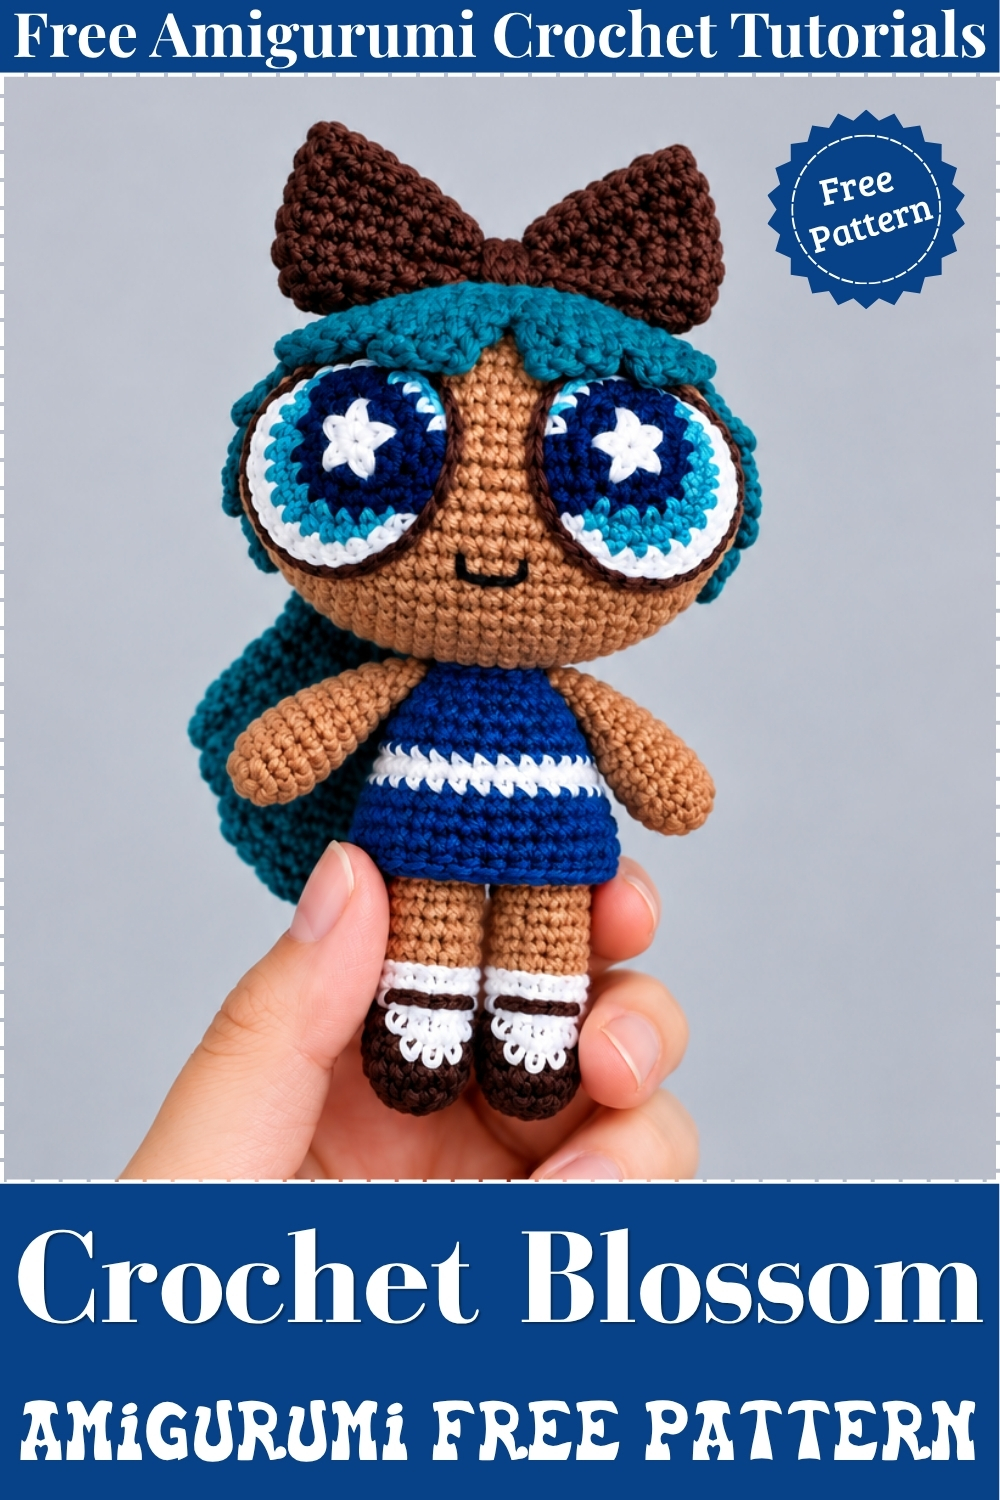
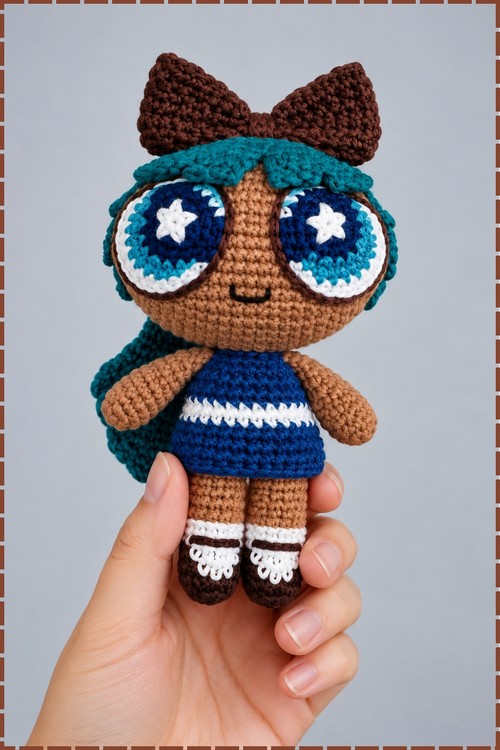
Sturdy legs join into one body before the dress ever goes on, which keeps this crochet blossom amigurumi sitting and standing without slumping. Teal hair caps the head in short bangs, then a long ponytail sweeps down the back and gives the doll real movement. Big eyes take four yarn colours and finish with a tiny white star at the centre, so the face reads clearly from across the room. My version trades the usual pink and ginger for deep blue, teal, and chocolate brown. Every piece works up on its own, then the whole doll comes together in one sewing session.
Materials and Tools
- Worsted weight yarn (weight 4) in tan for the skin, chocolate brown for the boots and bow, teal for the hair, royal blue for the dress, navy for the eyes, and white for the boot trim, dress stripe, and eye whites
- 3.25 mm crochet hook, which gives a tight fabric that hides the stuffing
- Tapestry needle for sewing and for the embroidered face and boot details
- Polyester fiberfill stuffing
- Stitch marker for the arm and hair pieces, since those work in continuous rounds
- Scissors and pins for holding the eyes and hair in place before sewing
Difficulty and Time
From my own run at this doll, it sits at a confident beginner to easy intermediate level. Nothing here goes beyond single crochet, half double crochet, double crochet, and colour changes, but the eyes and the hair cap ask for patience. I spread mine across two evenings, roughly six to seven hours in total including sewing. Treat that as a rough guide, because your speed with colour changes will decide most of it.
Beginner Technique Notes
- Magic ring (MR) means wrapping the yarn around your finger, working the first round into that loop, then pulling the tail to close the hole. Give it a firm tug so no stuffing peeks through later.
- Increase (inc) means two stitches worked into one stitch. Decrease (dec) means single crocheting two stitches together.
- Back loops only (BLO) means working under the back strand of the stitch, which leaves a visible ridge on the outside.
- Most parts here use the join method: slip stitch (sl st) into the first stitch of the round, then chain (ch) 1 before starting the next round. The arms, hair, and ponytail work in continuous rounds instead, so mark your first stitch.
- Change colour on the very last yarn over of the stitch before the new colour begins. Doing it any later leaves a stray blob of the old shade.
The Pattern
Legs and Lower Body (Make 2 Legs)
- Start with chocolate brown yarn for the boots.
- Round 1: MR, 6 single crochet (sc) into the ring. Sl st to first st, ch 1. (6 sts) Your ring should close into a firm coin with no gap in the middle.
- Round 2: [1 sc, 1 inc] x 3 around. Sl st, ch 1. (9 sts)
- Round 3: 1 sc, 1 inc, [2 sc, 1 inc] x 2, 1 sc in last st. Sl st, ch 1. (12 sts) The piece now reads as a flat sole ready to turn upward.
- Round 4: 2 sc in brown, change to white on the second st, 3 sc in white, change back to brown on the third st, 7 sc in brown. Sl st, ch 1. (12 sts) The white block sits at the front of the boot and becomes the laced toe panel.
- Round 5: 2 sc in brown, change to white, 4 sc in white, change back to brown, 6 sc in brown. Sl st, ch 1. (12 sts) Carry the unused colour loosely inside so the boot stays soft.
- Rounds 6 to 12: 12 sc around in brown. Sl st, ch 1. (12 sts) On my doll these rounds form the ankle and the bare lower leg above the boot, so keep tension even.
- Between Rounds 6 and 7, thread white yarn on a tapestry needle and embroider a thin strap straight across the white panel, then add two short diagonal stitches above it for the criss cross lacing you can see on my pair.
- Stuff each leg lightly so it stays bendable at the top.
- Leg 1: cut a short tail and fasten off.
- Leg 2: do not cut the yarn after Round 12.
Joining the Legs and Body
- Round 13: on Leg 2, sc in the first 8 sts. Insert your hook into the 3rd st of Leg 1 and sc across all 12 sts of Leg 1. Jump back to Leg 2 at the 9th st and sc in the remaining 4 sts. Sl st, ch 1. (24 sts) Check that both boots point forward before you close this round, because a twisted leg cannot be fixed later.
- Rounds 14 and 15: 24 sc around. Sl st, ch 1. (24 sts) A small gap often shows where the legs meet, so close it with a few stitches of matching yarn once the body is stuffed.
Skirt Band and Upper Body
- Use royal blue yarn for the skirt band.
- Ch 25, or work 24 foundation single crochet (Fsc) if you prefer a stretchier edge.
- Round 1: work 24 sc along the back bumps of the chain. Sl st to first st, ch 1. (24 sts)
- Round 2: 24 sc around, changing to chocolate brown on the final st. Sl st, ch 1. (24 sts) You now have a blue ring that slides over the legs like a tube skirt.
- Slide the blue ring down over the top of the joined legs and line the stitches up all the way around.
- Round 16: in chocolate brown, work 24 sc through both layers, catching the skirt ring and the body together. Sl st, ch 1. (24 sts) Pull each stitch snug or the skirt will flare away from the hip.
- Round 17: 24 sc in brown, switching to royal blue on the last st. Sl st, ch 1. (24 sts)
- Rounds 18 to 20: in royal blue, 24 sc around. Sl st, ch 1. (24 sts) On my doll I worked Round 19 in white instead of blue, which gives the single white band that runs across the middle of the dress.
- Round 21: 1 sc, 1 dec, [2 sc, 1 dec] x 5, 1 sc in last st. Sl st, ch 1. (18 sts) The shoulders start to pull in here, so stuff the body firmly before the opening shrinks.
- Round 22: [1 sc, 1 dec] x 6. Sl st. (12 sts)
- Fasten off leaving a 12 to 18 inch tail for sewing the head on later.
Head
- Use tan yarn throughout.
- Round 1: MR, 6 sc. Sl st, ch 1. (6 sts)
- Round 2: 6 inc around. Sl st, ch 1. (12 sts)
- Round 3: [1 sc, 1 inc] x 6. Sl st, ch 1. (18 sts)
- Round 4: 1 sc, 1 inc, [2 sc, 1 inc] x 5, 1 sc. Sl st, ch 1. (24 sts)
- Round 5: [3 sc, 1 inc] x 6. Sl st, ch 1. (30 sts)
- Round 6: 2 sc, 1 inc, [4 sc, 1 inc] x 5, 2 sc. Sl st, ch 1. (36 sts) The disc should still lie flat on the table at this point.
- Round 7: 36 sc around. Sl st, ch 1. (36 sts)
- Round 8: [5 sc, 1 inc] x 6. Sl st, ch 1. (42 sts)
- Rounds 9 to 11: 42 sc around. Sl st, ch 1. (42 sts)
- Round 12: 3 sc, 1 inc, [6 sc, 1 inc] x 5, 3 sc. Sl st, ch 1. (48 sts) This is the widest point and it sits right behind the eyes on the finished doll.
- Rounds 13 to 16: 48 sc around. Sl st, ch 1. (48 sts)
- Round 17: 3 sc, 1 dec, [6 sc, 1 dec] x 5, 3 sc. Sl st, ch 1. (42 sts)
- Rounds 18 to 20: 42 sc around. Sl st, ch 1. (42 sts)
- Round 21: [5 sc, 1 dec] x 6. Sl st, ch 1. (36 sts)
- Round 22: 36 sc around. Sl st, ch 1. (36 sts) Start stuffing the head firmly now and keep adding as you decrease, since a soft head tips forward once the hair goes on.
- Round 23: 2 sc, 1 dec, [4 sc, 1 dec] x 5, 2 sc. Sl st, ch 1. (30 sts)
- Round 24: [3 sc, 1 dec] x 6. Sl st, ch 1. (24 sts)
- Round 25: 1 sc, 1 dec, [2 sc, 1 dec] x 5, 1 sc. Sl st, ch 1. (18 sts)
- Round 26: 18 sc around. Sl st, ch 1. (18 sts)
- Round 27: [1 sc, 1 dec] x 6. Sl st, ch 1. (12 sts)
- Round 28: 6 dec around. Sl st. (6 sts)
- Fasten off, then weave the tail through the back loops of the last 6 sts and pull tight to close the hole. Aim the closed point at the base of the skull so it hides under the body join.
Arms (Make 2)
- Use tan yarn and work in continuous rounds without joining.
- Round 1: MR, 6 sc. (6 sts)
- Round 2: [1 sc, 1 inc] x 3. (9 sts)
- Round 3: 1 sc, 1 inc, [2 sc, 1 inc] x 2, 1 sc. (12 sts) The rounded hand is formed at this point.
- Rounds 4 to 7: 12 sc around. (12 sts)
- Round 8: [1 sc, 1 dec] x 4. (8 sts) This narrowing reads as the wrist and elbow on my doll.
- Round 9: 8 sc around. (8 sts)
- Round 10: [2 sc, 1 dec] x 2. (6 sts)
- Stuff only the lower half of the arm so the top stays flat for sewing.
- Flatten the top opening and work 3 sc through both sides to close it.
- Ch 1 and cut a 6 to 8 inch tail for sewing.
- Sew the arms to the upper body between the top two rows, one on each side, angled slightly downward so they rest against the dress the way mine do.
- Sew the head onto the body with the long tail left from Round 22, going around twice for a neck that does not wobble.
Main Hair Cap and Bangs
- Use teal yarn and work in continuous rounds.
- Base: ch 6.
- Round 1: 4 sc along the chain, 3 sc in the last st, then turn to the opposite side of the chain and work 3 sc, 1 inc in the last st. (12 sts)
- Round 2: 1 inc, 3 sc, 2 inc, 1 inc, 4 sc, 1 inc in the last st. (17 sts)
- Round 3: 1 inc, 1 sc, 1 inc, 2 sc, 1 inc, 1 sc, 1 inc, then turn to the other side and work 1 sc, 1 inc, 5 sc, 1 inc, 1 sc. (23 sts)
- Round 4: 1 sc, 1 inc, 1 sc, 1 inc, 5 sc, 1 inc, 1 sc, 1 inc, 1 sc, then turn and work 1 inc, 1 sc, 1 inc, 4 sc, 1 inc, 1 sc, 1 inc in the last st. (31 sts) Lay this oval on top of the head now and check that it covers the crown before you start the bangs.
- Round 5 part 1: 3 sc, 1 inc, 3 sc, sl st, ch 1, turn.
- Bang row 1: skip the first st, 3 sc, ch 1, turn.
- Bang row 2: 3 sc, ch 1, turn.
- Bang row 3: skip the first st, 2 sc, ch 1.
- Sl st loosely down the side of the strand back to the base cap, keeping the slip stitches relaxed so the bang can still curve.
- Round 5 part 2: sl st in the next base st, ch 1.
- Bang row 1: 3 sc in the same st and the next sts, ch 1, turn.
- Bang row 2: 3 sc, ch 1, turn.
- Bang row 3: skip the first st, 2 sc, ch 1.
- Sl st down the side back to the base cap.
- Round 5 centre hair: sl st, 3 sc, 1 inc, 4 sc, 1 inc, 4 sc, 1 inc, 4 sc.
- Round 5 parts 3 and 4: repeat the same bang steps mirrored for the third and fourth strands, so the four points sit evenly across the forehead.
- Cut the teal yarn and rejoin it to the right side of the bangs to continue the back of the hair in turned rows.
- Rows 6 to 16: work turned rows across the back of the hair cap, increasing along the outer edges until you reach 30 sts across. Try the cap on the head every few rows, since the back should reach the middle of the skull.
- Rows 17 to 24: shape the bottom curve of the hair using slip stitches and decreases along the outer edges, which is what gives my doll the soft points falling beside each cheek.
- Cut a 24 to 30 inch tail and sew the hair piece to the head, leaving the four bangs free for styling at the end.

Long Ponytail
- Use teal yarn and leave a 12 inch tail at the starting slipknot for sewing later.
- Base: ch 7.
- Round 1: 5 sc along the chain, 3 sc in the end chain, then turn and work 4 sc, 1 inc. (14 sts)
- Round 2: in back loops only, 14 sc around. (14 sts) That ridge marks the tie at the top of the ponytail.
- Rounds 3 to 7: in both loops, 14 sc around. (14 sts)
- Round 8: 13 sc, 1 inc. (15 sts)
- Round 9: 7 sc, 1 inc, 7 sc. (16 sts)
- Round 10: 16 sc around. (16 sts)
- Round 11: [7 sc, 1 inc] x 2. (18 sts)
- Rounds 12 to 14: 18 sc around. (18 sts)
- Round 15: [8 sc, 1 inc] x 2. (20 sts)
- Round 16: 20 sc around. (20 sts)
- Round 17: 8 sc, 1 inc, 9 sc, 1 inc, 1 sc. (22 sts)
- Rounds 18 and 19: 22 sc around. (22 sts)
- Round 20: [10 sc, 1 inc] x 2. (24 sts)
- Rounds 21 and 22: 24 sc around. (24 sts)
- Round 23: 10 sc, 1 inc, 11 sc, 1 inc, 1 sc. (26 sts)
- Round 24: 26 sc around. (26 sts)
- Round 25: 10 sc, 1 inc, 12 sc, 1 inc, 2 sc. (28 sts)
- Round 26: 11 sc, 1 inc, 13 sc, 1 inc, 2 sc. (30 sts)
- Round 27: 11 sc, 1 inc, 14 sc, 1 inc, 3 sc. (32 sts)
- Round 28: 12 sc, 1 inc, 15 sc, 1 inc, 3 sc. (34 sts) Leave this piece unstuffed or barely stuffed, because a flat ponytail drapes against the back the way mine does.
- Round 29: 11 sc, 2 inc, 15 sc, 2 inc, 4 sc. (38 sts)
- Round 30: 12 sc, 2 inc, 16 sc, 2 inc, 6 sc. (42 sts)
- Round 31: 12 sc, 2 dec, 16 sc, 2 dec, 6 sc. (38 sts)
- Round 32: 6 half double crochet (hdc), 5 sc, 1 dec, 6 sc, 6 hdc, 6 sc, 1 dec, 5 sc. (36 sts) The taller stitches push the hair outward into that soft curve near the tip.
- Round 33: 2 hdc, 3 double crochet (dc), 2 hdc, 3 sc, 2 dec, 3 sc, 2 hdc, 4 dc, 2 hdc, 3 sc, 3 dec, 2 sc. (31 sts)
- Round 34: 9 sc, 2 dec, 12 sc, 2 dec, 2 sc. (27 sts)
- Round 35: 8 sc, 2 dec, 10 sc, 2 dec, 1 sc. (23 sts)
- Round 36: 7 sc, 2 dec, then flatten the end opening and work 8 sc through both layers, finishing with 1 dec across the final 2 sts.
- My ponytail carries no embroidered strands, so leave the surface plain teal. If you want the hair divided, run three long straight stitches down each side in a slightly darker teal before sewing it on.
- Sew the ponytail to the back of the head between Rounds 4 and 5 using the long starting tail, letting the wide end fall behind the body.
Hair Bow
- Use chocolate brown yarn.
- Make two identical halves.
- Row 1: ch 17, then 1 sc in the 2nd ch from hook, 3 sc, 2 hdc, 4 dc, 2 hdc, 3 sc, 1 inc in the last ch. Turn to the bottom of the chain and work 3 sc, 2 hdc, 4 dc, 2 hdc, 4 sc. Ch 1, turn.
- Row 2: skip the first st, 4 sc, 2 hdc, 2 dc worked as an increase, 2 hdc, 4 sc. Fasten off with a long tail.
- Fold each half in half lengthwise and sew the open edges closed so each loop holds its shape.
- Sew both halves together at the centre, then wrap brown yarn tightly around the middle several times to create the pinched knot.
- Sew the bow to the very top of the head in front of the ponytail. On my doll it sits high and slightly forward, resting on the bangs rather than behind them.
Eyes and Face
- Right eye round 1 in white: MR, 6 sc.
- Right eye round 2 in navy: 6 inc. (12 sts)
- Right eye round 3 in navy: [1 sc, 1 inc] x 6, changing to teal on the last st. (18 sts) The navy makes up the wide iris on my doll, with the white centre peeking through.
- Right eye round 4 in teal: 1 sc, 1 inc, 2 sc, 1 inc, 3 sc. Ch 1, turn.
- Right eye round 5 in teal: 2 sc, 1 inc, 7 sc, 1 sl st. Fasten off with an 18 inch tail.
- Right eye round 6 in white: reattach white yarn at the top edge and work 2 sc, 1 inc, 2 hdc, 1 hdc increase, 1 hdc, 2 sc, 1 sl st. That white crescent sits along the upper lid and lifts the whole face.
- Right eye round 7 in navy: work sl st in back loops only, loosely, around the entire outer curve.
- Left eye: repeat Rounds 1 to 4 of the right eye.
- Left eye round 5 in teal: 2 sc, 1 inc, 4 sc, 1 inc, 1 sc. Ch 1, turn.
- Attach teal yarn in the 4th st from the hook and work 2 sc to finish the top corner.
- Left eye round 6 in white: attach white yarn and work 4 hdc, 1 sc increase, 4 sc, 2 sl st.
- Left eye round 7 in navy: work sl st in back loops only, loosely, around the outer edge.
- Embroider a small five point white star over the white centre of each eye, working three crossing straight stitches from the centre outward until the points look even. Keep both stars the same size or the face will look lopsided.
- Pin both eyes to the front of the face and check the placement from several angles before sewing. Mine sit high and close together, almost touching in the middle, which is what gives the doll its wide eyed look.
- Sew each eye down with small stitches all around the navy edge.
- Embroider the mouth with brown yarn, three stitches wide and one stitch tall, centred just below and between the eyes, curving the ends down very slightly into a smile.
- Tack the tips of the bangs lightly onto the forehead so they stay flat against the teal hairline.
Tips and Troubleshooting
- Work every stitch tightly at 3.25 mm. Loose fabric lets white stuffing show through the tan head, and no amount of styling hides it.
- Pin the eyes and walk away for a minute before sewing. Placement decides the entire personality of the doll, and it looks different from a distance.
- Stuff the head in small pieces rather than one big lump. Small amounts pressed into the crown keep the shape round instead of lumpy.
- Keep the ponytail flat. Stuffing it makes the head tip backward once it is attached.
- Sew the hair cap on in two stages, first across the front hairline, then around the back, so nothing shifts halfway through.
- Weave every colour change tail inside the piece before you stuff. Reaching in afterwards is much harder than it sounds.
- Count the 24 stitches around the skirt ring twice before joining it to the body. One extra stitch throws the whole alignment off.
Yarn Substitution
Any smooth worsted weight acrylic or cotton works here. Cotton gives crisper stitch definition on the eyes and the white dress stripe, while acrylic makes a softer, squishier doll that holds stuffing well. Avoid anything fuzzy or variegated, since the face details disappear into the texture. If you switch to a lighter weight yarn, drop the hook to 2.75 mm and expect a noticeably smaller doll. My finished piece stands roughly the height of an adult hand, though that will shift with your tension.
Customization Ideas
- Swap the teal hair for any bold shade and match the eye rings to it for a coordinated look.
- Change the dress colour and keep the white stripe, which reads as a uniform band on almost any base colour.
- Skip the star in the eye centre and leave a plain white dot for a softer, younger face.
- Add a short cape by chaining a length that reaches from shoulder to shoulder, working rows of single crochet until it falls to the hem, then tacking the top corners at the neck.
- Make the ponytail shorter by stopping the increases early and moving straight to the closing rounds.
- Use white yarn for the boots and brown for the trim to flip the shoe contrast.
FAQ
Can a beginner make this doll? Yes, if you are comfortable with the magic ring, increases, and decreases. The eyes take the most concentration, so make one, set it aside, and come back to the second with fresh eyes. Nothing in the body or head goes beyond basic shaping.
Why does the skirt look loose on the body? The skirt ring and the body must be joined with stitches worked through both layers at the same time. If the ring flares away, the join round was worked too loosely, and pulling each stitch snug fixes it.
How do I stop the head from flopping forward? Stuff the head firmly right up to the final decreases and sew it to the body with two full passes around the neck opening. A lightly stuffed head almost always tips.
My eyes came out different sizes. What went wrong? The two eyes use different stitch placements in Rounds 5 and 6 because they mirror each other, so a small difference is normal. A visible difference usually means a missed increase in Round 3, so recount that round.
Is this doll safe for a small child? With embroidered eyes and no plastic parts, yes, as long as every seam is sewn securely and no long tails are left loose inside. Tug each limb firmly before handing it over.