Crochet Christmas Doily Free Pattern
Read thread gives this crochet christmas doily pattern the traditional look, while red or gold pushes it firmly into December. Pin every point when you block it and the piece lies flat for years rather than curling at the edges.
Thread weight decides everything about a doily, and this crochet christmas doily free pattern assumes fine cotton thread with a steel hook rather than yarn. Rounds build outward from a centre ring with the shell repeat carrying the pattern around, and the openwork only becomes visible once the piece is wet blocked and pinned. Stop at any round for a coaster-sized mat. Keep going for a full centrepiece.
Crochet Christmas Doily

A finished doily of this size — 17 rounds in 4-ply cotton at 3 mm — comes out at roughly 30 to 35 cm in diameter, which puts it exactly at placemat territory. That is not a decorative accident. Centred under a pillar candle on the dining table it catches the light through the fan edging in a way a plain tablecloth cannot. As a single layer beneath a glass bowl of baubles on a sideboard, the lace pattern reads as an intentional frame rather than padding. On a mantel shelf, one either side of a centrepiece creates a symmetry that actually holds the eye rather than competing with everything else on the shelf.
Display Ideas
Under a Christmas pudding or a centrepiece cake on a raised stand, where the fan edging shows around the perimeter. Beneath a battery-lit glass jar on a shelf. Pinned flat to a piece of dark linen and framed for a textile art display — the double-triple crochet fans in Row 16 photograph very well. Draped over the arm of a wooden chair as a seasonal textile detail. Gift-wrapped around a small plant pot or a candle with a satin ribbon tied around the outside of the fan border.
Countdown
- One doily: 5 to 7 hours for an experienced crocheter working in thread. The fan edging rows (14 to 17) are the slowest section and deserve a dedicated unhurried session. Do not attempt the double-triple crochet fans when you are tired.
- A batch of four: 22 to 28 hours. Make all four doilies through Row 11, then complete all four accent colour sections together so you are not rethreading the colour change repeatedly.
- Latest safe start: One doily for a Christmas table needs to be started at least eight days before you need it, including two days for blocking and drying. Blocking cotton lace flat takes longer than most people budget. For four, start three weeks out.
Pieces
- Doily: 1 piece, worked in continuous rounds from the centre outward
What You Need
- 4-ply 100% cotton thread in your main colour (red in the source version)
- 4-ply 100% cotton thread in a second colour for Rows 12 onward (green in the source, or a multicolour mix)
- An optional third colour for the final edging rows (Rows 16 and 17)
- 3 mm crochet hook
- Scissors and a tapestry needle for weaving ends
- Blocking board or flat surface, rust-proof pins, and a spray bottle for blocking
Abbreviations
- ch: chain
- sc: single crochet
- dc: double crochet
- dtr: double treble crochet (yarn over 3 times before inserting hook)
- sl st: slip stitch
- BLO: back loop only
- V-st: (dc, ch 2, dc) all in the same space
- sp: space
- st / sts: stitch / stitches
The Character Dial: Rustic or Bright
- The source palette is unambiguously festive — red and green with a multicolour option on the edging. Two directions from there.
- Go rustic and the piece shifts register completely. Work Rows 1 to 11 in a deep forest green rather than red, and switch to ecru or undyed natural cotton for the accent section. The fan edging in the same ecru, with no third colour at all. The result looks like something from a Scandinavian textile tradition rather than a Christmas craft project, which means it lives on a table through February rather than coming down with the tree. Add a light blocking spray with a few drops of lavender essential oil before the pins go in, and the finished piece will hold its shape and smell like January.
- Go bright and the contrast does all the work. Pair a true scarlet with a clear cold white rather than cream, and work the final edging fans in gold. The gold dtr fans against the white accent rows and scarlet base give the doily a Byzantine quality that reads very well under candlelight. The picot edge in Row 17 becomes a gold border visible from across the table. This is the version you photograph for the post thumbnail because the contrast is high enough to read clearly at small sizes.
Colourways
- Spruce and Linen. Deep bottle green for Rows 1 to 11, unbleached linen or oatmeal cotton for Rows 12 to 17. No red anywhere. The contrast is subtle enough that the lace pattern carries the visual interest rather than the colour, which is the correct choice for a home where the Christmas palette is natural materials and wood.
- Burgundy and Gold. Deep wine red for the main section, antique gold for the accent and edging. Neither colour shouts Christmas on its own, but together they read as festive enough to be seasonal and rich enough to stay out longer. Works exceptionally well on a dark wood table surface.
- Midnight and Silver. Very deep navy blue cotton for Rows 1 to 11, silver or pale grey for the accent section, and white for the final edging. No traditional Christmas colours at all. The fan pattern in white against navy reads as a snowflake motif, which is entirely unintentional and entirely useful. This is the version for a winter table that will be set for New Year’s as well as Christmas.
- Holly Classic. The source version: red main, green accent, multicolour or gold edging. The only reason to think twice about it is that it reads Christmas so specifically that it has no second life. Make it if you want it, keep it if you love it, know what you are signing up for.
The Pattern

Main Doily
The doily is worked in rounds from the centre outward. Each round ends with a sl st to join unless otherwise stated. The ch-3 at the start of each round counts as 1 dc throughout.
Centre and Base Rounds (Main Colour)
- Round 1: MR (or ch 5 to 6, join with sl st to form a loop). Ch 3 (counts as 1 dc), work 31 dc into the ring. Join with sl st to the 3rd ch of the starting ch-3. [32 dc] Do not pull the centre ring fully closed before the round is joined — leave a small amount of ease to prevent the centre from doming. You can snug it after joining. After Round 1 the piece should lie completely flat as a small tight disc. If it domes upward, the ring was pulled too tight; ease it before proceeding.
- Round 2: Ch 3, 1 dc in each st around. Join with sl st to 3rd ch. [32 dc] The disc should still lie flat and be growing outward rather than curling. If the edge is starting to ruffle, your tension is too loose; go down a hook size for the next round and check again.
- Round 3: Ch 3. Work groups of 4 dc separated by ch 1 across the round, for a total of 8 groups. Join with sl st. [32 dc plus 8 ch-1 sps] The 8 sections should be evenly spaced around the disc. Count your groups before joining — an uneven group at this round means an asymmetric doily at Round 14.
- Round 4: Ch 3. At the start of each group, work 2 dc in the first sp (increase). Dc in each middle sp of the group. Work 2 dc in the last sp of the group (increase). Ch 1 between groups. Join with sl st. [6 dc per group, 48 dc total plus 8 ch-1 sps] [CHECK — source states +2 per group each round; confirm group total matches]
- Round 5: Ch 3. Repeat the increase pattern: 2 dc in the first sp, dc across the middle, 2 dc in the last sp per group, ch 1 between groups. Join with sl st. [8 dc per group, 64 dc total plus 8 ch-1 sps] [CHECK]
- Round 6: Ch 3. Repeat once more: 2 dc in the first sp, dc across, 2 dc in the last sp, ch 1 between groups. Join with sl st. [10 dc per group, 80 dc total plus 8 ch-1 sps] [CHECK] After Round 6 the piece should be a clearly octagonal disc, each of the 8 sections visibly wider than the previous round. Laid flat, it should not lift at any edge. If one section is pulling up, that group has a stitch count error; count each group individually before continuing.
V-Stitch Motif Rows
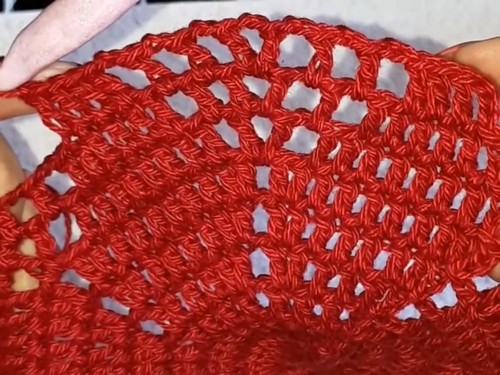
- Round 7: Sl st across the first st to skip it. Ch 3, work 7 dc (8 dc total per group, skipping the first and last sts from Round 6 to begin the taper). Ch 2, work V-st (dc, ch 2, dc) into the ch-1 sp below. Ch 2, skip the first dc of the next group, and repeat around. Join with sl st. [8 dc per flat section, 1 V-st per gap, 8 V-sts total] [CHECK — source states 8 dc remain per group after skip; confirm your count]
- Round 8: Sl st over to skip the first st. Ch 3, work 5 dc (6 dc per group). Ch 2, 1 dc into the ch-2 sp, ch 2, V-st into the previous V-st sp, ch 2, 1 dc into the next ch-2 sp, ch 2. Skip the first dc of the next group, repeat around. Join with sl st. [6 dc per flat section, V-sts growing outward] [CHECK — the V-stitch columns are building toward the fan motifs; each round should show a clearly wider V opening]
- Round 9: Sl st to skip the first st. Ch 3, work 3 dc (4 dc per group). Follow the established ch-2 and V-st column sequence across to the next flat section and repeat around. Join with sl st. [4 dc per flat section] [CHECK — source description is brief here; follow the established V-column logic from Rounds 7 and 8]

Mesh and Fill Row
- Round 10: Sl st over. Ch 5 (counts as 1 dc plus ch-2 sp). Work 1 dc in each sp around, separated by ch 2, to create a mesh of evenly spaced squares all the way around. Join with sl st. [CHECK — total dc count depends on preceding round’s sp count; work consistently into every sp] After this round the piece should look like an open mesh ring surrounding the central motif section. The solid groups are gone and the whole outer ring should be a regular grid of dc and ch-2 spaces.
- Round 11: Ch 3. Work 2 dc inside each ch-2 sp and 1 dc on top of each dc from Round 10, all the way around. Join with sl st. [CHECK — total count not given in source; the round fills the mesh back into a denser solid ring] After Round 11 the outer ring should feel solid and structured again, a clear dense band sitting outside the open V-stitch section.
Accent Colour Border (Second Colour)
- Round 12: Join second colour. Working in BLO only, sc in each st around. Join with sl st. [CHECK — total sc count not given in source; sc into every st] The BLO ridge created by this round is a physical dividing line between the main and accent sections. It should form a visible raised edge when you fold the fabric slightly. If it disappears into the work, you worked into both loops rather than just the back.
- Round 13: Ch 3, 1 dc in each st around. Join with sl st. [CHECK — maintain the same st count as Round 12]
Arch and Fan Foundation
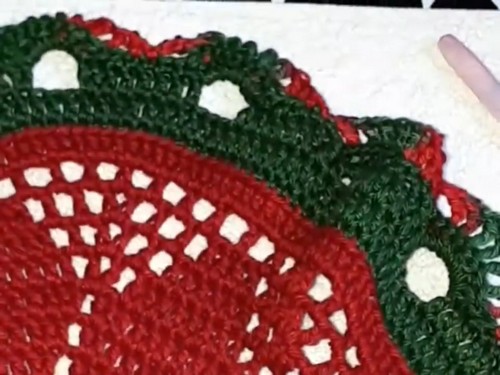
- Round 14: Ch 3. Work 8 dc in a row, ch 5, skip 3 sts, repeat around to create large arches. [CHECK — 18 arches total per source; distribute evenly around the round. Source notes that if your count runs slightly off at the end, discreetly adding or skipping a stitch or two to complete the 18 arches is acceptable] After Round 14 the large ch-5 loops should create clearly visible scallop-like openings all around the outer edge, each arch flanked by groups of 8 dc on either side.
- Round 15: Ch 1. Work 6 sc along the top of each dc arch. Into each ch-5 sp, work 9 dc. Skip the first st of the next group, work 6 sc, repeat around. Join with sl st. [CHECK — st count per motif not confirmed beyond the source description; 9 dc per fan sp and 6 sc per arch group is as stated] The 9-dc fans should now be visible standing upright inside the large ch-5 openings. Each fan should be a clearly rounded shape. If any fan is collapsing flat, the ch-5 loop from Round 14 was too tight to give the dc room to splay.
Final Fan Edging (Optional Third Colour or Same Accent Colour)
- Round 16: Join yarn near the sc sections. Working from behind, insert hook into each of the 9 dc from Round 15 in turn, working dtr stitches up and over (one dtr per dc from Round 15, each separated by ch 1, for 8 ch-1 sps per fan). Anchor between fans with sc. Repeat around. [CHECK — total dtr count is 9 per fan × 18 fans = 162 dtr, plus sc anchors; source states 8 chains between 9 dtr per fan] The dtr fans should now curve forward over the Round 15 dc fans, creating a layered 3D effect. If the fans are lying flat, the dtr are too short; a dtr is yarn-over 3 times before inserting the hook.
- Round 17: Working along the fan edge, sc into the first st, ch 3, sl st back into the same st to form a picot. Repeat (1 sc, ch-3 picot) across each fan motif. Sl st to finish. Fasten off securely and weave in all ends. [CHECK — picot count per fan not specified in source; work one picot per st or per ch-1 sp across the fan edge for a consistent finish] The picot row is the last thing a viewer’s eye lands on, so weave your ending tail in deeply and knot it rather than trusting a single weave pass on a finished edge.

Assembly and Finishing
There is no seaming on this piece. Finishing is blocking, and blocking is the difference between a thread doily that looks handmade and one that looks like it came from a shop. Soak the finished doily in cool water with a drop of wool wash until it is fully saturated, then press excess water out in a towel without wringing. Pin it to a blocking board or a piece of foam, starting from the centre and working outward, pulling each fan point to its full extension before the pin goes in. The fans in Round 16 need to be individually teased into position while wet — they will not open up on their own. Leave flat to dry for at least 12 hours, longer in a cold room.
Safety Eyes, Stuffing
Not applicable to this pattern. There are no amigurumi elements, no safety eyes, and no stuffing in a thread doily construction.
After the Season
Roll rather than fold. A folded thread doily develops permanent crease lines that will not block out the following year, and the fan points along the outer edge are the worst affected because they sit at a fold corner. Roll the dried doily around an acid-free cardboard tube (a gift wrap tube works perfectly), slip it into a cotton pillowcase, and store it flat on a shelf rather than compressed under anything heavier. Label the outside with the colour and year so you know what you are unrolling. A doily stored this way comes out of storage next December needing only a light spritz and a few minutes under a dry iron on a low cotton setting.
Quick Answers
- What weight is 4-ply cotton for this pattern? It is equivalent to fingering weight or sock weight in standard yarn terms — very fine, not the standard 4-ply craft yarn you would use for a sweater. In the UK it is labelled 4-ply; in the US it would be listed as size 10 crochet thread or fingering weight. The 3 mm hook is on the larger end for thread work, which keeps the fabric open enough for the lace pattern to read clearly.
- Can I make this bigger? Yes: continue the increase sequence from Rounds 4 to 6 for additional rounds (adding 2 dc per group per round, with the ch-1 separator between groups) before moving into the V-stitch section. Every additional round of increases adds roughly 2 to 3 cm to the overall diameter at a 3 mm gauge. The fan count in Row 14 may need adjusting to stay divisible by 8 if you change the preceding round counts significantly.
- The centre is puckering after blocking. What went wrong? Almost always, the magic ring or foundation chain was pulled too tight before the first round was joined, and the extra rows built up over a surface that was slightly domed from the start. A domed centre that has been worked for 17 rounds cannot be fully recovered by blocking alone. For the next doily, leave the centre slightly loose when joining Round 1, let it sag a little, and it will block flat. A small persistent dome can be pressed very firmly under a damp cloth and a warm iron, held in place until cool.
- Does this need to be starched? For a permanent display piece, yes — a spray starch or a light solution of sugar water applied before the final blocking pins go in will give the fans in Rows 15 and 16 a much crisper finish that holds through multiple handling sessions. For a placemat that will be washed regularly, skip the starch and accept that the fans will soften slightly with use. Restarch as needed after washing and re-block.