Crochet Christmas Scarf Pattern Free – Kids Scarf
Sizing this crochet christmas scarf pattern for a child means one wrap and no trailing ends, which matters more than it sounds when they are running around in it. Red and white stripes carry the season, and soft acrylic keeps it comfortable against the neck.
A kids’ scarf needs to be shorter and narrower than the adult version people default to, and this crochet christmas scarf pattern free is sized so it wraps once without a long tail a child can trip on or catch. Rows run the length of the scarf in a simple repeat, with fringe added at both ends if you want it. Soft acrylic beats wool for anything worn against a child’s neck. Adjust the length by adding rows rather than changing the stitch pattern.
Crochet Christmas Scarf

The construction is entirely flat double crochet rows worked in colour blocks, with small appliqué pieces added at the end. There is nothing here that requires counting rounds in continuous spirals or managing complex shaping. The face pieces (two eyes, one nose, one mouth) are made separately and attached, so any child-specific detail changes happen at assembly rather than mid-scarf.
Countdown
- One scarf: 3 to 4 hours at a comfortable pace. The double crochet rows go fast once you are in rhythm, but 90-plus rows of the main body length adds up. Budget an extra 30 minutes for the face appliqués and assembly.
- A batch of six: 18 to 22 hours total. Make all six scarf bodies first across multiple sessions, then sit down for one focused appliqué-making evening. Assembly at the end, all at once.
- Latest safe start: One scarf can be started five days out and finished with time to spare. For six, begin ten days before you need them. The yarn length is the one variable that catches people: longer scarves for bigger kids push the dark blue section well past 90 rows, so measure the recipient’s neck and adjust early.
Safety First
This scarf is worn around a child’s neck, which changes every decision about finishing and embellishment. The appliqués are the main concern. A hot-glue attachment is fast and clean on a warm afternoon and then fails in a schoolyard in January, and when a piece comes off a scarf it goes directly into small hands.
- Sew everything. Use a yarn needle and the long tails left on each appliqué piece, pass through the scarf body at least six times per piece, and knot on the underside. Glue is backup, applied after sewing, not instead of it.
- The mouth is a chain. A 20-chain strand is too long and too loose to leave glued on a child’s scarf. Sew it down at both ends and tack it at the centre as well. A chain that can loop off is a strangulation risk. Take this one seriously.
- Scarf length matters. The ends should not hang below the child’s waist when worn. Too long and it catches on things. Adjust the dark blue section up or down before you start it, not after.
- Under-five children: The carrot nose has a slightly pointed tip and a firm structure. On a very young child, embroider the nose with orange surface stitching directly onto the scarf face instead of attaching the separate piece.
- No bells, buttons, or beads on the face. The source design uses yarn appliqués only, which is the right call. Do not substitute buttons for eyes on any scarf going to a child under eight.
- Washing: Hand wash cold, lay flat to dry. Machine washing loosens sewn appliqués faster than anything. Tell the recipient’s adult this before you hand it over.
Making These for a Group
- For a school gift exchange or classroom set, six scarves in the same colour scheme are the most efficient route. Buy one large skein of the dark blue body colour and smaller amounts of red, white, black, and blue for the face sections. Write each child’s name on a piece of masking tape and stick it to the safety-pinned end of their scarf at the start, so you never have a pile of identical finished pieces and no idea which is which.
- Time estimate per unit: about 3.5 hours once you have the rhythm. Face pieces for all six can be made in a single two-hour session. Plan one sewing session per three scarves rather than doing assembly as you go, because it is much faster to switch between attaching eyes, noses, and mouths across multiple pieces than to fully assemble one at a time.
- Yardage for six scarves at standard adult length: approximately 800 to 1000 g of dark blue main colour, 100 g white, 80 g blue, 50 g red, 30 g black. Buy a little more than you think you need. Running out of dark blue mid-scarf on number four is the exact kind of problem that costs you an evening.
Pieces Per Scarf
- Scarf body: 1 piece
- Eyes: 2 (both identical, in black yarn)
- Nose (carrot): 1 piece, in orange yarn
- Mouth: 1 piece, a single chain in black yarn
What You Need
- Main (body) colour yarn: dark blue, mink, or your preferred scarf colour. Worsted weight works well; DK is also suitable for a lighter result.
- Face section colours: blue, red, white, and black. Small amounts of each.
- Orange yarn for the carrot nose.
- Crochet hook sized to your yarn. The source uses dc throughout, so a 4.0 to 5.0 mm hook depending on your yarn weight.
- Yarn needle for assembly and weaving ends.
- Stitch marker to track colour block transitions.
- Hot glue gun for backup only, adult use.
Abbreviations
- ch: chain
- sc: single crochet
- hdc: half double crochet
- dc: double crochet
- tr: treble crochet
- sl st: slip stitch
- MR: magic ring
- st / sts: stitch / stitches
The Pattern
Scarf Body
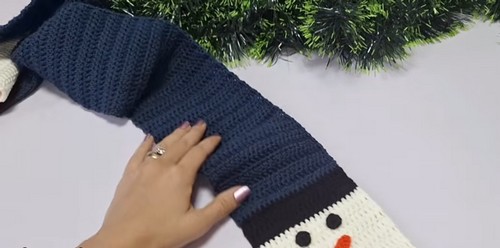
The scarf is worked as a single flat strip in double crochet rows, changing colour in blocks. Both ends mirror each other so each end has a snowman face. The dark blue middle section is the body of the scarf. Work End 1 first, then the middle, then End 2.
End 1 (First Snowman Face), Blue Section
- Foundation: Ch 25 (22 working stitches plus 3 turning ch). [25 ch total]
- Row 1: Skip the first 2 ch (counts as 1 dc), dc in the 3rd ch from the hook, dc in each remaining ch across. [23 dc] [CHECK — the skip-2 setup counts the turning ch as 1 dc, so confirm your stitch count matches your foundation]
- Rows 2 to 8: Ch 2, turn. Skip the first st, dc in each st to the end. [23 dc per row] Work 7 more rows for a total of 8 rows in blue. — After 8 rows the blue block should be clearly rectangular, roughly twice as tall as it is wide, with clean vertical edges on both sides.

End 1, Red Section
- Rows 9 to 10: Change to red. Ch 2, turn. Skip the first st, dc in each st across. [23 dc per row] Work 2 rows in red. — The red block sits immediately above the blue, forming the scarf trim band. It should be noticeably narrower in height than the blue section below it.
End 1, White Section
- Rows 11 to 20: Change to white. Ch 2, turn. Skip the first st, dc in each st across. [23 dc per row] Work 10 rows in white. — The white section is the snowman’s body on the face end of the scarf. At 10 rows it should be slightly taller than the blue section.
End 1, Black Section (Hat)
- Rows 21 to 24: Change to black. Ch 2, turn. Skip the first st, dc in each st across. [23 dc per row] Work 4 rows in black, then fasten off. — The black hat section at the top of End 1 is the shortest colour block. Laid flat, the four colour bands (blue, red, white, black from the cast-on edge up) should read clearly as a colour-blocked snowman head.
Middle Section
- Rows 25 onward: Join dark blue yarn. Ch 2, turn. Dc in each st across. [23 dc per row]
- Continue working dc rows until the middle section reaches your desired scarf length. The source works 90 rows of dark blue, which gives a standard adult scarf length. [CHECK — adjust row count based on the recipient’s size; measure chin to waist for a child and work to that length]
- Do not fasten off until you are satisfied with the length.
If you’re new to reading crochet patterns, don’t worry, just follow along with the video tutorial below and use the written pattern as a reference!
End 2 (Second Snowman Face)
Work the colour blocks in reverse order to mirror End 1: black first, then white, then red, then blue at the cast-off edge.
- Black section: Ch 2, turn. Dc in each st across. Work 4 rows in black. [23 dc per row]
- White section: Change to white. Dc in each st across. Work 10 rows. [23 dc per row]
- Red section: Change to red. Dc in each st across. Work 2 rows. [23 dc per row]
- Blue section: Change to blue. Dc in each st across. Work 8 rows. Fasten off and weave in all ends. [23 dc per row] — End 2 should be a perfect visual mirror of End 1 when both ends are laid side by side. If the colour blocks differ in height, count your rows before finishing.

Eyes, Make 2
- MR.
- Ch 1.
- Work 8 sc into the ring. [8 sc]
- Pull the tail to close the ring tight.
- Sl st into the first sc to join. Fasten off, leaving a long tail for sewing. — The finished eye should be a small flat disc. If it cups upward instead of lying flat, your tension is too tight. Block it gently under a damp cloth before attaching.
Nose (Carrot), Make 1
- Sl knot, ch 8.
- Sc in the 2nd ch from the hook. [1 sc]
- Hdc in each of the next 2 ch. [2 hdc]
- Dc in each of the next 2 ch. [2 dc]
- Tr in each of the next 2 ch. [2 tr]
- Ch 2, sl st to finish. Fasten off, leaving a long tail for sewing. — The carrot graduates from narrow at the sc end to wide at the tr end. Laid flat, the widest point should be about twice the height of the narrowest. If the shaping reads as straight rather than tapered, check that you worked the stitch sequence in the right order along the foundation chain.

Mouth, Make 1
- Sl knot, ch 20. [20 ch]
- Fasten off, leaving a long tail at each end for sewing. — The mouth is a simple chain curve. It should be relaxed and slightly wavy when held up. Do not pull it taut. The curve comes from how it is pinned and sewn onto the face, not from the chain itself.
Assembly
- Lay the finished scarf flat and identify the face sections at each end. The white section is the snowman’s face area where the appliqués go. The black section is the hat above it.
- Pin the appliqués before sewing any of them down. Eyes sit roughly one third of the way down the white section, spaced evenly apart from the centre. The nose goes in the middle, slightly below the eyes. The mouth curves below the nose with the ends angling slightly downward. Step back and look at the full face before committing. A nose placed too low reads as a double chin rather than a face.
- Sew the eyes first (they anchor the face geometry for everything else), then the nose, then pin and sew the mouth. For the mouth, sew down both ends, pull the chain into a gentle curve, and tack the centre point as well. Repeat for the second face on the other end.
- Weave all remaining tails through the back of the scarf rather than cutting them flush, especially on a child’s scarf that will be washed.
The Character Dial: Classic or Playful
- The source design is the standard snowman: black and white with a red stripe and a carrot nose, and it reads immediately for what it is. Two directions from there.
- Go classic and tighten everything up: swap the mid-blue face sections for a pure navy, use a brick red rather than a bright red for the stripe, and work the mouth in a slight frown rather than a curve. The nose stays orange. A pair of tiny surface-stitched eyebrows in black above the eyes adds a lot of personality for very little work. The result is a snowman that looks slightly resigned about winter, which is honestly more relatable than a grinning one.
- Go playful and loosen it. Work the face section in pale lavender instead of blue, give the snowman a pink carrot nose, use a hot coral for the stripe instead of red, and embroider rosy circles in pink on each cheek below the eyes. The black hat section can become deep plum. This version reads as a snowperson rather than the classic snowman, and it is the one that children with opinions about colour will choose if you let them pick their own yarn.
Colourways
- Frost on the Common. Slate grey body, ice blue face sections, charcoal hat, cream white, dusty coral stripe. Muted enough to work on an adult, immediately familiar enough that a child still recognises it as a snowman.
- Apricot Snow. Off-white body, soft peach face section, caramel hat, the brightest orange you can find for the nose. No red anywhere. The warmth of the palette makes it look like the snow is catching the last of the afternoon light.
- Midnight Parade. Black body, deep cobalt face sections, gold stripe instead of red, bright white. A high-contrast version for older kids who have moved past pastels. The gold stripe holds its own against both the black and the cobalt.
- Knitted Toy. Warm mid-brown body, cream face section, any colour stripe, small felt nose cut and sewn rather than crocheted. The felt nose is faster for a batch and reads as slightly more toy-like than the crocheted carrot, which some children prefer.

Where It Lives
The finished scarf belongs on a child, specifically. Draped over a bedroom chair it works as decor through December, and then it goes outside where it belongs. A row of them hung from a wooden dowel on the wall of a school hallway, each with the child’s name sewn into the back of the blue section, makes a corridor display that is worth photographing before pickup day. As a gift it needs no wrapping; fold it so the face shows and tie it with a strand of yarn in the stripe colour.
After the Season
Hand wash it in cool water and dry it flat before putting it away. Hanging dries a long dc strip unevenly. When it is fully dry, fold it loosely so the face ends are visible rather than tucked inside, and store it in a breathable fabric bag rather than a sealed plastic bin. The appliqués hold better when the scarf is not compressed for eleven months. Check the mouth attachment in November before the next season, because a chain tacked at three points still loosens over time and is faster to re-sew before it comes off than after.
Quick Answers
- My daughter wants a pink snowman. Can I just swap the colours? Yes, entirely. Every colour in this pattern can be changed independently. The structure is just coloured blocks of dc rows, so swap any of them and the construction stays the same. The only one worth thinking about is the nose: if you want a pink nose instead of orange, work the carrot in pink yarn and nothing else changes.
- How do I stop the mouth from falling off? Three sewing points: both ends and the centre. Use doubled yarn or strong thread, pass through the scarf body at least four times at each point, and knot on the back side. Then run a thin bead of fabric glue under the chain as backup. A mouth that is only glued will last one school run.
- Can a ten-year-old make this as their first project? A ten-year-old who already knows how to chain and double crochet, yes. The stitch is the same all the way through. The main skill being practised is turning at the end of a row without losing stitches, which takes a few rows to get right and then clicks. If they are genuinely new to crochet, the appliqué pieces (especially the magic ring for the eyes) are worth practising on a swatch first.
- Will it fit a five-year-old and a ten-year-old? Measure the child. The 23-stitch width is fixed, but the dark blue middle section is fully adjustable. Count the rows as you go and hold the piece up against the child (or a piece of string cut to their neck-to-waist measurement) before fastening off. The source’s 90 rows is an adult length.