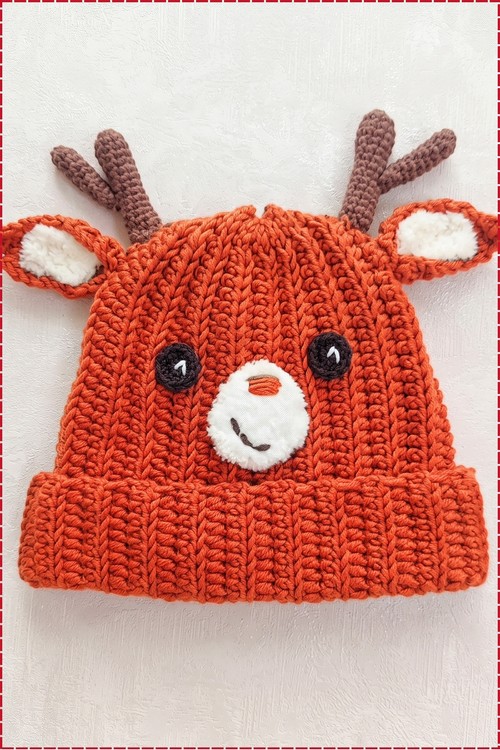
Free Crochet Christmas Baby Blanket Pattern
Choose a closed stitch and this crochet christmas baby blanket survives repeated washing without fingers catching in the gaps. Soft red or green rather than bright keeps it in use after the season rather than going in a box in January.
Six separate pieces go into a finished square, and none of them are throwaway. The base granny converts from a tight circular centre through four rounds of increases before it corners out, which means the reindeer face sits on a shape that begins round and squares itself outward, and you can see that transition in the finished piece if you know to look.
Crochet Christmas Baby Blanket

The antlers stay partly unsewn and stand proud of the fabric surface, which is the detail that separates this from a flat appliqué. The muzzle builds through four full rounds and has genuine dimension by the time it reaches the face. Nothing here is a shortcut.
The Christmas Countdown
- One complete square, all pieces sewn: four to six hours from first stitch to finished face, depending on how long the antler branches take to hold their shape in your hands.
- A set of four for a lap blanket panel: one weekend, two long days.
- A single square as a standalone wall piece or framed gift: doable in an evening and a morning.
- Latest sensible start for a gift: eight days out. The assembly alone, with pinning, positioning and embroidering the eyes, is a full hour.
- This is not a quick make. Plan for it.
Where Makers Usually Go Wrong on This One
- The colour change at the end of round 4 is where most people lose the clean finish on the base square. Pulling up a long loop before switching to green sounds like a minor instruction, but skipping it leaves a visible jog at the join that is impossible to hide in assembly. Do it exactly as written.
- The antler branches are the second risk. The instruction to leave the tips unsewn seems optional until you sew them flat by mistake and lose the 3D effect entirely. Pin the stems down, check the branches are free, and only then commit the needle. Unpicking antlers from a finished square is a specific kind of terrible.
- The muzzle is oval, not round, which the four-round build makes clear from round 1. If yours looks round after round 2, your starting chain of 6 has been worked into too tightly and the oval has been lost. Pull back to round 1, ease the stitches along the chain, and the shape will open up.
- Round 5 of the base square is the structural round that turns circle into square, and it requires a consistent rhythm of sc, hdc, dc, corner, dc, hdc, sc around each of the four sides. Rushing this round or miscounting the progression is what produces a square that sits like a diamond rather than a square when blocked.
Pieces at a Glance
- Base granny square, make 1
- Antlers, make 2
- Ears, make 2
- Muzzle, make 1
- Nose, make 1
Five components, six pieces to make. The ears and antlers are worked as mirror pairs, but both are made the same way from the same starting point, so there is no separate left and right version to track.
What You’ll Need
- 4-ply milk cotton yarn in warm brown for the main square body, antlers and base of the ears
- Dark brown yarn for the ear detail and colour work
- Green yarn for the outer border of the square
- Red or deep rose yarn for the nose
- Black yarn for embroidered eyes
- 2.5 mm hook
- Yarn needle
- Tapestry needle for embroidery
- Pins for assembly
Abbreviations used: sc is single crochet, hdc is half double crochet, dc is double crochet, inc is single crochet increase, ch is chain, sl st is slip stitch, MR is magic ring, BLO is back loops only, FLO is front loops only.
The Pattern
Part 1: Base Granny Square (Brown into Green)
Round 1
- Start with a MR.
- Work 11 sc into the ring. The starting ch does not count as a stitch. [11]
- Pull the ring tight and sl st into the first sc to join. Checkpoint: a tight flat disc with 11 even stitches radiating from the centre and no hole at the ring.

Round 2
- Ch 3, this counts as your first dc.
- Work 1 dc into the same sl st space to complete the first increase pair. [2 dc in one space]
- Work 2 dc into the next stitch, and repeat this increase across all remaining stitches for 10 pairs in total [CHECK: the source states 10 sets from the beginning ch-3 space, which would give 20 dc total if the ch-3 is counted as one dc. Confirm your stitch count against your round 1 total of 11 before joining.]
- Sl st into the 3rd ch of the starting ch-3 to join. Checkpoint: the piece should still sit flat. If it is cupping upward, you have too few increases. If it is ruffling at the edge, too many.
For Round 3
- Ch 3.
- Work 1 dc increase into the 2nd stitch.
- Work 1 dc into the 3rd stitch, then 1 dc increase into the 4th stitch.
- Repeat the sequence of (1 dc, 1 dc increase) for 10 sets in total [CHECK: stitch count not fully confirmed in source. The pattern of alternating plain and increase stitches should keep the piece flat.]
- Sl st into the first stitch to join. Checkpoint: still lying flat, noticeably wider than round 2, with the alternating plain and increased stitches creating a slight petal texture.
If you’re still learning how to read crochet patterns, no stress! Follow the video tutorial below and use the written pattern below as you get more comfortable!
Round 4
- Ch 3, this counts as the first dc.
- Work 1 dc into the 2nd stitch.
- Work 1 dc increase into the 3rd stitch.
- Repeat the sequence of (2 dc, 1 dc increase) for 10 sets in total [CHECK: same count caveat as round 3. Work the sequence consistently and the circle will remain flat.]
- Pull up a long loop before switching yarn. Change to green yarn by pulling it through, and sl st into the first stitch to join.
- Fasten off the brown yarn and weave in that end now, before the piece gets any more complicated. Checkpoint: a full, flat brown circle ready to be squared off in round 5.
Round 5 (Circle to Square)
- Using green, ch 3.
- Work 1 hdc into the next stitch, then 6 sc.
- Work 1 hdc, then 1 dc.
- Into the next stitch work the corner: (2 dc, ch 3, 2 dc) all into the same stitch. [corner made]
- Repeat this full side sequence (hdc, 6 sc, hdc, dc, corner) four times total to create all four sides and four corners.
- Sl st to join. Checkpoint: the piece should now lie as a recognisable square with four defined corner loops. If any side is shorter or longer than the others, the stitch sequence was not held consistently around one of the turns.

For Round 6
- Ch 3, this counts as 1 dc.
- Work 12 dc along the side.
- At the corner ch-3 space, work (2 dc, ch 3, 2 dc). [corner]
- Continue with 12 dc along the next side.
- Repeat for all 4 sides and sl st to join. [CHECK: 12 dc per side not independently verified against round 5 stitch count; adjust if your actual count differs.]
Round 7
- Ch 3.
- Work 16 dc along the side.
- At the corner ch-3 space, work (2 dc, ch 3, 2 dc). [corner]
- Complete all 4 sides.
- Finish with an invisible join rather than a sl st to keep the final round clean. Fasten off and leave a short tail. Checkpoint: a flat, even square with a clear green border and defined corners that do not pull inward or flare. Block lightly with a damp cloth now if the corners are resistant.
Part 2: Antlers (Make 2, Brown)
- Ch 11.
- Starting from the 2nd ch from the hook, work 2 sc.
- Work 1 sc decrease (worked over 2 stitches).
- Work 1 sc. [CHECK: 4 stitches worked down the main stem so far. The total stem length is not fully stated in the source.]
- First branch: ch 4. Starting from the 3rd ch from the hook, work 2 sc back along the branch chain. Continue down the main stem with 2 sc.
- Second branch: ch 4. Starting from the 3rd ch from the hook, work 2 sc back along the branch chain. Continue down the main stem with 2 sc.
- Ch 1 and leave a long tail for sewing. Checkpoint: a Y-shaped piece with two short branches, each ending in a distinct tip. Held up by the stem, both branches should point outward rather than curling back flat. If the branches are curling, the foundation chain was worked too tightly. Make both antlers before sewing either down.
For Part 3: Ears (Make 2, Light into Dark Brown)
- Using light brown yarn, ch 6.
- Starting from the 3rd ch from the hook, work 4 sc. [4]
- Change to dark brown on the final two loops of the last sc. Ch 1 and turn.
- Work 2 sc, 1 sc increase, and 1 sc. [5]
- In the top chain space, work (2 sc, ch 1, 2 dc). [corner of the ear tip]
- Work 1 sc, 1 sc increase, and 2 sc down the other side. [CHECK: total count not confirmed in source; the ear should be a pointed oval at this stage]
- Ch 1 to finish. Leave a tail for sewing. Checkpoint: a small pointed ear shape with a visible two-tone edge, light on the outer curve and dark at the inner detail. Both ears should be the same size before you commit to assembly.

Part 4: Muzzle (Cream or Light Brown)
Round 1
- Ch 6.
- Starting in the 2nd ch from the hook, work 4 sc in BLO. [4]
- Work 3 sc into the last chain stitch for the rounded end. [3 at the end]
- Work 3 sc in FLO along the opposite side of the chain, then 1 sc increase. [CHECK: total for round 1 not confirmed; should produce an oval shape]
- Sl st to join. Checkpoint: a small flat oval, distinctly longer than it is wide. If it looks like a circle, the end increases were too large or worked into adjacent stitches rather than all into one.
Round 2
- Ch 1, work 2 sc into the sl st space.
- Work 3 sc.
- Work 3 sc increases in sequence. [CHECK: exact placement of increases not confirmed in source]
- Work 3 sc, then 2 sc increases.
- Sl st to join. Checkpoint: a wider oval, visibly larger than round 1, still lying flat.
For Round 3
- Ch 1, work 1 sc, then 1 sc increase.
- Work 3 sc. [3]
- Repeat (1 sc, 1 sc increase) for 3 sets. [CHECK: count unclear in source]
- Work 3 sc, then repeat (1 sc, 1 sc increase) for 2 sets. [CHECK: count unclear in source]
- Sl st to join. Checkpoint: the muzzle is now substantial enough to cup very slightly at the edges, which is what will give it dimension once sewn onto the face.
Round 4
- Ch 1, work 1 sc, then 1 sc increase.
- Repeat (2 sc, 1 sc increase) for 11 sets in total. [CHECK: count unclear in source; work the repeat until you return to the start]
- Work 1 final sc increase.
- Finish with an invisible join. Fasten off and leave a long tail for sewing. Checkpoint: a large, flat, well-defined oval with no loose or uneven edges. This is the most visible piece on the finished square, so take a moment to block or press it lightly before assembly.
Part 5: Nose (Red)
Round 1
- Start with a MR and work 5 sc into it. [5]
- Pull the ring tight and sl st to join.
Round 2
- Work 5 sc increases (2 sc into each stitch all the way around). [10]
- Sl st to join.
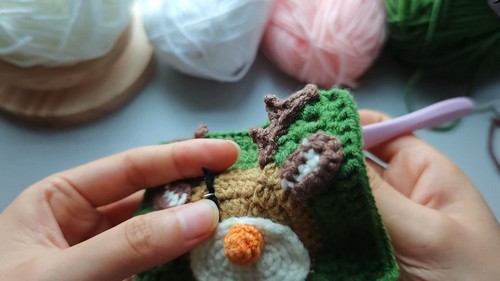
For Round 3
- Ch 1 and work 10 sc across. [10]
- Sl st, ch 1, fasten off.
- Turn the piece so the textured reverse side faces outward before sewing. This is not optional. The texture reads as a nose; the smooth side does not. Checkpoint: a small convex disc with a raised surface, about the size of a thumbnail.
Safety Eyes and Face
There are no safety eye rounds in this pattern. The face is worked entirely in embroidery after assembly, using black yarn and a tapestry needle. The upside of embroidered eyes is that they are completely safe for any age, for a gift to an infant, for a toy that will be washed. The downside is that placement is everything and you cannot move them once the yarn is pulled through and knotted. Take a pin and mark eye position on the assembled face before committing the needle. Stand back and look from a full arm’s length. The eyes almost always need to move down one stitch from where your first instinct puts them.
Assembly
Order matters here because each piece covers the base of the one above it.
- Sew the muzzle onto the centre of the base square using the remaining yarn tail, pinning it first and adjusting until it sits level. The muzzle is the anchor for everything else, so if it is off-centre the whole face will follow.
- Sew the nose onto the centre of the muzzle. Position it slightly toward the top of the muzzle oval rather than dead centre, which reads as more naturalistic.
- Pin the ears to the upper sides of the face area and check left-right symmetry before sewing. The ear bases should sit just inside the green border.
- Position the antlers above the ears with the stems pointing down toward the ears and the branches opening outward and upward. Sew the stems down firmly. Leave the branched tips free and unsewn so they stand proud of the surface.
- Embroider the eyes last, above and on either side of the muzzle. Simple closed arcs read better than open circles at this scale and this yarn weight.
Stuffing
Nothing in this pattern is stuffed. The muzzle has natural dimension from its four-round build and does not need filling. If you want more pronounced dimension on the muzzle, you can work a small loose knot of yarn scraps between the muzzle and the square surface before closing the final sewing stitches, but the original does not call for it and the difference is subtle. The nose disc is convex by construction rather than stuffing.

The Character Dial: Rustic or Bright
- Rustic runs toward a reindeer that looks like it belongs in a Scandinavian textile tradition rather than a greeting card. Use undyed or lightly heathered brown throughout the face, leave the ears in one muted colour rather than two-tone, and replace the red nose with a dark walnut brown so the face reads as a single warm palette. Work the green border in a deep spruce rather than bright green. Embroider the eyes as small open ovals rather than arcs, which gives a more awake, less cartoon look. A cream or natural undyed yarn for the muzzle instead of a contrasting colour pulls the whole face together without reads as simplified.
- Bright goes the other direction and commits to it. A milk chocolate brown base, crisp white muzzle that reads clearly from across a room, cherry red nose, and a saturated holly green border. Add a second colour to the antler tips by switching to cream for the final two stitches of each branch, which the source never suggests but which reads beautifully when the antlers are standing up. Satin ribbon loop at the top corner to make it a hanging piece. For a children’s room version, add small red and white beads along the green border as a faux-garland, sewn down individually with a backstitch so they hold securely.
Colourways
- Reindeer in Snow. Warm oat main body, cool grey-white muzzle, burgundy nose, pine green border. Quieter than the original and better for a room with a lot going on.
- Gingerbread. Warm ginger brown, terracotta muzzle, dark cocoa nose, deep sage border. Every element reads as edible in the best possible way.
- Midnight Stable. Very deep walnut brown, cream muzzle, forest green border with a strand of gold held alongside. The nose in dark red rather than bright. Use this one for the piece that lives year-round.
- Classic Bright. The original palette pushed to full saturation. Milk chocolate, white, cherry red, holly green. The one for someone who wants to find this from across a room.
Where the Square Actually Lives
Framed under glass as a wall piece, which works especially well with the 3D antlers because the frame gives the branches room to be slightly raised without getting crushed. Stretched over an embroidery hoop in the same way. Sewn into the front pocket panel of a large tote that becomes a December bag. Set into the corner of a lap blanket as a single feature square. Made in a small set and hung as a mobile above a cot, which works only if the antler tips are very securely stitched and the whole piece passes the tug test.
After the Season
Cotton holds up well to storage, but the antlers have a memory for shape and they need to be stored without anything pressing down on the branches. A shoebox with tissue paper supporting the tips works. If the piece is sewn into a blanket that goes into a vacuum bag, the antlers will flatten, and they do not always recover their lift when taken out. Better to store the blanket folded, antlers outward, in a bag with a cedar block rather than compressed. Check the embroidered eye stitches before display each year, since embroidery on a softly textured base shifts over time and a stitch can work free without becoming immediately visible.
Quick Answers
- My base square is cupping and won’t lie flat. The increase count in rounds 2, 3 or 4 is off, usually too few increases, which pulls the circle inward. Block the piece aggressively under a damp cloth with pins at the corners. If that does not fix it, round 5 will make it worse because the corner structure needs a flat base to square properly.
- The antler branches keep flopping forward onto the face. They need a little stiffening, which the source does not address. Work a thin twisted cord from the same yarn and whip-stitch it along the back of each branch before sewing the stems down. Invisible from the front and enough to hold the angle.
- Can I scale this up to a full blanket square? Yes, with a larger hook and aran or worsted weight yarn. The muzzle and nose rounds stay the same in number; they will just produce larger pieces. The antlers need one or two more chain stitches in the starting chain and an extra branch to stay proportional. Everything else follows.
- My two antlers look different sizes. They probably are, because the branching is worked by feel and hand tension is never perfectly consistent across two separate pieces. Hold them back to back before sewing and see which branch needs extending. Two extra stitches on the shorter branch tip, fastened off and woven in, brings them level without remaking.