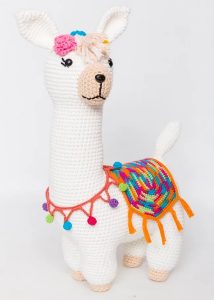
Free Crochet Witch Amigurumi Pattern – Beginner’s Guide
This Crochet Witch Amigurumi with Hat pattern is the Halloween project you didn’t know you needed until right now. She sits on shelves, hangs from bags, and judges your yarn stash with her tiny little eyes. Beginner friendly and works up in one cozy evening. Make her. You won’t regret it.
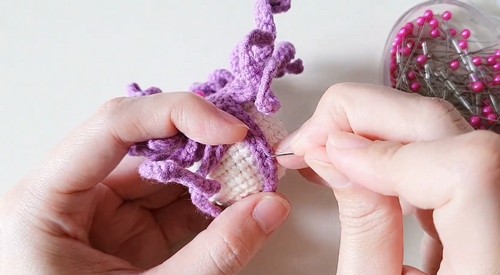
Witch amigurumi patterns live or die by the hair, and this crochet witch amigurumi pattern gets it exactly right. The looped purple ringlets are worked separately and sewn on in sections, which gives the finished piece that full, wavy volume that makes the character instantly readable from across a shelf.
Crochet Witch Amigurumi

How Much Time Do You Have?
- One witch runs about 3–4 hours for a first-time amigurumi maker, including the hat and hair strands. If you’ve made a stuffed sphere before, budget closer to 2.5 hours. A batch of six sits around 15–18 hours total.
- Starting from zero: you can comfortably finish one witch with 4–5 days to spare before Halloween. Don’t leave the hair strands for the last evening — they’re meditative but there are a lot of them.
Pieces List
- Head × 1
- Hair cap × 1
- Hair strands × 24 (worked directly onto the cap)
- Witch hat × 1
- Face details (embroidered mouth, blush cheeks)
Total crocheted pieces: 3 separate elements. The hair strands attach to the cap, which attaches to the head. The hat sits on top of everything.
Materials
- Milk cotton yarn: skin tone, black, purple
- Gold glitter yarn (for hat band — a small amount)
- 2.50 mm crochet hook
- Polyester fiberfill
- 4 mm black safety eyes × 2
- Black embroidery thread
- Pink blush or cosmetic chalk
- Tapestry/sewing needle
- Needle pins (for positioning before sewing)
- Hot glue gun and glue sticks
- Scissors
Abbreviations (US Terms)
MR — Magic Ring sc — Single Crochet inc — Increase (2 sc in same stitch) dec — Decrease (2 sc together) hdc — Half Double Crochet dc — Double Crochet dc inc — Double Crochet Increase (2 dc in same stitch) FLO — Front Loop Only slst — Slip Stitch ch — Chain
Technique Notes for Beginners
This section exists because the pattern assumes you know a few things. If any of these are new to you, read this before you pick up your hook.
The Magic Ring
- A magic ring (also called a magic circle or magic loop) is how almost all amigurumi pieces start. Rather than chaining and joining, you wrap the yarn around your fingers, crochet into the loop, then pull the tail tight to close the centre hole completely.
- To make one: wrap yarn around two fingers to form a loop, insert your hook through the loop from front to back, pull up a loop of working yarn, chain 1 to secure, then work your first-round stitches into the ring. When the pattern says “6 sc into MR,” work all 6 stitches into that ring before pulling the tail to close it.
- If the centre hole won’t close, pull the tail firmly while holding the ring. Practice on scrap yarn once before starting the actual piece — it clicks after two tries.

Continuous Rounds vs. Joined Rounds
- This pattern works in continuous rounds — you never join at the end of a round or chain up to start the next one. You simply keep crocheting in a spiral. This is standard for amigurumi and gives you a seamless finish, but it means you can lose track of where one round ends and the next begins.
- Always use a stitch marker. Move it to the first stitch of each new round as you go. A scrap of contrast yarn looped through a stitch works just as well as a plastic marker.
The Decrease (dec)
- A standard decrease joins two stitches into one, reducing your stitch count. In amigurumi, the invisible decrease is strongly preferred — it closes the surface more neatly and reduces the gaps that show stuffing through.
- To work an invisible decrease: insert your hook under the front loop only of the first stitch, then under the front loop only of the second stitch, yarn over and pull through both loops, yarn over and pull through the remaining 2 loops on the hook. That’s one decrease — two stitches become one, and from the outside it’s nearly invisible.
Closing a Sphere
When your final round is down to 6 stitches, fasten off and cut the yarn leaving a tail of about 20 cm. Thread the tail onto a tapestry needle. Pass the needle through the front loop only of each remaining stitch, going around the circle once. Pull the tail gently and the hole will gather closed. Pass the needle into the body and out the side to hide the end — don’t cut it flush.
The Pattern
Part 1 — Head
Use skin tone yarn and 2.50 mm hook. Work in continuous rounds with a stitch marker.
- Rnd 1: 6 sc into MR. (6) Rnd 2: Inc in each st around. (12) Rnd 3: [1 sc, inc] × 6. (18) Rnd 4: [1 sc, inc, 1 sc] × 6. (24) Rnd 5: [3 sc, inc] × 6. (30) Rnds 6–11: Sc in each st around. (30) — 6 rounds even.
- → Shape checkpoint: After Round 2, you should have a small flat circle of 12 stitches — it will look almost like a coin. By Round 5, it should be doming upward into a bowl shape, about 4–5 cm across. If it’s staying flat or ruffling at the edges, your tension is off — too tight keeps it flat, too loose makes it ruffle. Adjust your hook grip and try a swatch first if you’re unsure.
- → Shape checkpoint: After Round 11, you have an open-topped sphere about halfway built. The sides should be straight and even, not tapering inward or bowing out. This is the right moment to check that your stitch marker is in the correct position — count 30 stitches around once before continuing.
- Safety eye placement — do this now, before Round 12: Attach the 4 mm safety eyes between Rounds 7 and 8, positioned 6 stitches apart. Push the locking washers on firmly from the inside until they resist. You cannot reach inside safely after the decreases begin.
- Stuff the head firmly at this point too — add fiberfill through the open top until the sphere feels solid and holds its shape when you squeeze it gently. You’ll add a little more before fully closing, but getting the bulk of it in now is much easier.
- Rnd 12: [3 sc, dec] × 6. (24) Rnd 13: [1 sc, dec, 1 sc] × 6. (18) Rnd 14: [1 sc, dec] × 6. (12) Rnd 15: Dec × 6. (6)
- Add a final pinch of stuffing if there are any soft spots, then close the sphere using the method described in the technique notes above. Leave a long tail — you’ll use it to attach the hair cap later.
New to crochet and not sure how to read a pattern yet? The video tutorial below will guide you through it step by step, you’ve got this!
→ Shape checkpoint: The finished head should be a firm, smooth sphere with no obvious flat spots or lumps. Roll it gently across a flat surface — it should roll, not rock. The safety eyes should be centred and level, with the closing seam at the bottom.
Part 2 — Hair Cap
Use purple yarn.
- Rnd 1: 6 sc into MR. (6) Rnd 2: Inc in each st around. (12) Rnd 3: [1 sc, inc] × 6. (18) Rnd 4: [1 sc, inc, 1 sc] × 6. (24)
- Fasten off, leaving a long tail for sewing. The hair cap is a small flat circle — it should lie completely flat after Round 4 and match roughly the top curve of the head. If it’s doming upward, the tension was too tight; if it’s ruffling, too loose.
Part 3 — Hair Strands
All strands are worked directly from the hair cap stitches using purple yarn. Each strand chains out, works back down, and slip stitches into the next cap stitch to anchor. Work them in order before attaching the cap to the head.
- Strands S1–S2 (long straight strands): Ch 17, starting in 2nd ch from hook: 16 sc back down the chain, slst into next cap stitch.
- Strands S3–S7 (short strands): Ch 6, starting in 2nd ch from hook: 5 sc back down the chain, slst into next cap stitch.
- Strand S8 (shaped strand): Ch 11, starting in 2nd ch from hook: slst, 2 sc, 2 hdc, 1 dc, 2 hdc, 2 sc, slst into next cap stitch.
- Strands S9–S11 (small shaped strands): Ch 6, starting in 2nd ch from hook: slst, 1 sc, 1 hdc, 2 sc, slst into next cap stitch.
- Strand S12 (shaped strand): Ch 11, starting in 2nd ch from hook: slst, 2 sc, 2 hdc, 1 dc, 2 hdc, 2 sc, slst into next cap stitch.
- Strands S13–S17 (long strands with slip stitch base): Ch 16, starting in 2nd ch from hook: 5 slst, 10 sc, slst into next cap stitch.
- Strands S18–S24 (long straight strands): Ch 17, starting in 2nd ch from hook: 16 sc back down the chain, slst into next cap stitch.
The mixed stitch heights in S8, S9–S11, and S12 create a gentle wave along those strands. Work them loosely — if you tension the chain tightly the strand will curl and bunch rather than hang naturally.
Part 4 — Witch Hat
Use black yarn. Work in continuous rounds, same as the head.
- The hat is worked top-down, starting at the pointed tip.
- Rnd 1: 3 sc into MR. (3) Rnd 2: 1 sc, inc, 1 sc. (4) Rnd 3: 1 sc, 2 dc inc, 1 sc. (6) Rnd 4: Inc, [1 dc, dc inc] × 2, inc. (10) Rnd 5: 4 sc, 2 dc, 4 sc. (10) — even round, creates taper in the hat cone. Rnd 6: 4 sc, 2 dc inc, 4 sc. (12) Rnd 7: [1 sc, inc] × 6. (18) Rnd 8: Sc in each st around. (18) Rnd 9: [1 sc, inc, 1 sc] × 6. (24) Rnd 10: Sc in each st around. (24)

Change to gold glitter yarn.
- Rnd 10 (gold band): Sc in each st around. (24) — 1 round in gold only.
Change back to black yarn.
- Rnd 11 (FLO): Working in front loops only — [3 sc, inc] × 6. (30) Rnd 12 (FLO): Working in front loops only — [inc, 4 sc] × 6. (36)
- Fasten off and weave in ends. The hat is not stuffed — cotton yarn holds the cone shape without any filling.
- → Shape checkpoint: The tip of the hat should taper to a proper point, not a blunt nub. If it looks flat at the top, the magic ring wasn’t pulled tight enough — this is fixable by threading the tail back through the centre stitches and pulling again. The brim (Rounds 11–12, worked in FLO) should flare outward naturally. If it’s not flaring, check that you worked in the front loops only — working both loops keeps the brim vertical rather than flat.
→ Shape checkpoint: The gold band (one round between the cone and brim) should sit as a clean horizontal stripe. If it looks uneven, check the colour change — pick up the new colour on the last yarn-over of the final stitch in the previous colour, not after.
Face Details
Mouth: Thread a sewing needle with black embroidery thread. Work a small curved smile below the safety eyes using 2–3 stitches. A single long stitch anchored at a slight curve at each end is the quickest approach. Keep it subtle — a tiny smile reads better on a small face than a wide one.
Cheeks: Dip a cotton swab into pink blush or cosmetic chalk and tap lightly on each side of the face, just below and outside the eyes. Build up gradually — you can always add more, you can’t remove it. A little goes a long way on a face this small.

Assembly Order
Follow this sequence exactly — the hat goes on last, over everything else.
- Step 1: Sew the hair cap to the top of the head. Position it with needle pins first and check from multiple angles — it should sit centred, covering the top half of the head. Sew around the edges with the yarn tail.
- Step 2: Apply hot glue to the underside of each hair strand and press it against the side of the head, shaping while the glue is still warm. Work from the front strands backward. The longer strands (S1–S2, S13–S18+) frame the face; the short strands cluster at the top and sides.
- Step 3: Embroider the mouth with black embroidery thread.
- Step 4: Apply blush cheeks with a cotton swab.
- Step 5: Place the witch hat over the hair cap and glue or sew in place. Gluing is faster and holds well; sewing is more durable if the witch will be handled regularly.
- Step 6: Weave in any remaining yarn ends. Trim loose threads.
- Pin before you glue. The hat placement in particular is easy to get wrong — it should tilt forward very slightly, not sit perfectly level, which reads as more expressive on a small figure. Pin it and look at it from the front before committing.
Safety Eye Timing
Eyes attach between Rounds 7 and 8 of the head, before Round 12, while the opening is wide enough to reach the inside and press the washer on firmly.
If you miss this window, the honest answer is to embroider the eyes — two small satin-stitched ovals in black floss will look intentional rather than like a mistake, and on a 2.5 mm gauge face they read clearly.
For children under three, treat bags, or party favours: embroider all eyes regardless. Safety eyes have a locking mechanism but are not choke-proof.
Stuffing Notes
The head needs firm stuffing — it’s the largest piece and the only one that’s stuffed. A firmly stuffed head sits better on a display surface and holds the hat more naturally. The hair cap and hat are not stuffed. Over-stuffing the head will stretch the stitches and create visible gaps; stop adding fiberfill when the surface still looks closed and even.
The Character Dial
- Toward sweeter: swap the purple hair for pale pink or lavender. Give the witch a slightly wider eye spacing for a more open expression. Use a very light blush, almost invisible. This version reads as a friendly Halloween figure rather than a spooky one — appropriate for spaces shared with kids who don’t want anything too menacing.
- Toward creepier: keep the purple hair but use a very deep, near-black purple. Skip the blush entirely. Embroider the smile as a thin straight line rather than a curve. Work the hat in a slightly oversized proportion by adding one or two extra even rounds before the brim — a too-big hat on a small head reads as unsettling in the best possible way.
Colourways
- Traditional Coven — black hat, purple hair, warm skin tone, gold band. The pattern’s own palette. Works because it’s supposed to.
- Forest Witch — deep green hat, rust or terracotta hair, darker skin tone, copper glitter band. Earthy and unusual. Photographs beautifully against autumn leaves.
- Silver & Midnight — very dark navy hat, silver-grey hair, pale skin, white glitter band. More elegant than Halloween-costume. Works on a bookshelf in November without looking out of place.
- Candy Witch — bright pink hat, white hair, rosy skin, gold band. For the child who wants Halloween in their bedroom year-round. Zero ambiguity about whose witch this is.
Display Ideas
- The hat makes this figure read clearly from a distance, which means it works well in spots where smaller details would be lost. On a mantel, it holds its own next to taller décor because the pointed hat adds vertical presence. On a tiered tray, it anchors the arrangement without needing a riser. A row of witches along a windowsill, hats slightly tilted at different angles, requires almost no other decoration around it.
- One spot that works especially well and that people don’t always think of: propped against a small stack of books on a desk or nightstand. The hat rests against the spines naturally and the figure looks like it’s been sitting there for years.

After the Season
Cotton yarn holds colour well in storage but the hair strands, being glued, can pick up dust. Before putting your witch away, brush the hair lightly with a clean dry toothbrush to remove any lint. Store in a small box or zip bag, hat upright — laying it on its side for months will compress the brim. When you bring it back out next year, a light finger-press on the brim while it’s slightly warm (near a lamp, not a heat gun) will restore the shape.
Quick Answers
- I’ve never made a magic ring before. Is it hard? It takes about two tries to get the feel of it. Wrap the yarn around two fingers, insert your hook through the loop, pull through a working loop, chain once, then crochet your starting stitches into the ring before pulling the tail closed. Practice on scrap yarn first — once it clicks, you’ll use it for every amigurumi you ever make.
- My sphere keeps going flat instead of rounding up. What’s wrong? Usually tension. With a 2.5 mm hook and milk cotton, the fabric should feel firm and slightly resistant to the hook. If you’re crocheting very loosely, the piece will stay flat rather than curving into a dome. Try gripping the yarn more firmly, or drop down to a 2.0 mm hook and see if the shape improves.
- What if I can’t find gold glitter yarn for the hat band? A single round of gold or yellow DK or sport-weight yarn works fine. The glitter is decorative — the band reads clearly in any contrasting colour. Cream or copper would both work.
- The hair strands are making me anxious. Is there an easier version? Yes — cut lengths of purple yarn (about 15 cm each), fold each one in half, and use a crochet hook to pull the folded loop through a stitch on the hair cap, then pull the ends through the loop. This is a standard fringe technique and goes much faster than the crocheted strands. The texture is slightly different but the effect is similar.
- Can I skip the hot glue and just sew everything? Completely. Hot glue is faster, but sewing with a tapestry needle and matching yarn is more durable and means the witch is washable if needed. Use small, tight whip stitches around the cap edge and the hat base.