Crochet Chicken Leg Free Pattern Amigurumi
Bold red and yellow 4-ply yarn turns this crochet chicken leg amigurumi into a graphic play food drumstick with twin bone knobs. It works up on a 3 mm hook in about an hour and a half, a quick afternoon make for any pretend kitchen.
Play kitchens get a serious upgrade from the crochet chicken leg amigurumi sitting in the toy fridge. It suits toddlers sorting pretend food and older kids running a play café. The crochet chicken leg amigurumi also lands with anyone building a felt food collection by hand instead of buying plastic sets.
Crochet Chicken Leg Amigurumi

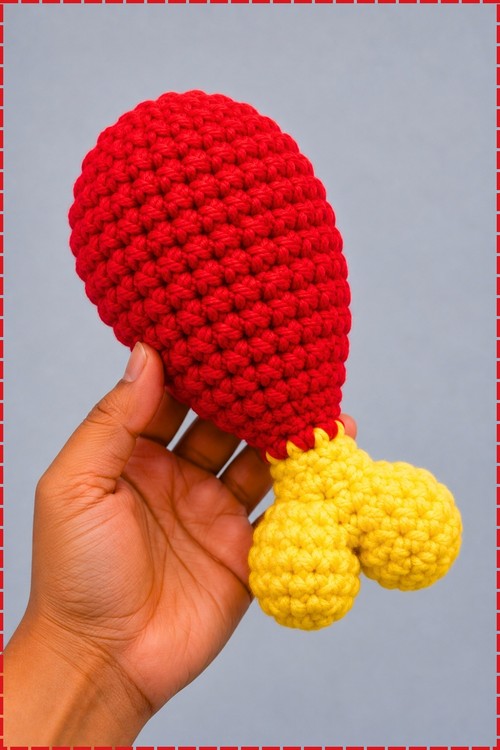
Two yellow knobs at the narrow end read instantly as the bone, while the wide red body tapers down to meet them. It fills a hand from palm to fingertips. The drumstick shape is built in one stuffed piece worked in the round, widening at the top and narrowing toward the base before the colour switch. Bone ends are two small balls made separately and joined at the tip. Nothing needs shaping beyond even increases and decreases, so the result depends mostly on stuffing it firmly. Sewing the bone on straight is the only fiddly moment in the whole make.
Materials And Tools
- Red 4-ply yarn for the meat section
- Yellow 4-ply yarn for the bone knobs and shaft
- Crochet hook in 3 mm
- Fiberfill stuffing
- Tapestry needle
- Scissors
Colour notes for my version. The original pattern uses brown for the meat and white for the bone to read as a realistic chicken drumstick. Mine runs red and yellow for a bold graphic look. Every round, row and stitch count below is unchanged from the original.
Difficulty And Time
Straightforward beginner to easy intermediate. The trickiest part is Row 4 of the bone, where you work across both knob pieces in one pass to join them. From my own build this took around an hour and a half across both pieces, not counting seaming. Make the bone knobs first so you can check the join before committing to the full drumstick.
Technique Notes
- Every row in this pattern begins with a ch 1 to rise and ends with a sl st into the first stitch of that row. Keep that chain 1 consistent throughout or your row heights will vary and the drumstick will look uneven along the side. The ch 1 does not count as a stitch, so do not work into it at the start of the following row.
- Use an invisible decrease throughout. Standard decreases leave a visible bump on the surface, and invisible ones are what keep the tapering clean along Rows 11 to 15 of the meat. Insert your hook under the front loops only of the next two stitches, pull up one loop, then yarn over and draw through all three loops.
- Stuff both pieces before the final closing rows, not after. Stuffing at Row 14 on the meat and at Row 6 on the bone gives you enough room to pack the fiberfill in properly while the opening is still wide. Waiting until Row 15 leaves a 6 stitch hole that barely fits a finger.
- When joining the two bone knobs in Row 4 of the bone shaft, align them side by side so both right sides face outward, then sc across all 8 stitches of Piece 1 and all 8 of Piece 2 in a single pass. The join happens automatically as the yarn spans the gap between the two pieces, which is what creates the narrow connector you can see in my photo.
The Pattern
Abbreviations
- MR means magic ring
- ch means chain
- sc means single crochet
- inc means increase, two single crochet in the same stitch
- dec means decrease, invisible decrease
- sl st means slip stitch
- st or sts means stitch or stitches
- Every row begins with ch 1 to rise and ends with sl st into the first stitch of that row

Meat Section In Red
- Row 1: 6 sc into a magic ring, pull tight, sl st into the 1st sc [6 sts]
- Row 2: Ch 1, 6 inc, sl st [12 sts]
- Row 3: Ch 1, repeat 1 sc then 1 inc six times, sl st [18 sts]
- Row 4: Ch 1, repeat 1 sc, 1 inc, 1 sc six times, sl st [24 sts]
- Rows 5 to 10, six rows: Ch 1, 1 sc in each stitch around, sl st [24 sts per row]. Six straight rows is what gives the drumstick its rounded middle section, and going too few leaves a stubby shape
- Row 11: Ch 1, repeat 1 sc, 1 dec, 1 sc six times, sl st [18 sts]
- Row 12: Ch 1, 1 sc in each stitch around, sl st [18 sts]
- Row 13: Ch 1, repeat 1 sc then 1 dec six times, sl st [12 sts]
- Row 14: Ch 1, 1 sc in each stitch around, sl st [12 sts]
- Stuff the meat firmly with fiberfill now, before the next row closes the opening too far
- Row 15: Ch 1, 6 dec around, sl st [6 sts]
- Fasten off and weave in the ends
Bone Knobs In Yellow, Make 2
- Row 1: 4 sc into a magic ring, pull tight, sl st [4 sts]
- Row 2: Ch 1, 4 inc, sl st [8 sts]
- Row 3: Ch 1, 1 sc in each stitch around, sl st [8 sts]. You should now have a small round disc for each knob
- For Piece 1: Fasten off and cut the yarn
- For Piece 2: Do not cut the yarn, since you will use it to continue into the shaft
Bone Shaft
- Row 4: Ch 1, work 8 sc directly across all stitches of Piece 1, then work 8 sc directly across all stitches of Piece 2 in the same pass, sl st [16 sts]. Hold both pieces side by side with right sides facing out before you start this row, since their positions here decide how the finished bone sits
- Row 5: Ch 1, 1 sc in each stitch around, sl st [16 sts]
- Row 6: Ch 1, 8 dec around, sl st [8 sts]
- Stuff the bone knobs with fiberfill now through the narrowing opening
- Row 7: Ch 1, repeat 1 sc, 1 dec, 1 sc twice, sl st [6 sts]
- Fasten off leaving a yarn tail long enough for sewing

Assembly
- Align the open end of the bone shaft with the bottom opening of the red meat piece, with the two knobs sitting below the drumstick body
- Use a tapestry needle and the yellow yarn tail to sew the bone securely to the meat, working all the way around the join so no gap appears between the two pieces. Check the alignment from the front as you sew since the knobs should sit centred below the drumstick, exactly as they do in my photo
- Weave in any remaining ends inside each piece
- Attach a keychain loop at the top of the meat if you want it as a bag charm or keyring, though my version is a standalone plushie with no keychain
Yarn Substitution
Any smooth 4-ply yarn holds this shape well. Cotton gives the cleanest stitch definition and is what I used. Acrylic works and is softer to handle, though the sheen is different. Avoid anything fuzzy since the decrease lines on the meat taper and a halo blurs them. Keep both colours in the same weight or the seam between meat and bone will not sit flush.

Customisation Ideas
Brown and white is the realistic version. Red and yellow is what I made for a cartoon look. Other colour swaps that work well include orange and beige for a roasted look, or deep purple and cream for a fantasy version. Adding a few stitches of a darker colour around the base of the meat before the knobs reads as a grill mark.
FAQ
- Why does my drumstick look lumpy in the middle section? Lumps in Rows 5 to 10 almost always come from uneven stuffing rather than uneven stitches. Try repacking the fiberfill so it fills the sides evenly rather than sitting as a central ball.
- The bone knobs came out different sizes. What went wrong? Check that both pieces used the same starting ring tension. A looser magic ring in Piece 1 gives it a larger base than Piece 2, and the two rows before joining are not enough to correct that gap.
- Can I make a larger version? Yes. Go up one or two hook sizes and use a heavier yarn, keeping the same stitch counts. Alternatively, add two extra increase rows after Row 4 of the meat before the straight rows and two matching decrease rows before Row 11.