Crochet Sheep Bag Free Pattern In Brown
Carry a little farm friend on your shoulder: this brown sheep bag pairs looped fleece with a cream face, black ears and feet, long straps, and a button closure. For smaller handmade treats, visit the bakery keychain set.
Autumn colouring puts the Crochet Sheep Bag right in step with the season, all rust brown fleece against boots and jumpers. Children carry it to school through winter. Farm shows and harvest fairs in spring give another outing. Hooking a Crochet Sheep Bag now means it is ready before the leaves turn.
Crochet Sheep Bag
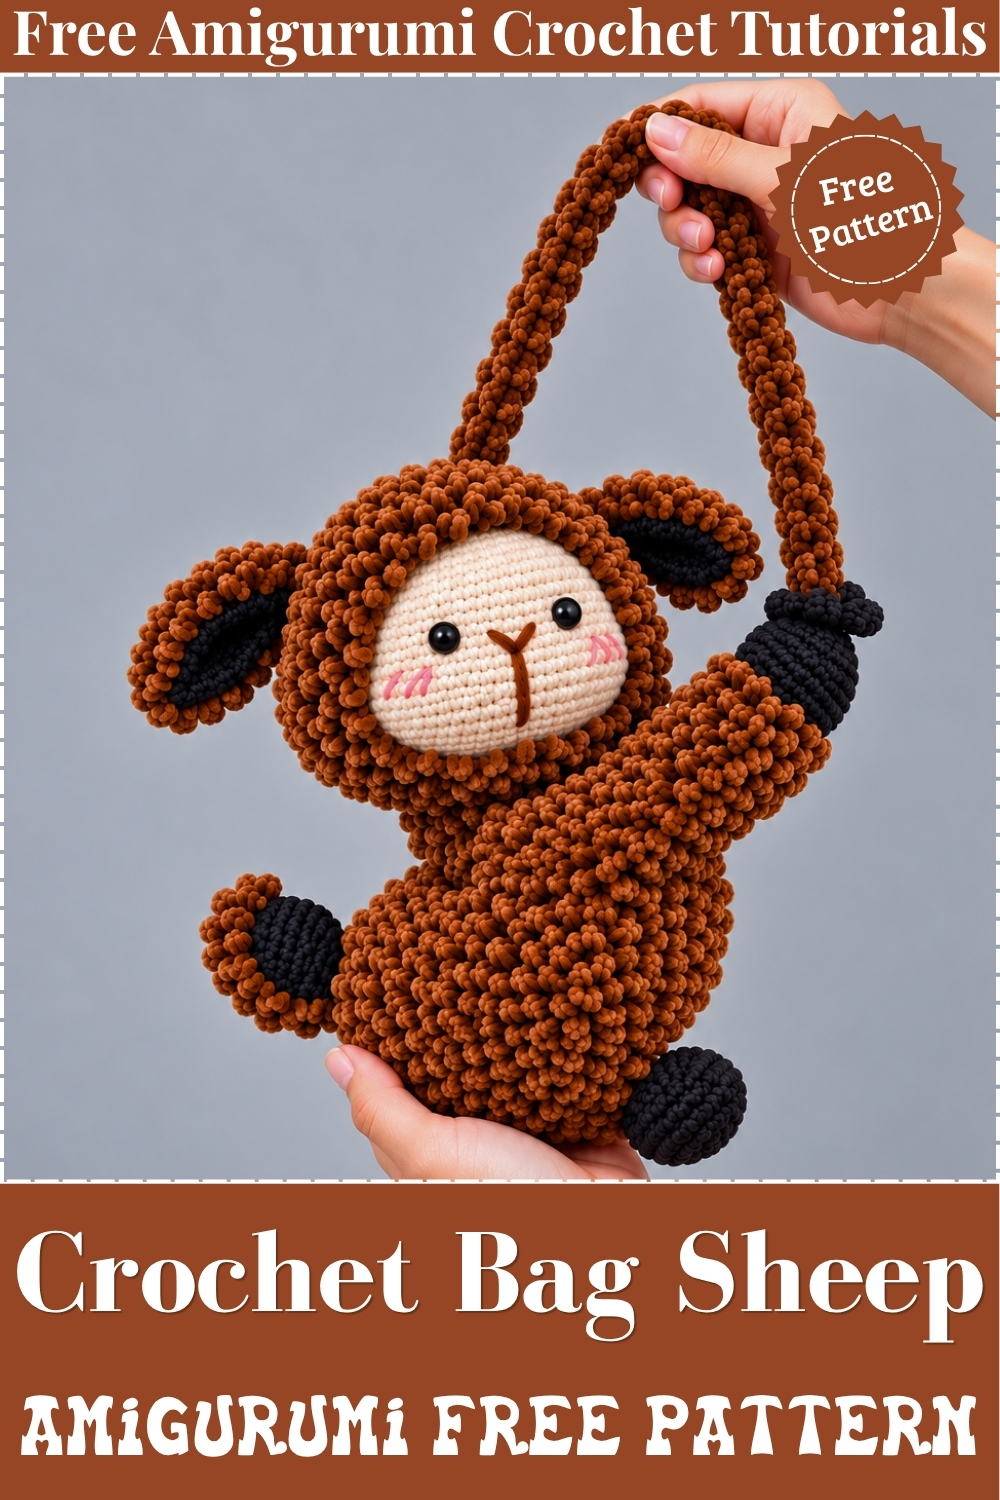
The body of this crochet sheep bag is worked entirely in back loops, round after round, so every front loop stays free for the fluffy chain-5 loop stitches that go on afterwards and give the piece its dense, textured fleece. My version lands in warm chocolate brown for the body fleece, with a cream single-crochet face, black ears and black feet that make the sheep read as a dark breed rather than the classic white version. Two long brown straps attach at the sides and the whole bag carries comfortably in one hand. The face is simple: two black safety eyes, a brown Y-shaped nose and pink embroidered blush.
Why I love this one: the moment you add the fluffy loops over the finished body, it transforms from a flat structured bag into something that looks like it took three times as long as it actually did. The BLO body work and the loop layer are two completely separate steps, and that separation makes both easier to execute cleanly.
Materials and Tools
- Milk cotton yarn in warm chocolate brown for the bag body fleece, arms fleece, and head cap fleece. The original pattern suggests cream or white for the fluffy layer. My version uses brown throughout for a darker sheep look.
- Milk cotton yarn in cream or off-white for the face, inner ear detail, and the single-crochet head. My photo shows the face worked in a pale cream that contrasts clearly against the brown fleece.
- Milk cotton yarn in black for the ears and feet. The original pattern works these in skin colour. My version uses black, as visible in the photo.
- A 4.0 mm crochet hook used with 2 strands held together for the bag body, arms, legs and straps.
- A 3.0 mm hook if you choose to work with a single strand only.
- Approximately 200g of polyester fiberfill for the head, arm tips and leg paws.
- Two 10 mm black safety eyes.
- Pink embroidery thread or yarn for the blush lines.
- Brown or dark embroidery thread for the Y-shaped nose and mouth.
- A 15 mm button for the bag closure.
- Stitch markers, a yarn needle, a hot glue gun and optional pink blush powder.
A Note on the Working Method
Every round of the bag body, head cap, arms and legs is worked in back loops only, which leaves the front loops exposed for the fluffy loop layer added afterwards. This is the structural logic of the whole bag. If you accidentally work through both loops at any point in the BLO sections, the front loops will not be available for the fleece step and the texture will be uneven. The ch-5 loop stitch used for fleece is simply a chain of 5 followed by a slip stitch into the next exposed front loop. It looks intimidating across 20 rounds of stitches, but each individual repeat takes only a second.
The Pattern
Part 1: Main Bag Body in Brown Fluffy Yarn
- Round 1: Make a MR, ch 2, work 12 dc into the MR. Sl st to the first dc in BLO. (12)
- Round 2: Ch 2, work 3 dc in each stitch around in BLO. Sl st to the first dc in BLO. (36)
- Round 3: Ch 2, work [1 dc, 2 dc in next stitch, 1 dc] x 12 in BLO. Sl st in BLO. (48)
- Round 4: Ch 2, work [3 dc, dc-inc] x 12 in BLO. Sl st in BLO. (60)
- Round 5: Ch 2, work [2 dc, dc-inc, 2 dc] x 12 in BLO. Sl st in BLO. (72)
- Round 6: Ch 2, work [5 dc, dc-inc] x 12 in BLO. Sl st in BLO. (84)
- Rounds 7 to 8: Ch 2, work 84 dc in BLO around for both rounds. Sl st in BLO. (84)
- Round 9: Ch 2, work 37 dc in BLO, then 10 dc-inc in BLO, then 37 dc in BLO. Sl st in BLO. (94) The 10 dc-inc all sit in the same section and form the widened front of the bag, which is what gives the body its slightly oval rather than perfectly circular shape.
- Rounds 10 to 12: Ch 2, work 94 dc in BLO around for all 3 rounds. Sl st in BLO. (94)
- Round 13: Ch 2, work 27 dc in BLO, then [1 dc, 1 dc-dec, 1 dc] x 10 in BLO, then 27 dc in BLO. Sl st in BLO. (84)
- Round 14: Ch 2, work [5 dc, 1 dc-dec] x 12 in BLO. Sl st in BLO. (72)
- Round 15: Ch 2, work [2 dc, 1 dc-dec, 2 dc] x 12 in BLO. Sl st in BLO. (60)
- Round 16: Ch 2, work [3 dc, 1 dc-dec] x 12 in BLO. Sl st in BLO. (48)
- Round 17: Ch 2, work 15 dc in BLO, ch 18, skip 18 stitches, then work 15 dc in BLO. Sl st in BLO. This is the bag opening row. The ch-18 bridge forms the mouth of the bag.
- Round 18: Ch 2, work 15 dc in BLO, then work 18 dc into the ch-18 space, then work 15 dc in BLO. Sl st in BLO. (48)
- Round 19: Ch 2, work [2 dc, 1 dc-dec] x 12 in BLO. Sl st in BLO. (36)
- Round 20: Ch 2, work 36 dc through both loops. Sl st through both loops. Fasten off.

Fluffy Fleece Layer on Body
- Attach the brown fluffy yarn to the unworked front loops starting from round 19 and working down to round 1.
- Work [ch 5, sl st into the next front loop] into every single front loop across all rounds.
- Fasten off and weave in ends inside the bag. The front loops from all 20 rounds are now fully covered with looped chains, giving the bag its dense textured fleece surface.
Head in Cream Yarn
- Round 1: Make a MR, ch 1, work 8 sc into the MR. Sl st to the first sc. (8)
- Round 2: Ch 1, work 8 inc. Sl st. (16)
- Round 3: Ch 1, work [1 sc, inc] x 8. Sl st. (24)
- Round 4: Ch 1, work [1 sc, inc, 1 sc] x 8. Sl st. (32)
- Round 5: Ch 1, work [3 sc, inc] x 8. Sl st. (40)
- Round 6: Ch 1, work 2 sc, inc, then [4 sc, inc] x 7, then 2 sc. Sl st. (48)
- Round 7: Ch 1, work [5 sc, inc] x 8. Sl st. (56)
- Round 8: Ch 1, work 3 sc, inc, then [6 sc, inc] x 7, then 3 sc. Sl st. (64)
- Round 9: Ch 1, work 64 sc around. Sl st. (64)
- Round 10: Ch 1, work [7 sc, inc] x 8. Sl st. (72)
- Rounds 11 to 15: Ch 1, work 72 sc around for all 5 rounds. Sl st. (72)
- Round 16: Ch 1, work [7 sc, dec] x 8. Sl st. (64)
- Round 17: Ch 1, work 64 sc around. Sl st. (64)
- Round 18: Ch 1, work 18 sc, then 10 inc, then 8 sc, then 10 inc, then 18 sc. Sl st. (84) The two sets of 10 increases push the face forward on both sides, forming the muzzle area of the sheep head.
- Rounds 19 to 24: Ch 1, work 84 sc around for all 6 rounds. Sl st. (84)
- Round 25: Ch 1, work 18 sc, then 10 dec, then 8 sc, then 10 dec, then 18 sc. Sl st. (64)
- Round 26: Ch 1, work 3 sc, dec, then [6 sc, dec] x 7, then 3 sc. Sl st. (56)
- Round 27: Ch 1, work [5 sc, dec] x 8. Sl st. (48)
- Round 28: Ch 1, work 3 sc, dec, then [6 sc, dec] x 5, then 3 sc. Sl st. (42)
- Round 29: Ch 1, work [5 sc, dec] x 6. Sl st. (36)
- Round 30: Ch 1, work 1 sc, dec, then [4 sc, dec] x 5, then 2 sc. Sl st. (30)
- Round 31: Ch 1, work [3 sc, dec] x 6. Sl st. (24)
- Stuff the head firmly with fiberfill now, before the opening narrows further. A well-stuffed head holds its round shape and sits upright on the bag.
- Round 32: Ch 1, work [2 sc, dec] x 6. Sl st. (18)
- Round 33: Ch 1, work [1 sc, dec] x 6. Sl st. (12)
- Fasten off leaving a tail. Thread the yarn tail through the front loops only of the remaining 12 stitches and pull tight to close.
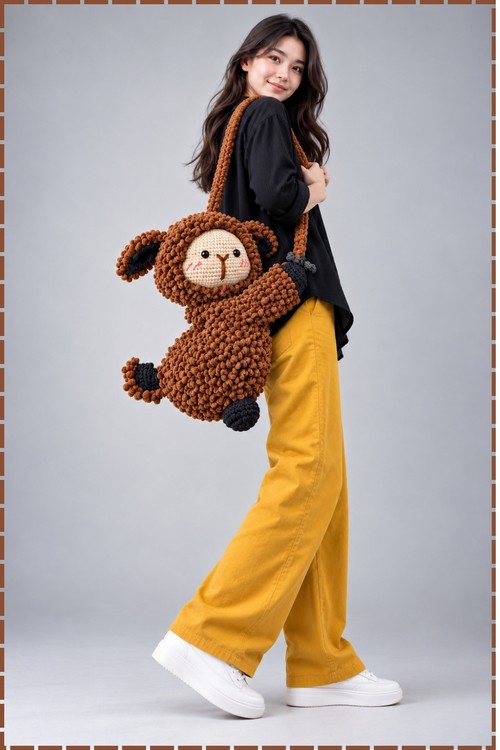
Head Cap and Fleece Hair in Brown
- Round 1: Make a MR, ch 2, work 12 dc into the MR. Sl st to the first stitch in BLO. (12)
- Round 2: Ch 2, work 3 dc in each stitch in BLO. Sl st in BLO. (36)
- Round 3: Ch 2, work [2 dc, dc-inc] x 12 in BLO. Sl st in BLO. (48)
- Round 4: Ch 2, work [3 dc, dc-inc] x 12 in BLO. Sl st in BLO. (60)
- Round 5: Ch 2, work [4 dc, dc-inc] x 12 in BLO. Sl st in BLO. (72)
- Rounds 6 to 9: Ch 2, work 72 dc in BLO around for all 4 rounds. Sl st in BLO. (72)
- Round 10: Ch 2, work [4 dc, 1 dc-dec] x 12 in BLO. Sl st in BLO. (60)
- Rounds 11 to 12: Ch 2, work 60 dc in BLO around for both rounds. Sl st in BLO. (60)
- Round 13: Ch 2, work [3 dc, 1 dc-dec] x 12 in BLO. Sl st through both loops.
- Fluffy loops: Working into the front loops left from all previous rounds, work [ch 5, sl st into next front loop] from the bottom edge up to the top center. Fasten off.
Ears in Black, Make 2
- Round 1: Make a MR, ch 2, work 6 hdc into the MR. Sl st to the first stitch in BLO. (6) The original pattern uses skin colour. My version uses black for the ears, as visible in the photo.
- Round 2: Ch 2, work 2 hdc in each stitch in BLO. Sl st in BLO. (12)
- Round 3: Ch 2, work [1 hdc, hdc-inc] x 6 in BLO. Sl st in BLO. (18)
- Round 4: Ch 2, work [2 hdc, hdc-inc] x 6 in BLO. Sl st in BLO. (24)
- Round 5: Ch 2, work [3 hdc, hdc-inc] x 6 in BLO. Sl st through both loops. Fasten off. (30)
- Fleece edge: Work [ch 5, sl st into front loop] across the available front loops from previous rounds to add a looped border. My version adds a brown fluffy loop border over the black ear base so the ears blend with the body fleece.
Arms in Brown Fleece, Make 2
- Round 1: Make a MR, ch 2, work 8 hdc into the MR. Sl st. (8)
- Round 2: Ch 2, work 8 hdc-inc. Sl st. (16)
- Round 3: Ch 2, work [1 hdc, hdc-inc] x 8. Sl st. (24)
- Rounds 4 to 6: Ch 2, work 24 hdc around for all 3 rounds. Sl st. (24)
- Rounds 7 to 11: Switch to BLO. Ch 2, work 24 dc in BLO around for all 5 rounds. Sl st in BLO. (24)
- Round 12: Ch 2, work [1 dc, dc-dec] x 8 in BLO. Sl st in BLO. (16)
- Round 13: Ch 2, work 16 dc in BLO. Sl st through both loops. Fasten off.
- Fluffy loops: Using brown yarn, add [ch 5, sl st] into all available front loops on rounds 7 to 13. The arm tips from the hdc section at rounds 1 to 6 show as the hand of the sheep, and the dc fleece section covers the upper arm. My photo shows the arm tips in black, so attach black yarn for the loop section at the hand end if you want to match my version.
Legs in Black, Make 2
- Round 1: Make a MR, ch 2, work 8 hdc into the MR. Sl st. (8) The original pattern uses skin colour for legs. My version uses black, as visible in the photo.
- Round 2: Ch 2, work 8 hdc-inc. Sl st. (16)
- Round 3: Ch 2, work [1 hdc, hdc-inc] x 8. Sl st. (24)
- Round 4: Ch 2, work 24 hdc around. Sl st. (24)
- Round 5: Ch 2, work [2 hdc, hdc-dec] x 6. Sl st. Fasten off. (18)
- Lightly stuff the leg paws with fiberfill before sewing on.

Tail in Brown Fluffy Yarn
- Round 1: Make a MR, ch 1, work 8 sc into the MR. Sl st. (8)
- Round 2: Ch 1, work 8 inc. Sl st. (16)
- Round 3: Ch 1, work [1 sc, inc] x 8. Sl st. (24)
- Round 4: Ch 1, work 1 sc, inc, then [2 sc, inc] x 7, then 1 sc. Sl st. (32)
- Round 5: Ch 1, work [3 sc, inc] x 8. Sl st. (40)
- Round 6: Work [ch 5, sl st into next stitch] around the entire round. Fasten off. The tail is fully looped and fluffy all over with no plain surface showing.
Bag Straps in Brown, Make 2
- Chain 4.
- Row 1: Skip 1 ch, work 3 sc across. (3)
- Row 2 onwards: Turn the work, ch 1, work 3 sc across.
- Repeat the row until the strap reaches approximately 1 meter or your preferred length. Fasten off.
- Make a second matching strap for the backpack style, or a single longer strap for a tote carry style.
Assembly and Finishing
- Face details: Insert or glue the 10 mm black safety eyes onto round 18 of the head, spaced 4 to 5 stitches apart.
- Using dark brown embroidery thread, stitch a small Y shape below and between the eyes for the nose and mouth, as visible in my photo.
- Apply pink embroidered blush lines on each cheek below the eyes using pink thread. My photo shows short diagonal pink stitch lines rather than powder blush.
- Head cap: Glue the brown fluffy head cap onto the top half of the cream head.
- Ears: Sew the black ears onto the left and right sides of the cap at the round 1 to 3 section, so they sit just above where the cap meets the head.
- Arms: Sew the arms securely onto the upper sides of the bag at approximately round 4, so they extend outward from the body at shoulder height.
- Legs: Sew the legs onto the lower front base of the bag at approximately round 12, positioned symmetrically so the bag sits level when set down.
- Tail: Sew the fluffy tail onto the lower back middle area at approximately round 6.
- Head: Sew the back bottom of the head to the upper front area of the bag opening so the face sits forward facing.
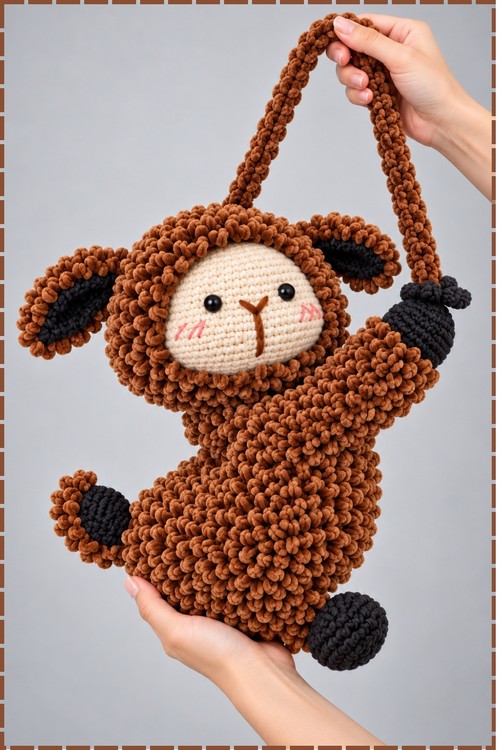
- Straps: Loop and sew the straps onto the arm anchor loops on both sides. My photo shows two straps forming a handle that the bag hangs from, held in two hands.
- Closure: Sew a 15 mm button onto the inner back flap of the bag opening to align with a chain-loop closure at the front.
Tips and Troubleshooting
- The BLO work is strict across most of this pattern and skipping it even for a single round means the fleece layer cannot be added cleanly. Before starting any dc round, make sure you can see two distinct loops on each stitch and are inserting your hook under only the back one. If the loop layer looks patchy after you add it, check whether any earlier rounds were accidentally worked through both loops and have no free front loop left.
- Count the stitches in round 9 of the bag body before continuing. The jump from 84 to 94 is the largest single-round increase and the most common place for an error to hide. An undetected mistake at round 9 compounds through rounds 10 to 12 and affects the shape of the shaping rounds that follow.
- Add the fluffy loop layer from round 19 downward to round 1, not from the top of the bag down. Starting at round 19 means you can access the front loops cleanly before the fleece from lower rounds gets in the way.
Customization Ideas
- Work the body, cap and arms in cream or white for a classic white sheep colourway.
- Use a pale grey for the fleece and keep the face and feet in cream for a grey sheep version.
- Add a small flower embroidered above one ear using pink or yellow yarn.
- Embroider small stars across the bag body over the fleece layer for a patterned effect.
- Make the bag in a solid single colour with no colour changes for a faster, simpler version.
Frequently Asked Questions
- Can I use a single strand of yarn instead of holding two strands together? Yes. The original pattern notes a 3.0 mm hook for single strand use. The bag will come out smaller and lighter but the stitch counts stay identical. Single strand also makes the body rounds faster to work because you are only managing one strand at a time.
- The fleece loop layer is taking a very long time. Is that normal? Yes. Adding [ch 5, sl st] into every single front loop across 20 rounds of the body plus the head cap, arms and ears is genuinely the longest step in the project. It is also repetitive enough to do while watching a show. Budget more time for this step than any other.
- My fleece loops are falling off or coming undone. What went wrong? The sl st joining each loop to the front loop of the body needs to be snug but not tight. A very tight sl st pinches the loop base and eventually pulls out. Work each sl st at the same tension as the body stitches rather than yanking the loop closed.
- Can I skip the tail? Yes. The tail adds about 20 minutes and is sewn on at the end, so it is easy to leave off. The bag reads as a sheep without it.