Crochet Easter Egg Bunny Free Amigurumi Pattern In Red Color
Easter morning baskets get a bold pop of colour from one red skein, enough for the whole crochet egg bunny amigurumi on a 2.5 mm hook. Increases at the base and matching decreases higher up form the egg, and a small pom pom tail finishes the back.
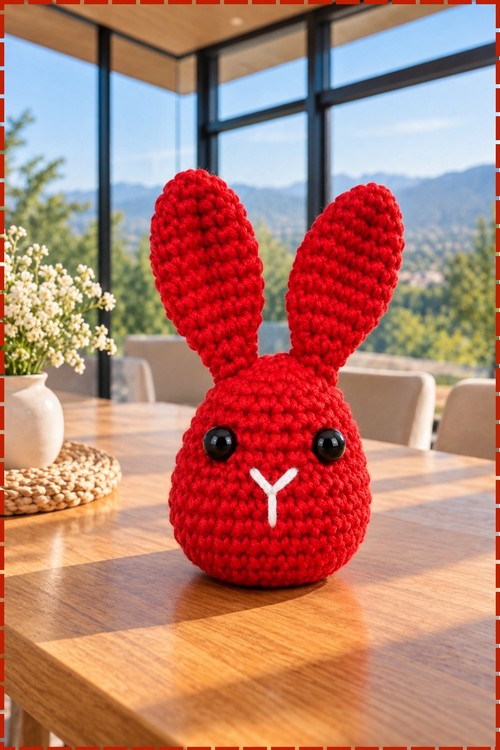
One piece, two ears, done. The crochet egg bunny amigurumi has no arms or legs to attach and sits upright without a weighted base. Face is two beads and stitched thread. Anyone who wants an egg bunny finished before the yarn ball runs out should start with this shape.
Crochet Egg Bunny Amigurumi

Worked in a single continuous piece from the base upward, this crochet egg bunny amigurumi builds its rounded egg shape through a set of increases at the bottom and matching decreases higher up. Ears go on separately once the body is closed. No flat base, no sewn seams on the main body, and no colour changes make it a clean build from start to finish. Bright red yarn gives mine a bold look that reads well from across a room. Black safety eyes and a white embroidered V nose sit low on the face, which is where the egg shape pushes the features naturally.
Materials and Tools
- Worsted weight yarn in red, roughly one skein
- Small amount of white yarn or embroidery thread for the nose
- 2.5 mm crochet hook
- Two black safety eyes with washers
- Polyester fiberfill stuffing
- Pom pom maker, 3/4 inch size (optional, see tail note below)
- Stitch marker, yarn needle, scissors, pins
The Pattern
Body
- Round 1: ch 2, place 6 sc (single crochet) in the second chain from the hook, pull the tail to close the centre ring [6 sts]
- Round 2: inc (increase, 2 sc in the same stitch) in each st around [12 sts]
- Round 3: repeat (1 sc, 1 inc) 6 times around [18 sts]
- Round 4: repeat (2 sc, 1 inc) 6 times around [24 sts]
- Round 5: repeat (3 sc, 1 inc) 6 times around [30 sts]
- Rounds 6 to 12: 1 sc in each st around for 7 rounds [30 sts per round]. The body reads as a short squat cylinder at this point before the top shaping begins.
- Round 13: repeat (3 sc, 1 inv dec) 6 times around, where inv dec means picking up the front loops of the next two stitches and working them together [24 sts]
- Round 14: 1 sc in each st around [24 sts]
- Round 15: repeat (2 sc, 1 inv dec) 6 times around [18 sts]
- Round 16: 1 sc in each st around [18 sts]. Pause here to attach the safety eyes and embroider the nose before the opening closes further.
- Insert safety eyes between rounds 13 and 14, spaced approximately 5 stitches apart. Turn the work inside out and press the washers on until they click. My eyes sit close together and low on the face, which suits the egg shape.
- Embroider a V shape in white just below the eyes using a needle and white yarn, working diagonally across 1 to 2 stitches on each side. Add a short vertical line extending down from the base of the V for the mouth. Tie both ends off inside the body. My version uses white rather than black thread so the nose reads clearly against the red.
- Stuff the body firmly with fiberfill.
- Round 17: repeat (1 sc, 1 inv dec) 6 times around [12 sts]
- Round 18: 1 sc in each st around [12 sts]. Add any extra stuffing now before the top closes.
- Round 19: inv dec 6 times around [6 sts]
- Cut the yarn leaving a short tail, thread it through the front loops of the 6 remaining stitches with a yarn needle, pull tight to close, and weave the end in.
Ears, Make 2
- Round 1: ch 2, place 6 sc in the second chain from the hook, pull the tail to close the centre [6 sts]
- Round 2: repeat (1 sc, 1 inc) 3 times around [9 sts]
- Round 3: 1 sc in each st around [9 sts]
- Round 4: repeat (2 sc, 1 inc) 3 times around [12 sts]
- Rounds 5 to 9: 1 sc in each st around for 5 rounds [12 sts per round]. The ears are worked unstuffed, and the length from these straight rounds gives them their tall upright look.
- Round 10: repeat (2 sc, 1 inv dec) 3 times around [9 sts]
- Round 11: repeat (1 sc, 1 inv dec) 3 times around [6 sts]
- Round 12: 1 sc in each st around [6 sts]
- Fasten off leaving a long tail for sewing. Make a second ear the same way.
Pom Pom Tail
- Wrap main colour yarn thickly and evenly around both arches of the 3/4 inch pom pom maker until full and flat across.
- Close the maker and snip along the central channel on both sides.
- Slide a length of folded sewing thread through the groove, wrap tightly around the centre and knot firmly several times on each side.
- Open the tool arms to release the pom pom, then trim to a smooth sphere.
- Keep the long thread tails to use for attachment.
- Note: my photo does not show the tail clearly, so it is kept here as described in the pattern but treat it as optional.

Assembly
- Pin the ears to the top of the body between rounds 2 and 3, both pointing straight up as seen in my photo, and sew them down securely using the yarn tail.
- Position the pom pom centrally at the lower back of the body, pass the thread tails through the body and back through the pom pom core several times to anchor it, and tie off inside the body.
Tips
- Pin the ears and step back to check they sit evenly before sewing a single stitch. Parallel ears matter more than centred ones.
- Keep the invisible decrease throughout rather than a standard decrease or the surface stays bumpy and puckered on red yarn.
- Embroider the nose before stuffing rather than after, because a flat unstuffed body gives you much easier needle control.

Customization Ideas
- Work the ears in a contrast colour for an inner ear effect by changing yarn on the early rounds.
- Substitute white yarn for the whole body and add a small pink nose for a classic Easter rabbit.
- Make a smaller version by using sport weight on a 2 mm hook.

FAQ
Can I skip the pom pom tail? Yes. The tail is not visible from the front and is optional. A small crocheted circle sewn flat to the back works just as well. Why does the egg shape look more like a ball? The straight rounds in the middle need a full seven rounds to push the widest point low enough. Cutting them short by even two rounds makes the body round rather than egg shaped. Should the ears be stuffed? Mine are unstuffed and they stand upright on their own because the straight rounds are worked tightly. Light stuffing is fine if yours lean, but heavy stuffing makes them rigid.